
Whether you’re using your Windows 10 PC, laptop, or tablet, a time might arise where you would like to screenshot whatever is happening on your display. It could be a moment from when you’re working in a program, a funny tweet or a post on social media you’d like to save, or just a screenshot of something from within the OS which you’d like to save for later. I’ve had a few of these moments for myself, and have found there is more than one way to capture what happens on my screen, so I would like to share the following guide on how to take screenshots in Windows 10.
Print Screen on the Keyboard
If you’re old fashioned, you can take the traditional method of screenshotting by pressing the “PrntScn” key on your keyboard. By doing this, your computer will save a pictured copy of whatever you were doing when you pushed the key. After you press the key, you can then open an image editing program such as Paint, and press the paste button or Control and V to move your screenshot to a suitable place to edit. In most instances, this key combination will then insert the screenshot into the canvas, and you can edit it how you please.
If you want to skip the step of going into Paint to edit, you can also press Windows Key and Print Screen, and this will automatically save a full screenshot to your “Screenshots” folder in the Pictures library.
Lastly, if you only want to screenshot just one active window, you can click on the title bar of the window that you want to capture. Here, you press “Alt + PrtScn”, and then a screenshot of your currently active window will be copied to the clipboard.

Editing screenshots in Paint
Windows Ink
Another great way to take screenshots in Windows 10 is to use the Windows Ink feature. As you may know, Windows Ink was introduced in the Windows 10 Anniversary Update, and is your home for all the inking fun. To enable Windows Ink, all you need to do is to right-click on the taskbar and choose “Show the Windows Ink Workspace Button.”
After you do this, you can go ahead and click on the pen icon on the taskbar, and choose Screen Sketch from the Windows Ink Workspace menu. This will then open up a square space which appears similar to Paint, but with your exclusive screenshot instead. Here you can sketch on your screenshot, highlight certain elements, or use a crop feature to crop out what you do and do not want to save.
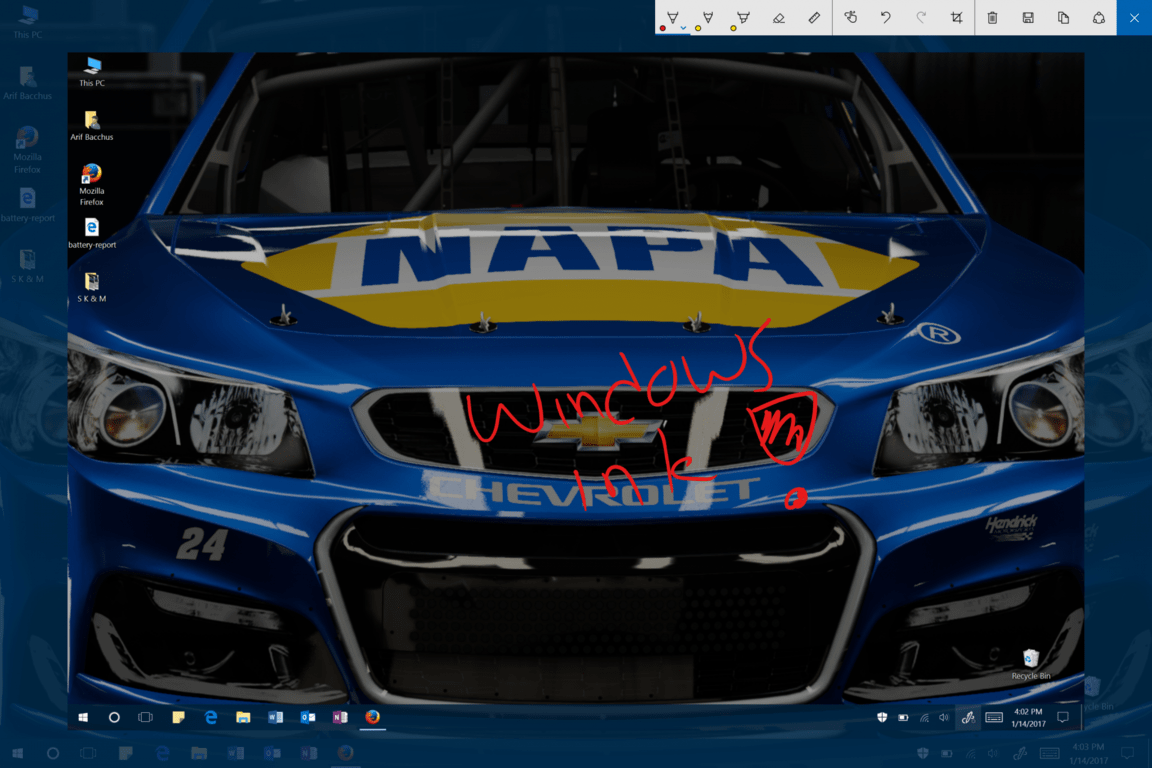
Editing a screenshot in Windows Ink
Snipping Tool
Along with Print Screen, and Windows Ink, a third way to take screenshots in Windows 10 is to use the built-in Snipping Tool feature. To access the Snipping Tool, all you need to do is open the Start menu and type in “snipping tool.” After you open it, you can go ahead and press on “New” to begin the process of taking a screenshot.
For added convenience, or for when the moment is not just right, you even can set a time delay for your screenshot by pressing “delay.” That done, you can go ahead and make your selection by dragging the cursor. This will then open another window, which is again similar to Paint, where you can draw lines, highlight, or save your screenshot.

Sniping Tool
Screenshots in 2017 Windows Insider builds
If you’re the brave kind that likes to run Windows Insider builds, then screenshotting is even easier for you. Just like on a Mac where there are keyboard commands to screenshot, Windows 10 build 15002 and up now has the same feature. This keyboard command feature was initially pointed out in the change logs for build 15002, but Windows Insider Scott Hanselman recently tweeted about how keyboard hotkeys for screenshots can be used.
All it takes to screenshot in Windows Insider builds 15002 and up is to press Windows Key, Shift, and S. Pressing these keys will open up a selection tool to select elements of your screen. Then, after selecting, the snipping tool will automatically open up and allow you to furthur edit your screenshot.
Memorize this new #Windows10 hot key coming soon! WIN-SHIFT-S -> screeenshot with selection built into the OS! pic.twitter.com/thurhMZF3L
— Scott Hanselman (@shanselman) January 11, 2017
Screenshots on a Surface
If you’ve been an active user of the Surface lineup of devices over the past few years, you’re probably familiar with taking screenshots by pressing the physical Windows Key and the volume down button. Unfortunately, as the Surface family of devices evolved, and as Windows 8.1 was phased out, Microsoft eliminated the physical Windows Key on the side of Surface devices. As explained by the company here, there are now other ways to screenshot on a newer Surface device such as the Surface Pro 4 or Surface Book.
– Since the Windows logo doesn’t appear on the display of these devices, hold the power button down and then press the volume-down button to take a screenshot. The screenshot will be saved in the Screenshots folder under “This PC.”
– Double-click the top button of your Surface Pen to take a screenshot of your desktop. The full screenshot will be saved in your Screenshots folder on OneDrive, but this method also gives you the option to crop your image immediately. A greyed-out version of the image will show up on your screen; use your Surface Pen to drag the tip of the pen from one corner of the portion you want to capture to the opposite corner. When you lift the pen tip, your selection appears in a new page in OneNote.
– To take a screenshot of just the active window on your screen, hold down the Alt key and press PrtScn. The screen will be saved to OneDrive as described in Method 3.

A Surface Pro 4
Which of these methods do you use to take a screenshot? What items do you frequently screenshot? As always, please do let us know what you think by dropping us a comment below! And, be sure to check out our featured section for more Windows 10 how-to guides!
Further reading: screenshots, Snipping Tool, Windows 10, Windows Ink