Microsoft has just announced the release of Windows 10 Insider build 17704 to Fast and Skip Ahead Insiders, and this one is a pretty major release with lots of new features and improvements. It’s been two weeks since the last flight, and fortunately it was well wort the wait: in addition to new features for Microsoft Edge and a big update for the Skype UWP app, this latest build comes with improvements for Windows Security, Task Manager and much more.
Among highlights, you’ll find a new viewing mode when you’re watching videos outside. Microsoft says that this feature uses your PC’s light sensor to automatically adjust your video accordingly, and you can turn it on in the Settings app. Additionally, you’ll see that the Task Manager app now has 2 new columns in the “Processes” tab called “Power usage” and Power usage trend.” Microsoft says that these columns should help Windows 10 users better understand what apps and services are the most power hungry on their PC
Last but not least, some Insiders may see a new post-update experience after installing this build. This actually came with previous Insider builds, but Microsoft says that Insiders who haven’t seen this page until now have a very good chance to see it after installing the new bits. You can learn more about all the new features included in Windows 10 Insider build 17704 below:
New Diagnostic Data Viewer features to improve your Privacy Experience
To showcase improvements in our privacy tools made in our next release of Windows, we are providing Windows Insiders early access to new improved features coming to the Windows Diagnostic Data Viewer. At Microsoft, we understand that your data is your data. That’s why we are committed to providing full transparency on what diagnostic data Windows collects, when it is collected, and how you can control what you share. We care about your privacy and helping you build trust and confidence in our products.
Windows Diagnostic Data Viewer
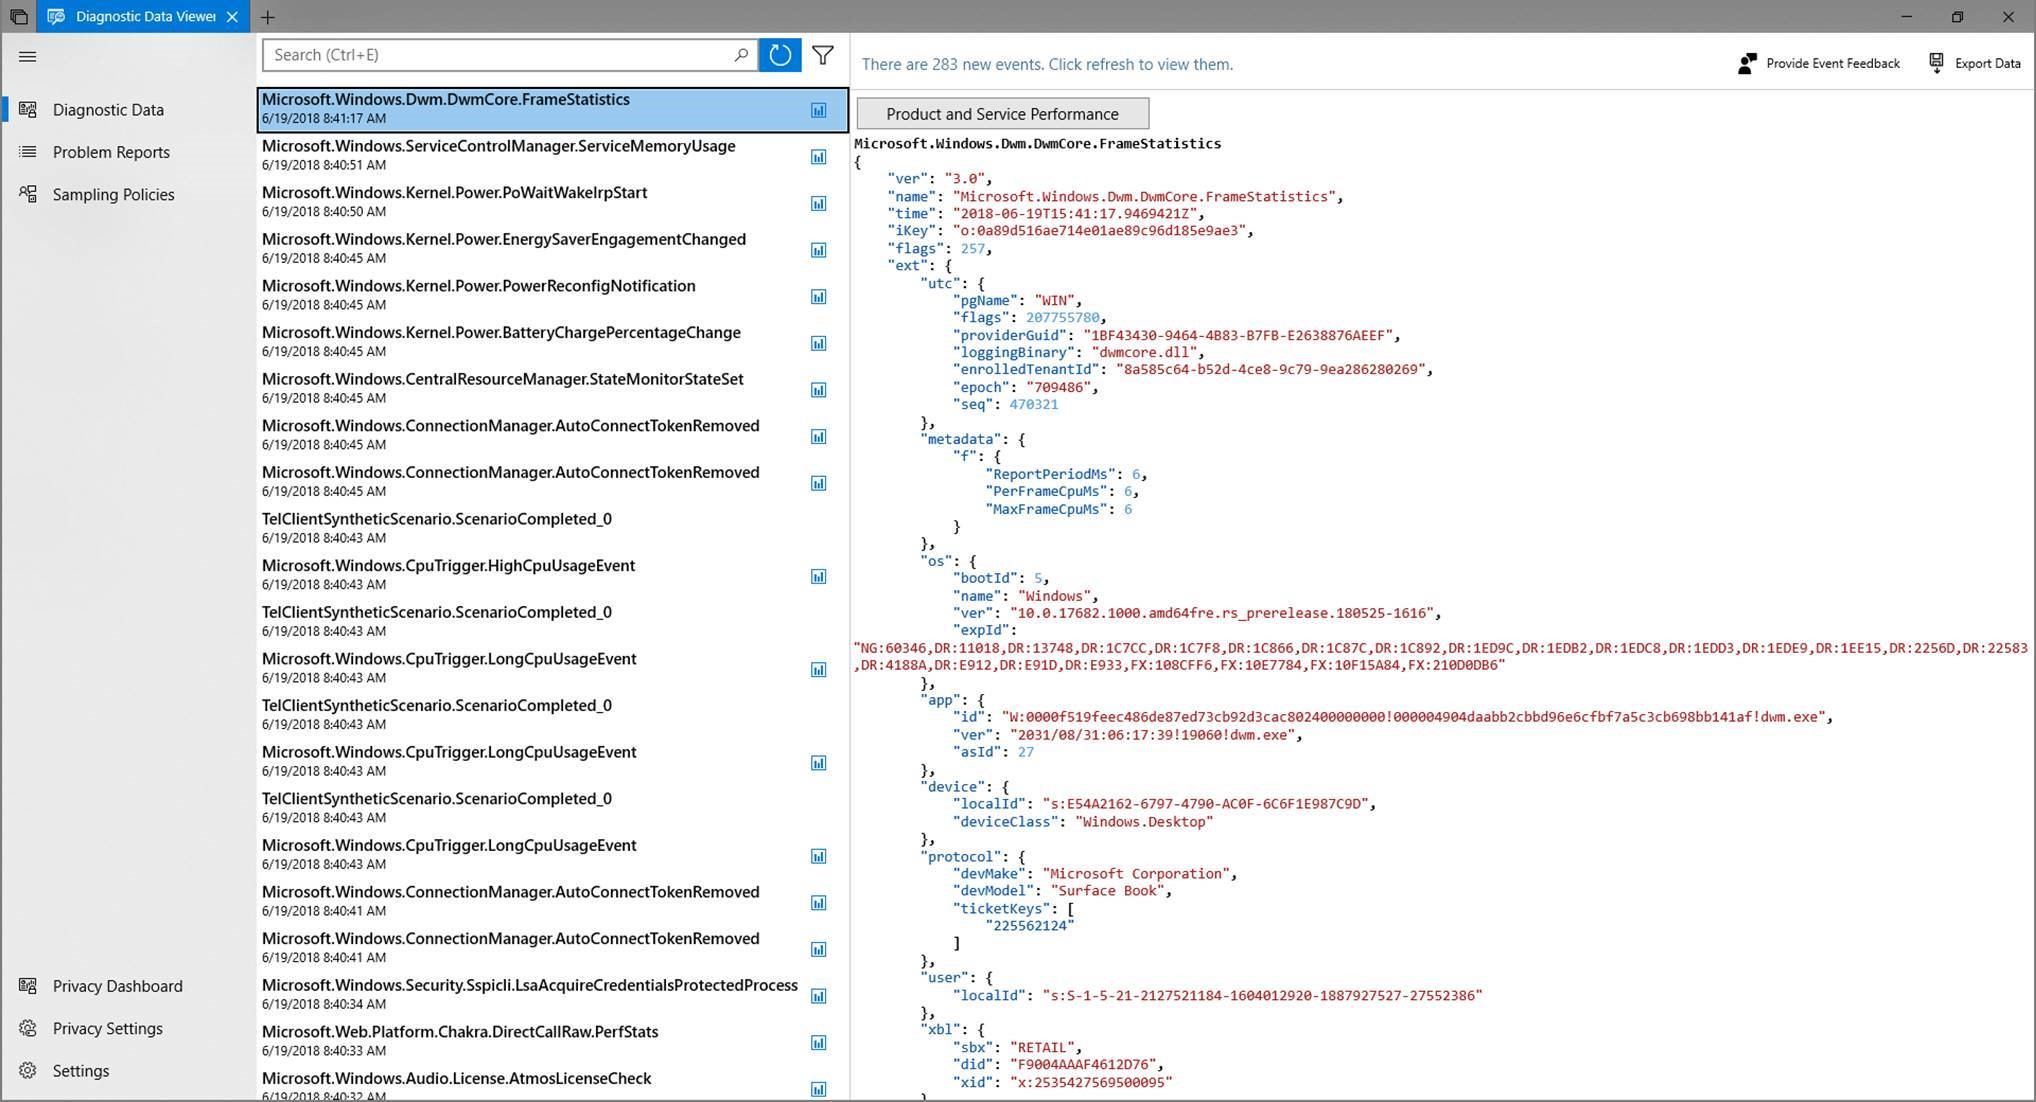
We first introduced the Windows Diagnostic Data Viewer on Data Privacy Day earlier this year. The Windows Diagnostic Data Viewer helps you understand exactly what diagnostic data is received from your Windows device. Available to anyone through the Microsoft Store, the tool provides you full transparency when it comes to diagnostic data.
Through the viewer, you can see the different categories of diagnostic data which includes:
- Common Data like the OS name, version, device ID, Device Class, and diagnostic level selection
- Device Connectivity and Configuration such as device properties, preferences, settings, and network information
- Product and Service Performance such as device health, performance and reliability, and device file queries (this is not meant to capture user patterns or habits)
- Browsing History such as frequently visited sites
- Product and Service Usage data like applications and services used
- Software Setup and Inventory such as installed apps and device update information.
Each of these categories are important so that we can diagnose performance issues and ensure your device is secure. The viewer provides you full insights into exactly what we collect so that you are aware of what’s happening on your device. Through this tool, you can do things like search by keyword, filter data by category, export the data to a separate file, and provide feedback about the tool or a specific data point.
New to the Diagnostic Data Viewer
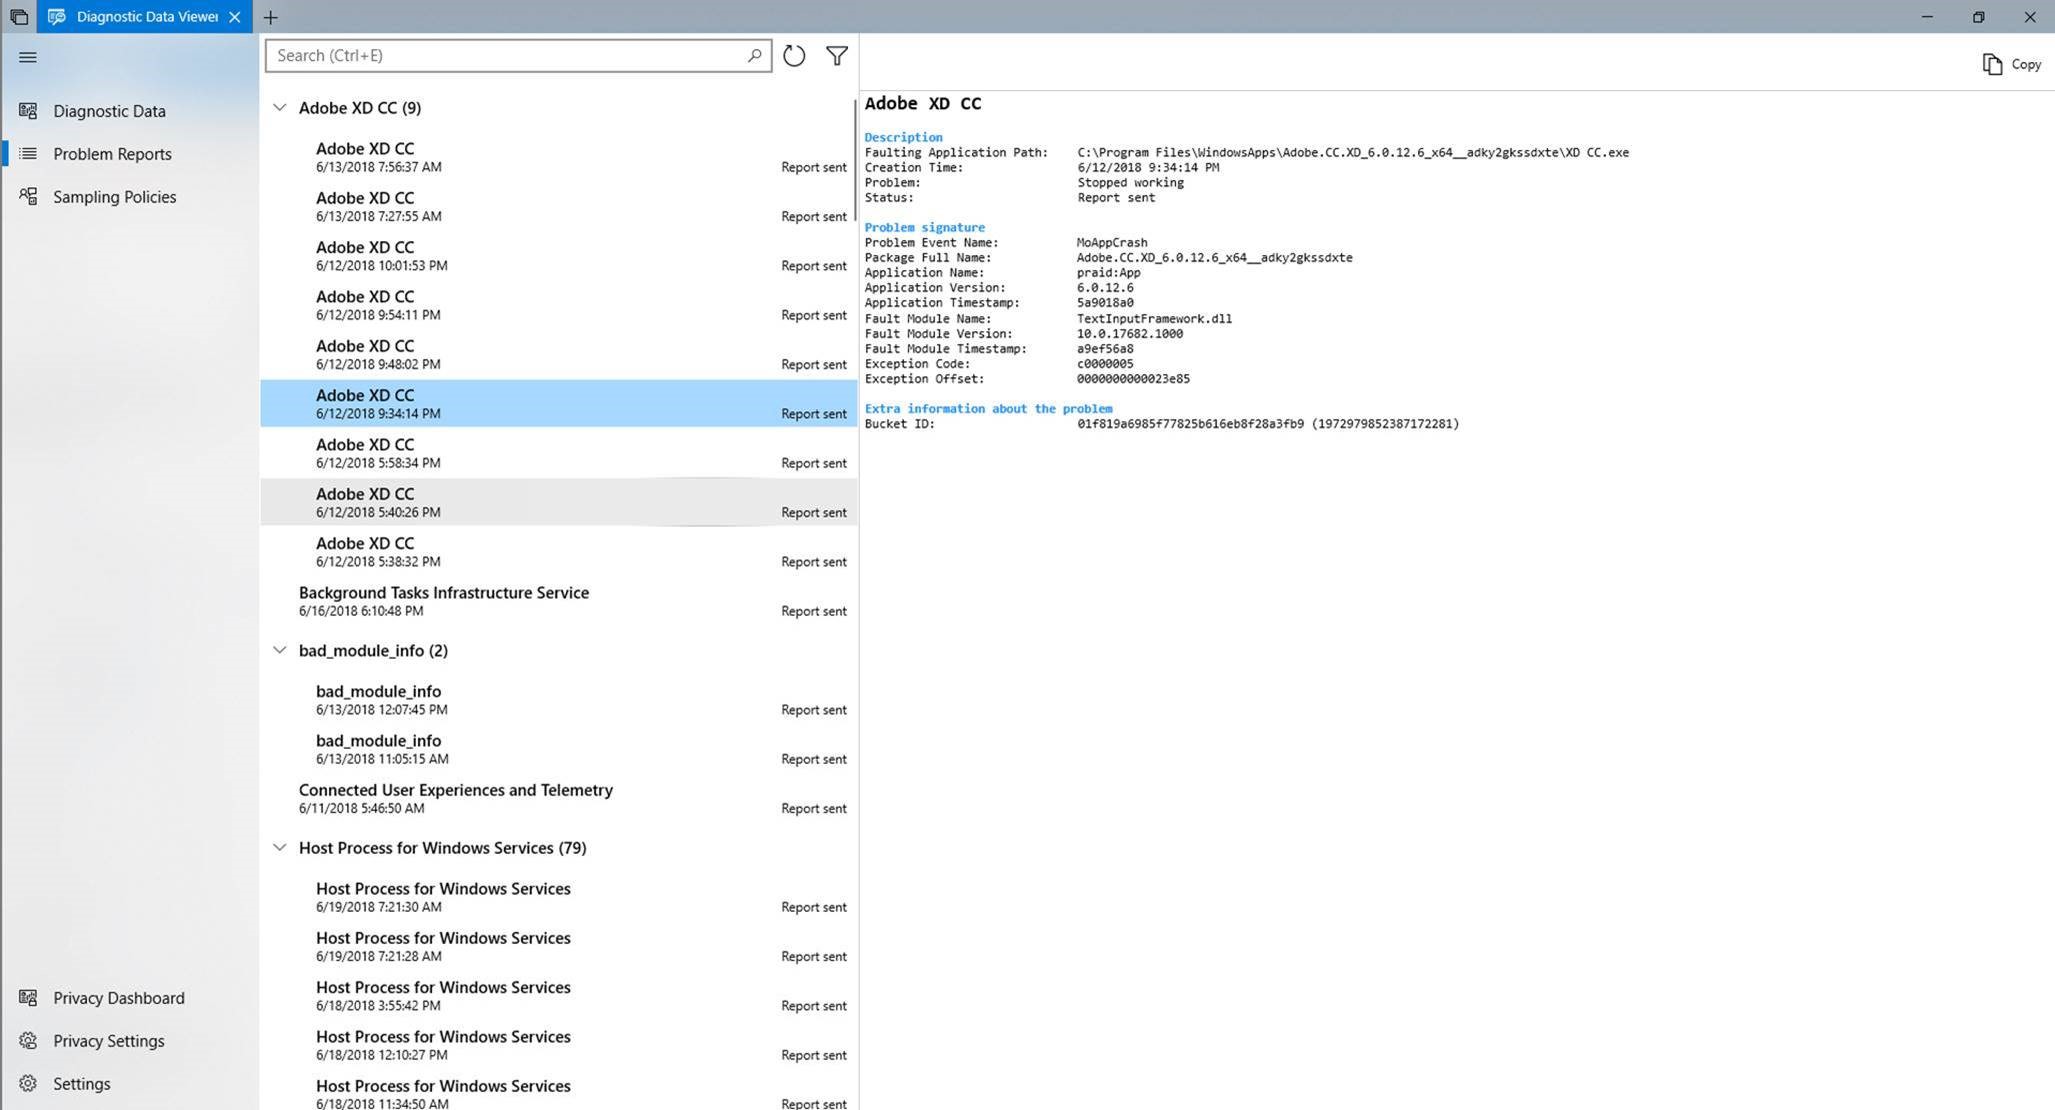
We are excited to say that users can now directly view Problem Reports that have or will be sent to Microsoft. Problem Reports help us identify crashes and other disruptions on your device so that we can improve your Windows experience. On the Diagnostic Data Viewer, users can view specific details about each report collected such as when it was sent and what application or component caused the report to be created.
Along with the ability to see Problem Reports, the Diagnostic Data Viewer comes with new changes to the UI as well. For example, the filter feature to view data points by category is now directly to the right of the search bar, and the export data feature now exists at the top right of the tool.
How to get it
Whether you’re new to Windows, or If you’ve just updated your OS to the new build, you’ll want to check out these steps.
You can get the Diagnostic Data Viewer on your Windows device through the Microsoft Store. Once you install the tool, open the app through the Start menu.
If you see “No events found”, go to “Open diagnostics and feedback menu in settings panel” on the bottom left of the tool (the middle icon). On this page, double check that “Diagnostic Data Viewer” is enabled. Once it is enabled, it will take some time for the tool to show events.
You can hit the blue refresh button to the right of the search bar to see if any events have been found.
Our Commitment
Windows Insiders get an exclusive look at this new feature releasing to Diagnostic Data Viewer, and we couldn’t be more excited to see the amazing feedback to come.
Our promise to upholding the highest standards of privacy will continue to be a top concern. When you use our products and services, we want you to feel confident that having great experiences and features does not mean sacrificing your privacy. It’s your device. You deserve to know what’s happening on it.
In making Windows 10 better and more secure, we will continue to make your privacy our top concern. This means providing you with the all the right tools to empower you to take control of your data. From prioritizing full transparency of diagnostic data to helping you take action about what you share, we are here to provide you with the power to know what’s on your device and who you share it with.
We cannot wait to hear more from you about making privacy stronger on Windows 10. We welcome you to submit feedback related to the Diagnostic Data Viewer through feedback hub. You can also submit feedback regarding our approach to privacy here.
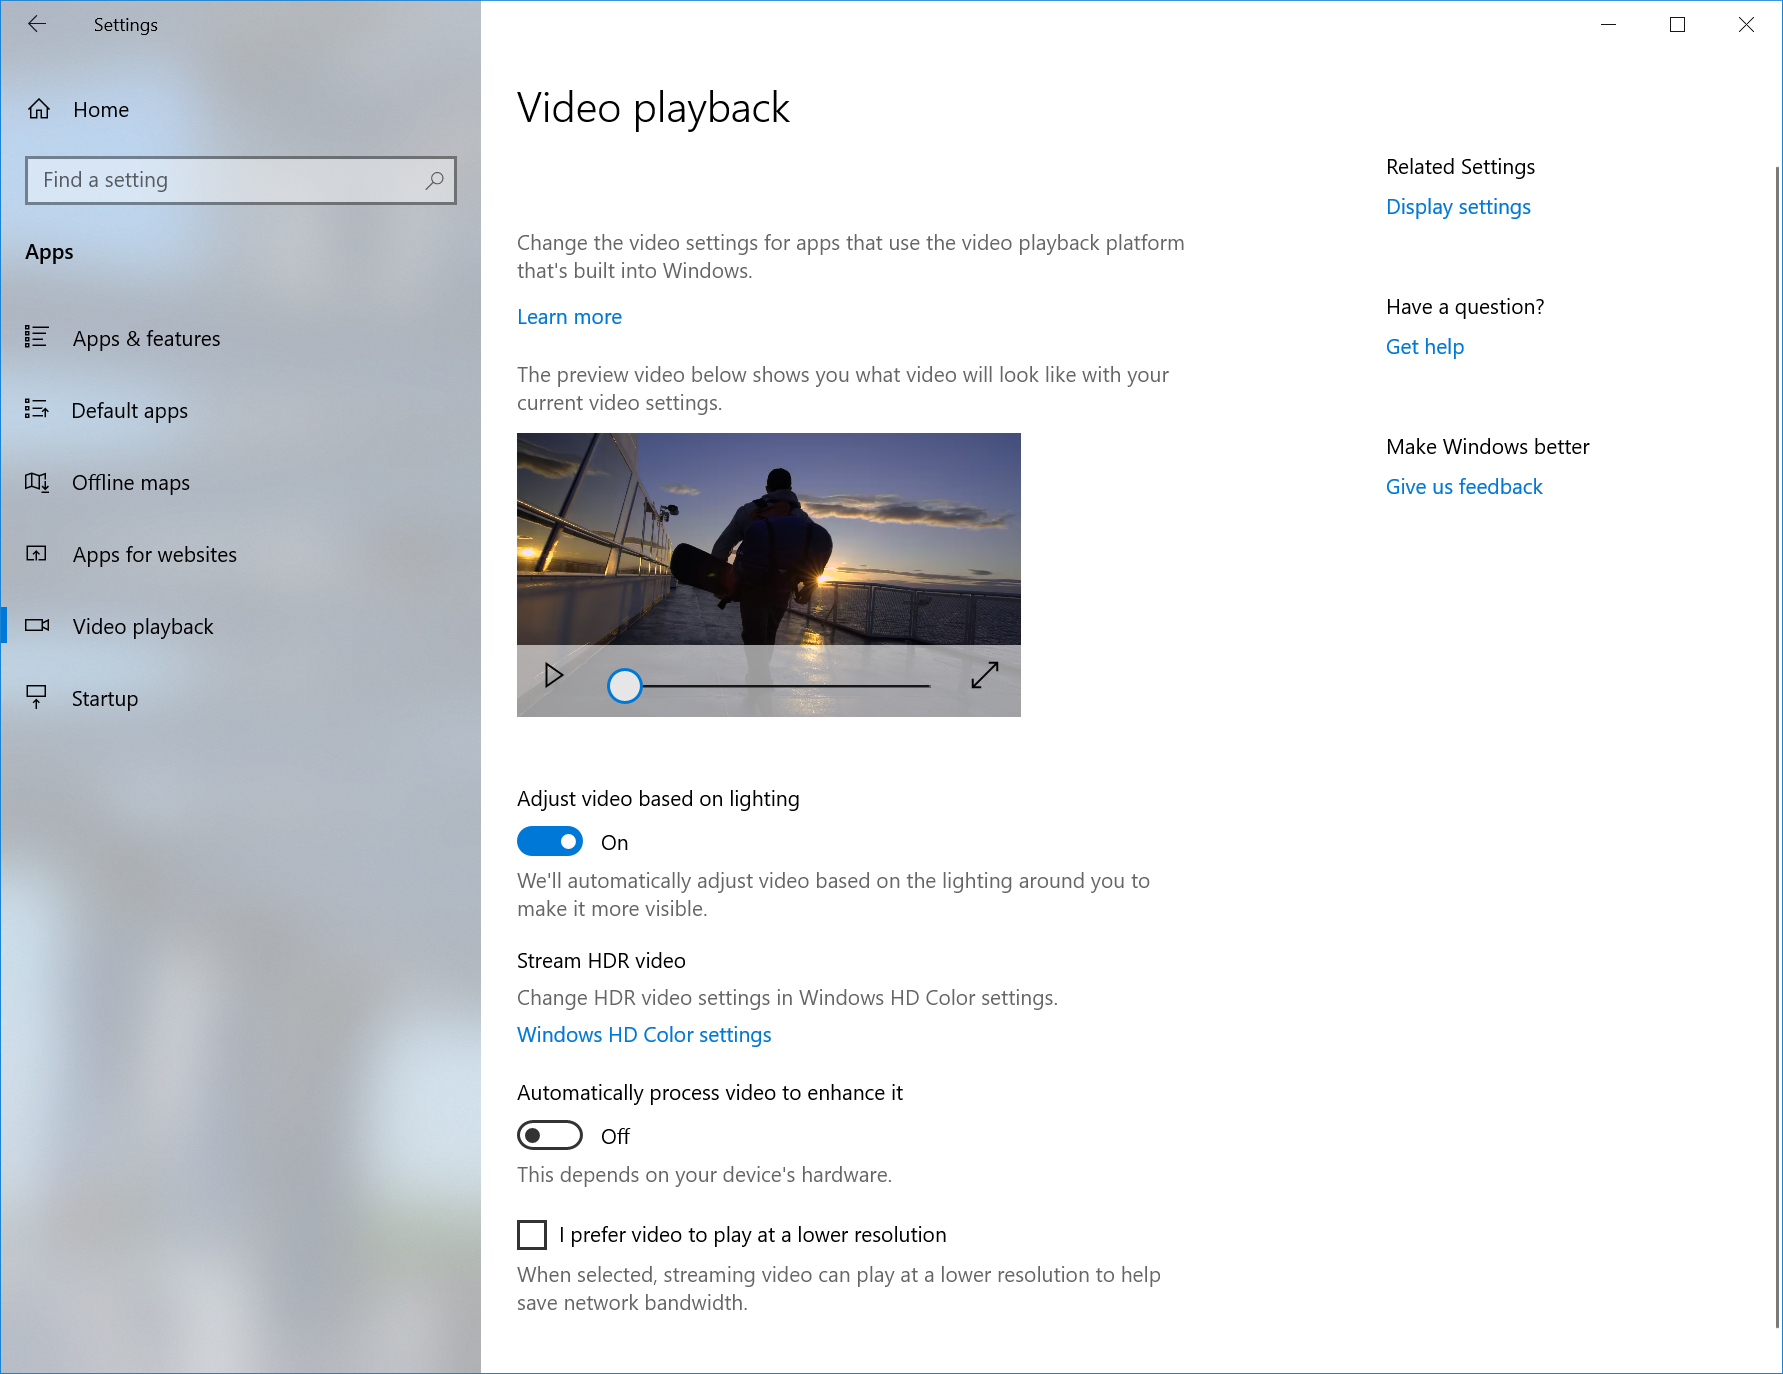
See Your Videos Better Outside
There’s a new viewing mode for you to try out, designed to improve the visibility of your video when you are in a very bright environment. This feature uses the light sensor on your device to detect your ambient light, and automatically adjusts your video accordingly. To turn it on, navigate to Settings > Apps > Video playback, and turn on “Adjust video based on lighting”.
We’d love feedback as we work to refine this feature for the next Windows release! Please use the Feedback Hub and file feedback under Category: “Devices and Drivers”, Subcategory: “Video Playback”. Hit “Recreate my problem” and start the capture of the video playback you would like to give feedback on!
A couple notes:
- In order for this feature to work, your device must have a light sensor. There are a couple different ways you can check:
- Go to “Display Settings” in the Settings app. If you have the option to turn on Auto-brightness, you most likely have a light sensor
- Go to Device Manager. If you have something that sounds like “Light Sensor” under Sensors, you likely have a light sensor.
- Currently, not all devices have light sensors that are well-calibrated. If you are on a device where video looks really, really bad with this setting on, please let us know via the Feedback Hub!
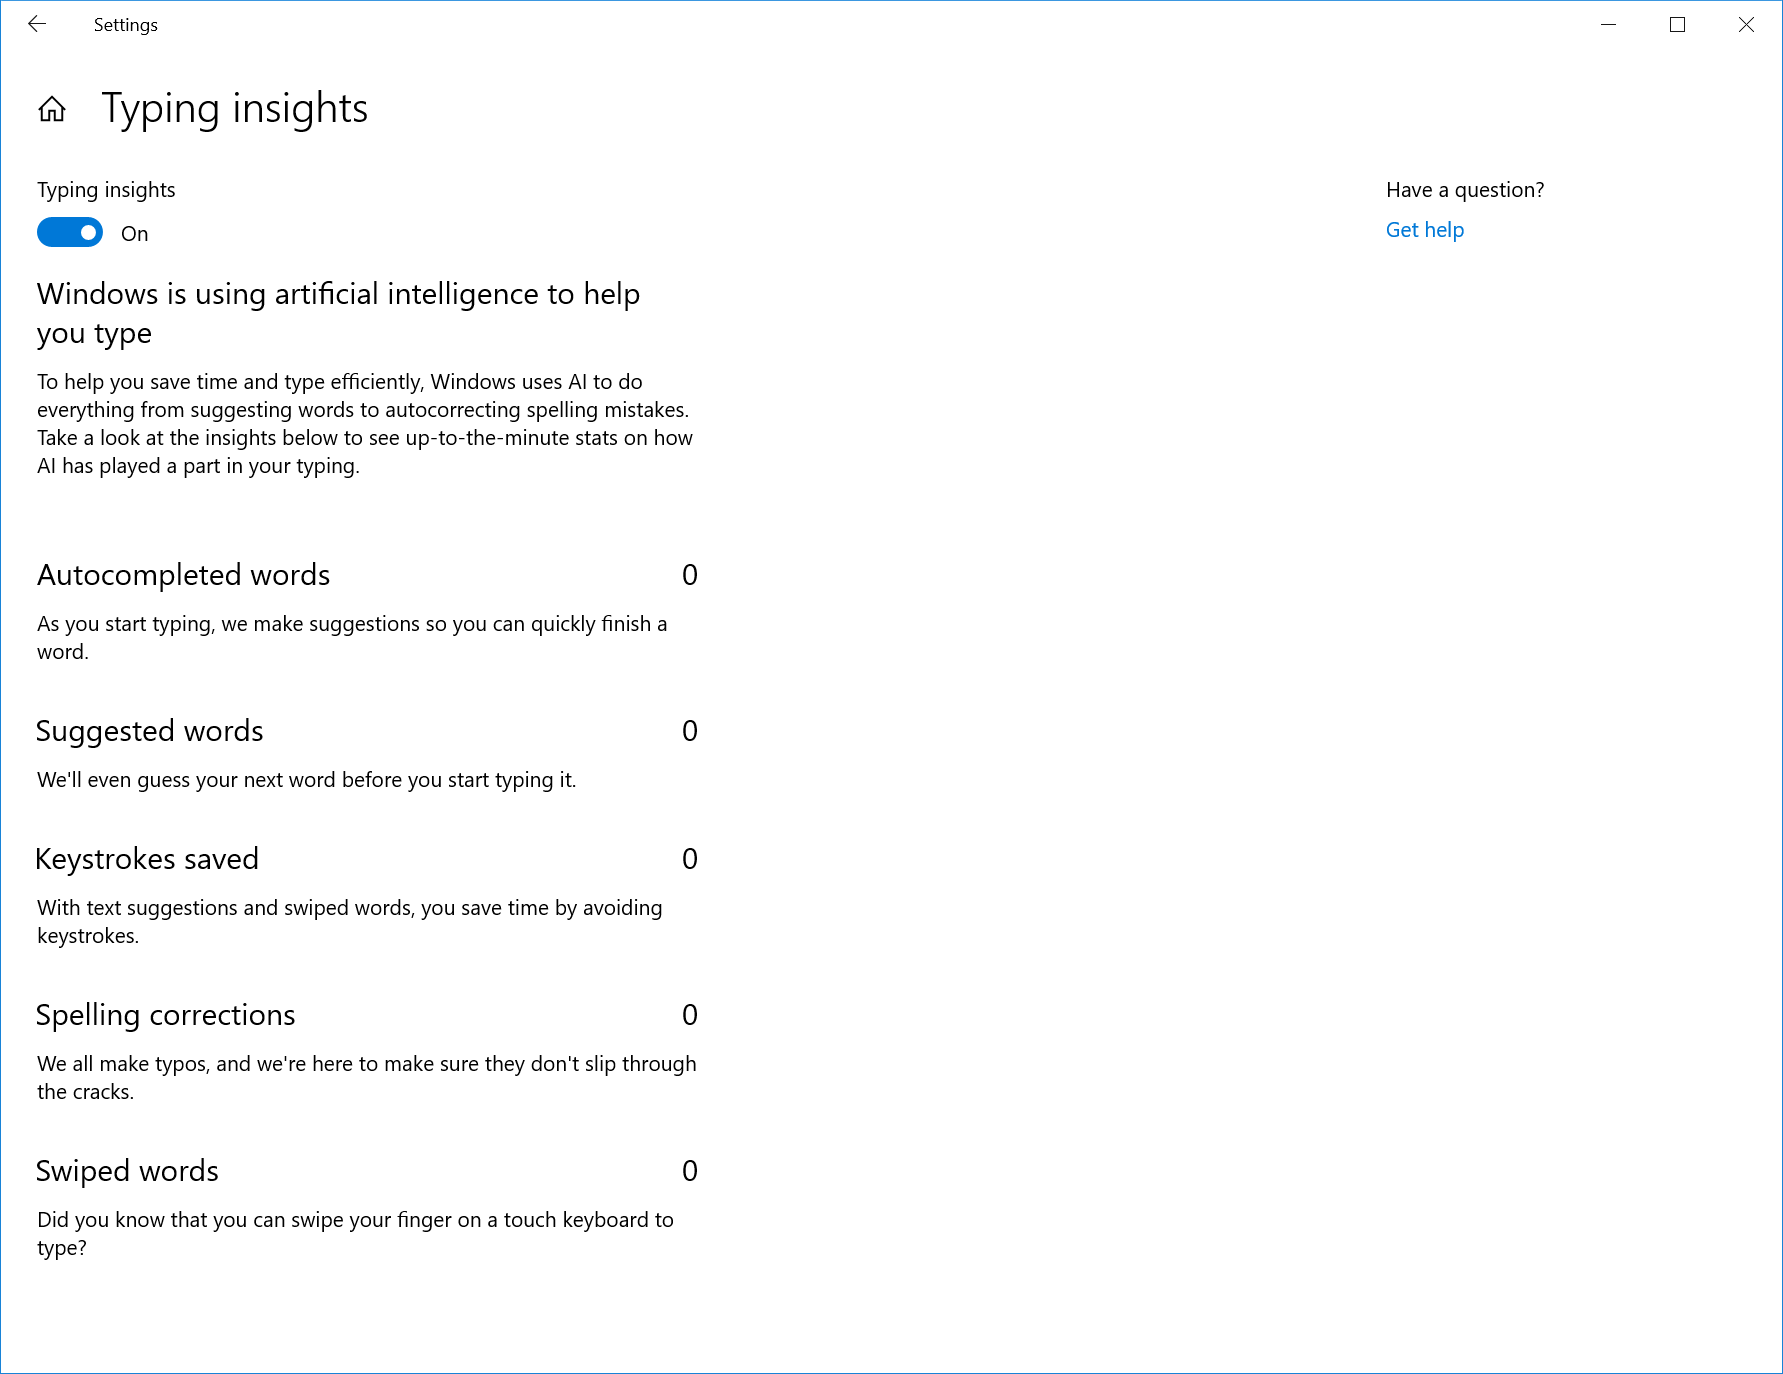
Typing Insights
Windows now shows you insights about how its AI has been helping you type with efficiency. If you use the software keyboard on Windows, there are many features built into the typing experience that leverage AI and ML to help you be more efficient. Some examples include autocorrecting your spelling mistakes, prediction of the next word you would type, word suggestions as you start typing so you don’t have to type the full word and the number of words you’ve typed by swiping over the letters on the software keyboard (yes, you can do that, try it out if you have not yet).
Windows now shows you stats about each of these features. Go to Settings > Devices > Typing and click on “View typing insights” link to see them.
Currently these stats cover the typing insights for software keyboard usage and hardware keyboard prediction features. If you like to see additional insights in the future releases, head over to the Feedback Hub and share your thoughts.
Font installation for non-admin users
Have you ever wanted to use your own fonts from your account on a shared school or work PC, but couldn’t because you didn’t have the administrator privileges required to install the fonts? Well, we’ve heard your frustration about this and have made some changes.
In the past, fonts in Windows have always been installed for all users. Because that is a system-wide change, it always required admin privilege. The need for an admin was reflected in the user interface. For example, if you browse in File Explorer to a folder containing a font file and right-clicked on the file to bring up the context menu, then the “Install” option would appear with the security badge, which means that it requires an admin.
If you tried to install a font but didn’t have admin privileges, then you would be presented with a User Account Control dialog, so that an admin could approve the change. If you’re a non-admin user and often need to install (or uninstall) fonts, then that could be a big hassle.
In the Windows 10 1803 feature update, we introduced fonts in the Microsoft Store. To enable that capability, we needed to make changes deep in Windows to allow a font to be installed for a specific user rather than system-wide. That’s why no admin action is needed when fonts acquired in the Store are installed.
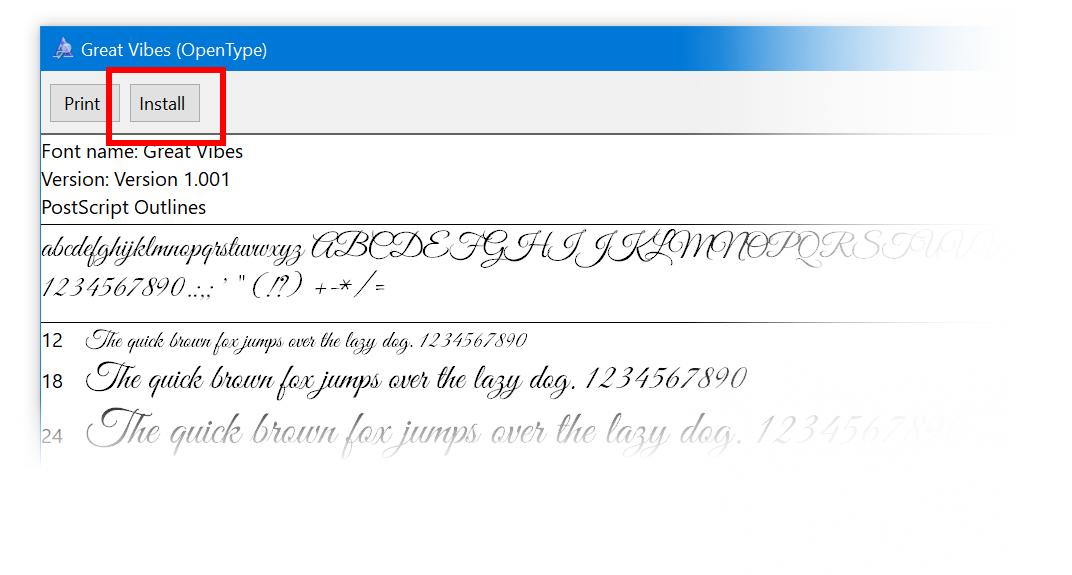
Now we’ve extended this further to include font files that you obtain from other sources and want to install. Now when you right-click on a font file in File Explorer, you’ll see two options. “Install for all users” provides the past, system-wide install capability and requires an admin. But now there is another option: “Install” allows any user, including non-admin users, to install a font for their own use.
Often font files come within a compressed folder (that is, a .zip file). The “Install” context-menu option isn’t available in File Explorer when you view the contents of a compressed folder, but you can double-click the font file within the compressed folder to open it in the font previewer, and that provides an “Install” button. In the past, the button in the font previewer had the security badge, and it would do a system-wide install, requiring an admin. Now the security badge is gone, and the “Install” button in the font previewer performs a single-user font install, which can be done by non-admins.
Let us know what you think of this no-admin-required, single-user capability for installing fonts!
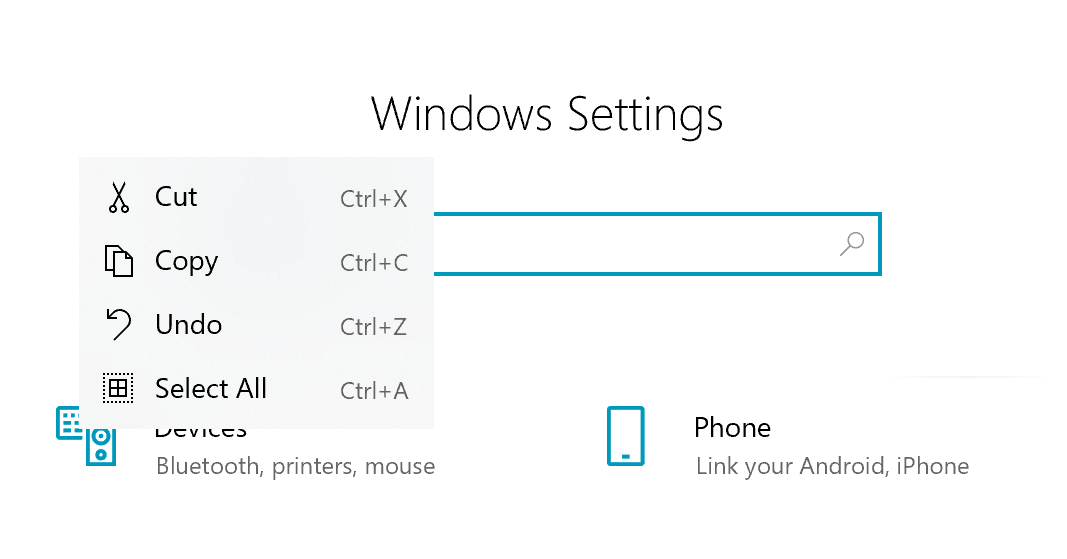
Contextual Commanding Improvements to Text Controls
Our inbox text controls are now taking advantage of the new CommandBarFlyout control. This allows a number of exciting improvements including:
- The ability to quickly cut, copy, and paste in textboxes with touch
- New icons for common actions
- The ability to bold, italicize, etc. in our rich text surfaces
- New animations, acrylic treatment, and depth support
This change will apply to any XAML based text boxes on this build.
Windows Security Improvements
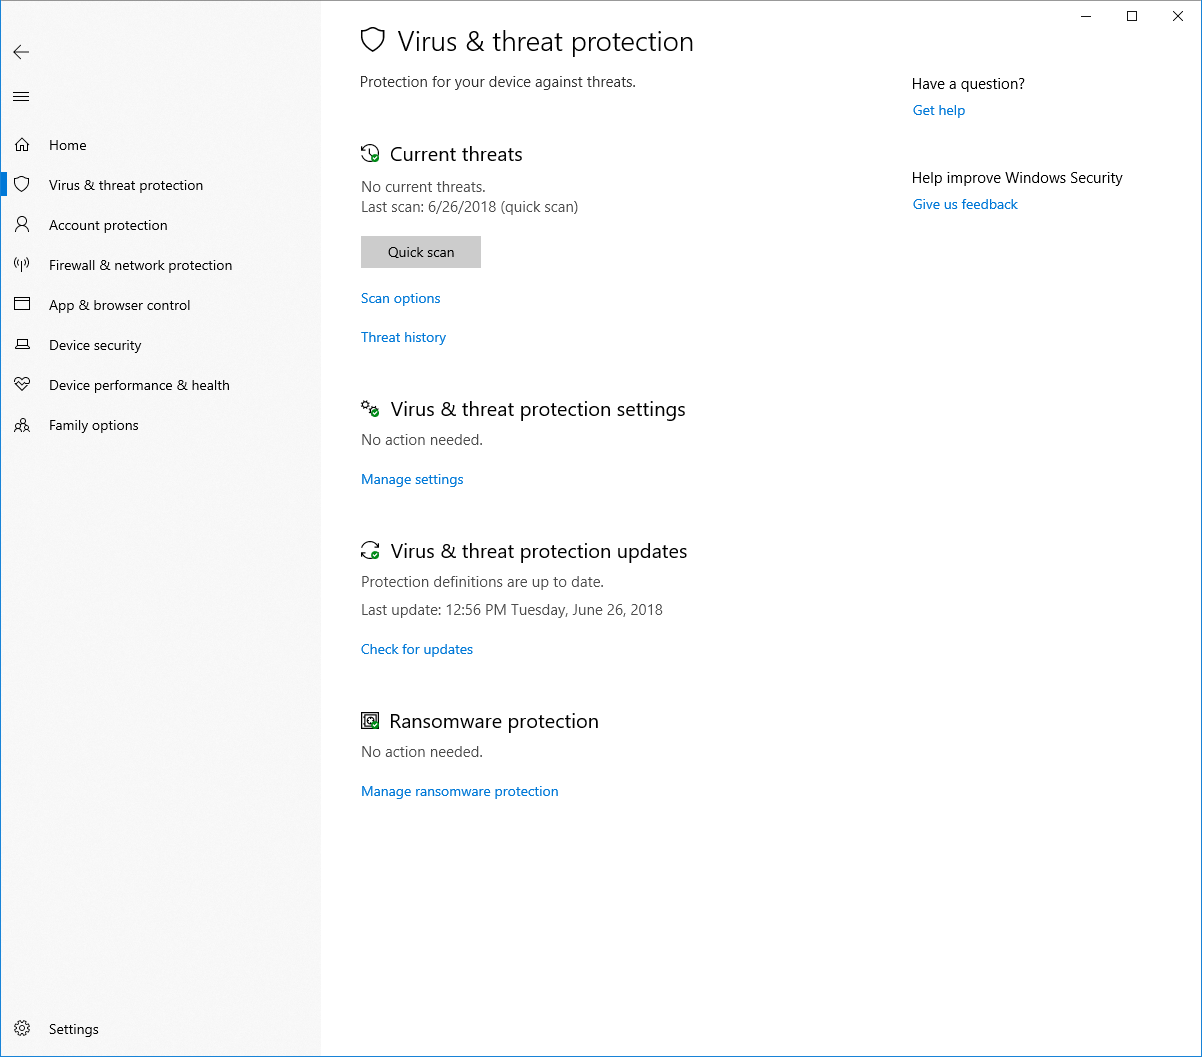
We’ve continued to work on the Current threats area on the Virus & threat protectionsection, which now displays all threats that need action. You can quickly take action on threats straight from this screen.
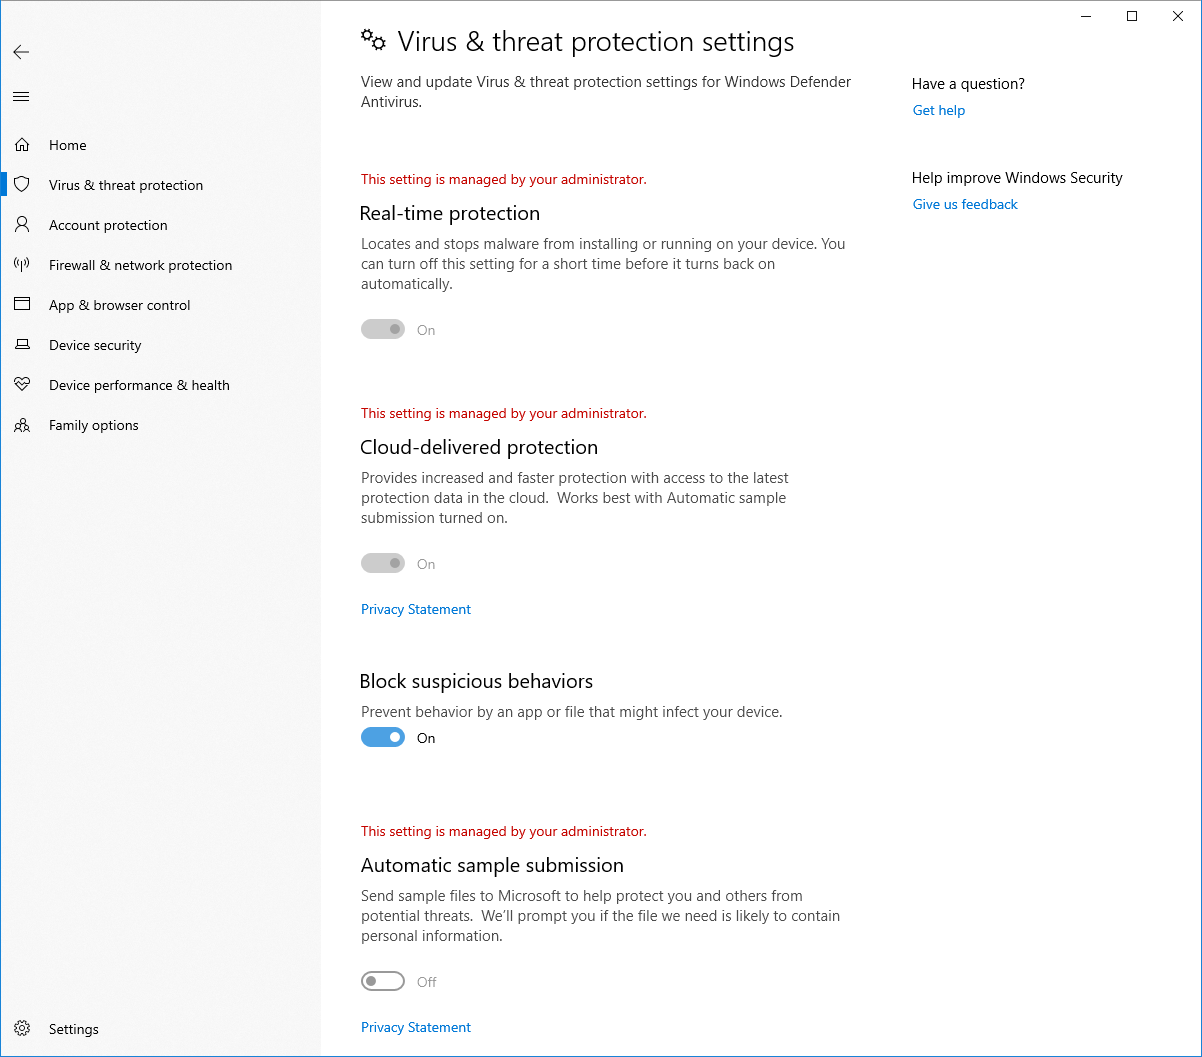
You can enable a new protection setting, Block suspicious behaviors, which brings our Windows Defender Exploit Guard attack surface reduction technology to all users. To enable this setting, go to the Virus & threat protection section and click Manage settingsunder the Virus & threat protection settings heading, as shown in the following screenshot:
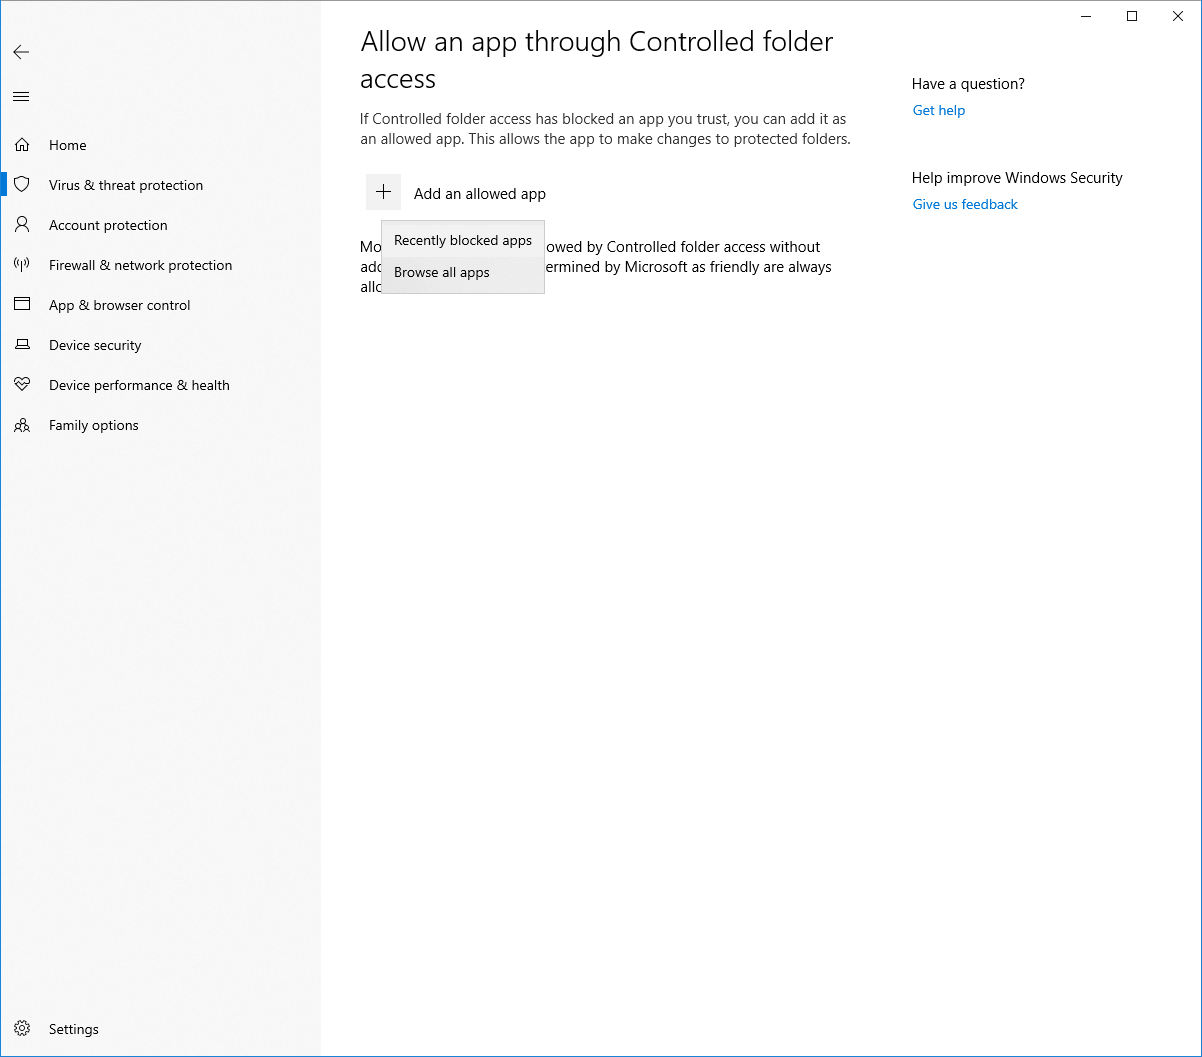
With Controlled folder access you can help prevent ransomware and other destructive malware from changing your personal files. In some cases, apps that you normally use might be blocked from making changes to common folders like Documents and Pictures. We’ve made it easier for you to add apps that were recently blocked so you can keep using your device without turning off the feature altogether.
When an app is blocked, it will appear in a recently blocked apps list, which you can get to by opening the Virus & threat protection section, clicking Manage settings under the Ransomware protection heading, and then Allow an app through Controlled folder access. After the prompt, click the plus button and choose Recently blocked apps. Select any of the apps to add them to the allowed list. You can also browse for an app from this page as well.
In the Device performance & health section, we’ve added a new assessment for the Windows time service. If we detect that your device’s time is not properly synced with our time servers and the time-syncing service is disabled, we’ll provide the option for you to turn it back on.
We’re continuing to work on how other security apps you’ve installed show up in the Windows Security app. There’s a new page called Security providers that you can find in the Settings section of the app. Click Manage providers to see a list of all the other security providers (including antivirus, firewall, and web protection) that are running on your device. Here you can easily open the providers’ apps, or get more information on how to resolve any issue that they have reported to you through the Windows Security app.
This also means you’ll see more links to other security apps within the Windows Security app. For example, if you open the Firewall & network protection section, you’ll see the firewall apps that are running on your device under each firewall type (domain, private, and public networks).
Task Manager Improvements
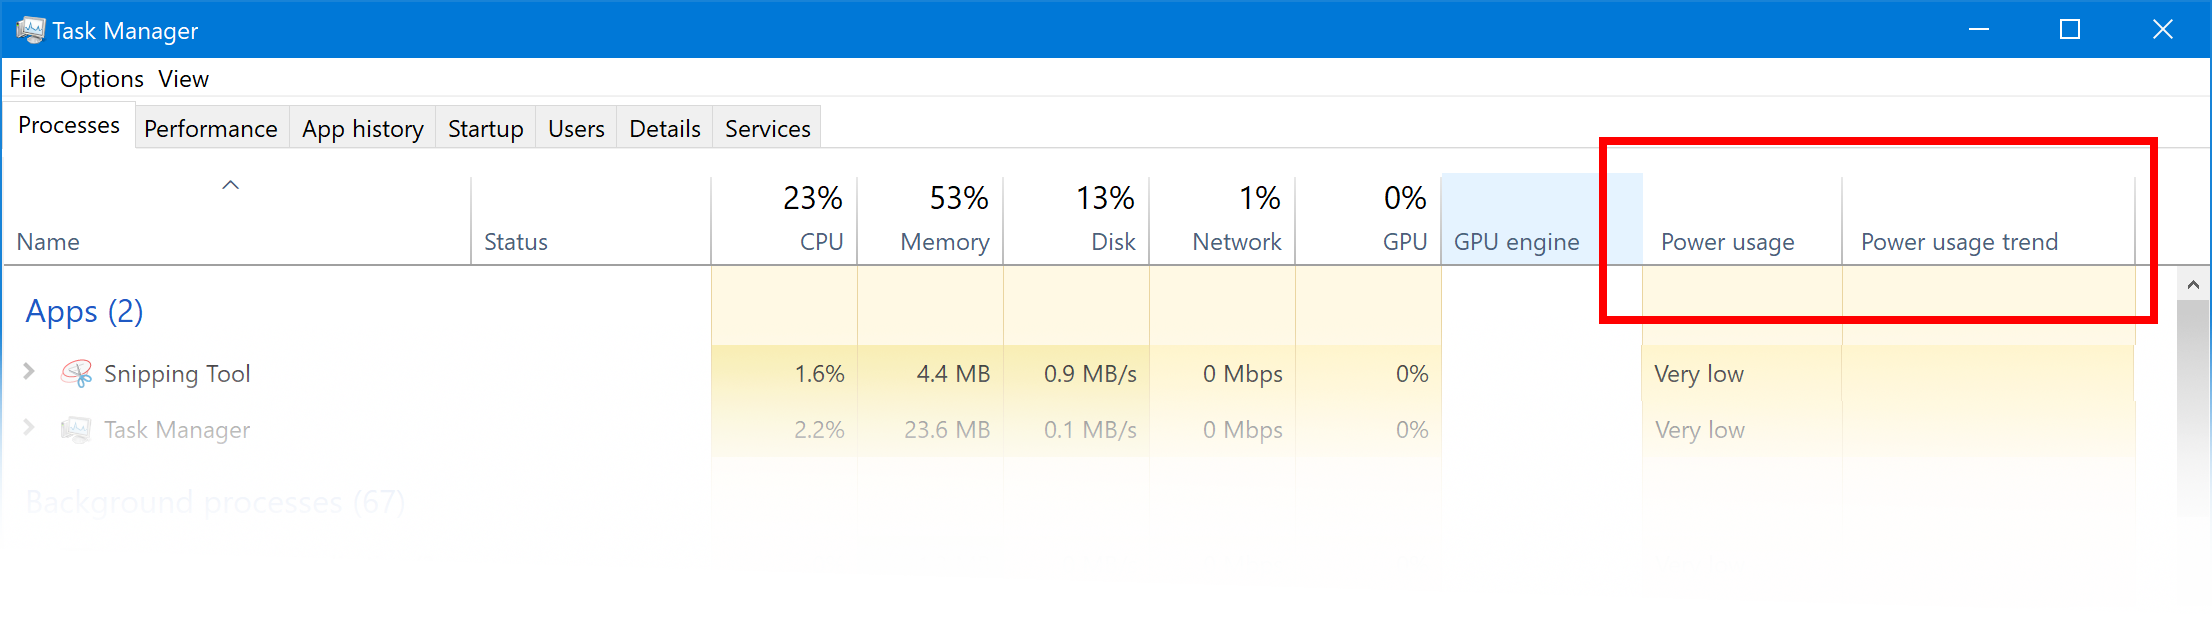
Task Manager now includes 2 new columns in the “Processes” tab to show energy impact of the running process on their system. This should help our customers to understand which apps/services are using the maximum power vs. the least power-hungry apps. The metric takes CPU, GPU & Disk into evaluation when calculating power usage.
- Power usage: This column will provide an instantaneous view of apps/services using power.
- Power usage trend: This column provides a power usage trend over 2 mins for each running apps/services. This column will be blank when you start an app but will populate based on the power usage every 2 mins.
Ease of Access and Narrator improvements
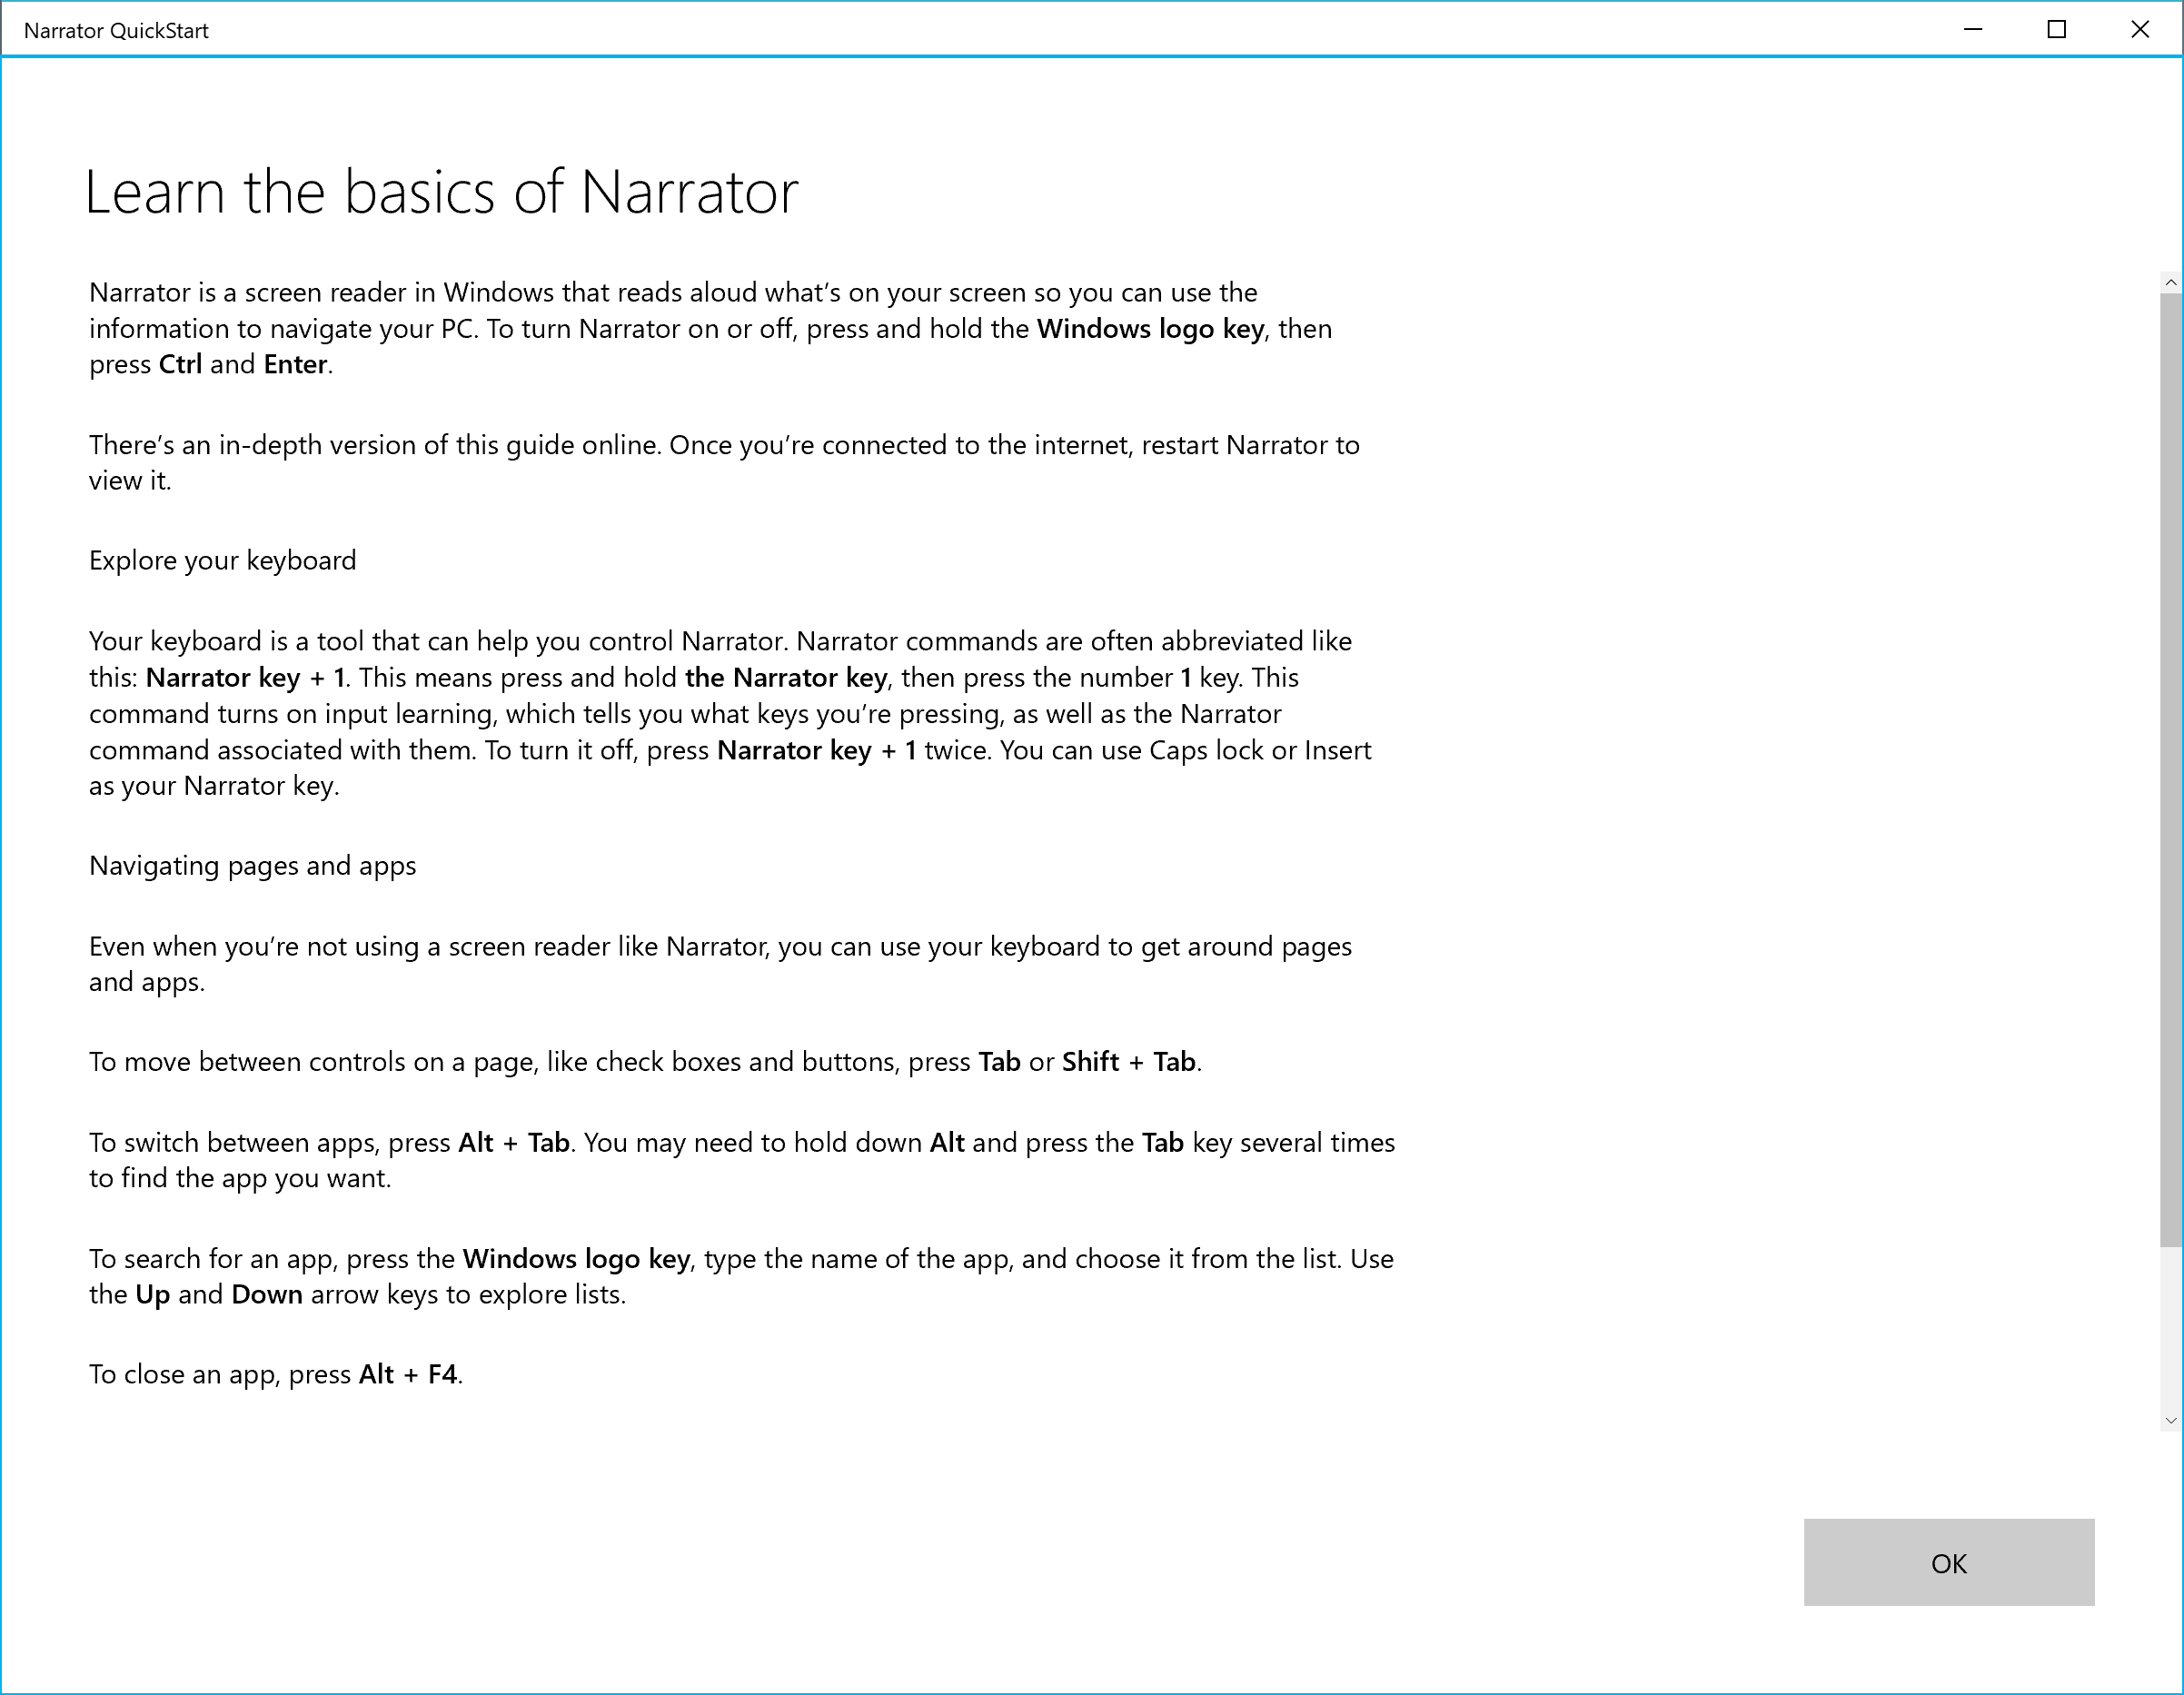
Narrator Quickstart: When Narrator launches, a new Quickstart tutorial experience will be available. The Narrator Quickstart will help you get up and running quickly with Narrator. It teaches the basics of using Narrator, such as learning the keys on your keyboard, navigation, the most used commands etc. At the end of the Quickstart there is a link to the User Guide where you can continue learning about Narrator.
When the Narrator Quickstart launches, Scan Mode may not reliably be on by default. We recommend going through the Quickstart with Scan Mode on. To verify that Scan Mode is on, press Caps Lock + Space.
Narrator New Standard Keyboard improvements: We have added the scan mode secondary action command (Narrator + F1) and Spell current selection command. Please refer to Intro to New Narrator Keyboard Layout doc for more information.
Updated Ease of Access > Display Settings UI: We’ve made some tweaks to the Make text bigger section under Settings > Ease of Access > Display Setting to make it a bit clearer.
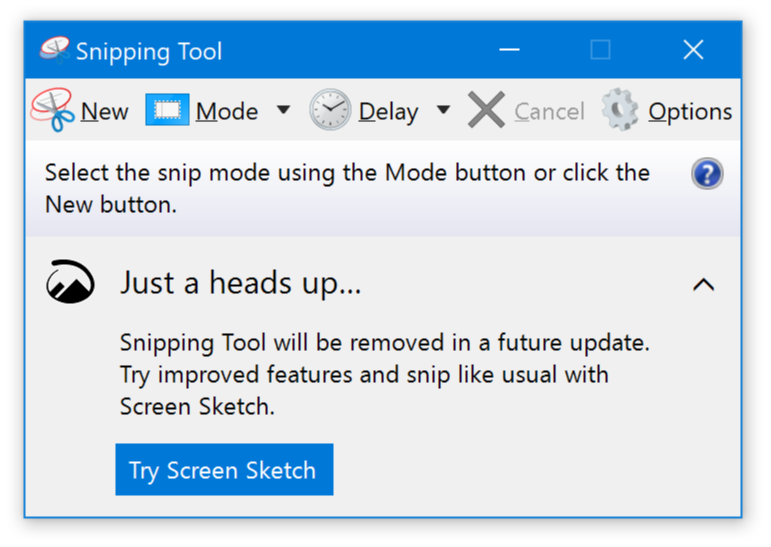
A note about Snipping Tool
As we mentioned with Build 17661, we’re in the process of consolidating and modernizing our snipping experiences in Windows. When you upgrade to today’s build you’ll see a note about this in the Snipping Tool. Currently, we are not planning to remove the Snipping Tool in the next update to Windows 10 and the consolidation work underway will be a feedback and data-driven decision. If you haven’t already, please take a moment to try out the Screen Sketch app and let us know how it’s working for you. Screen Sketch gives you all of the functionality of the Snipping Tool with additional improvements. You can launch the app directly and start a snip from there, or just press WIN + Shift + S, click the back of your pen, or press the Print Screen key (the later two you will need to turn on in Settings – details here).
Windows Container Improvements
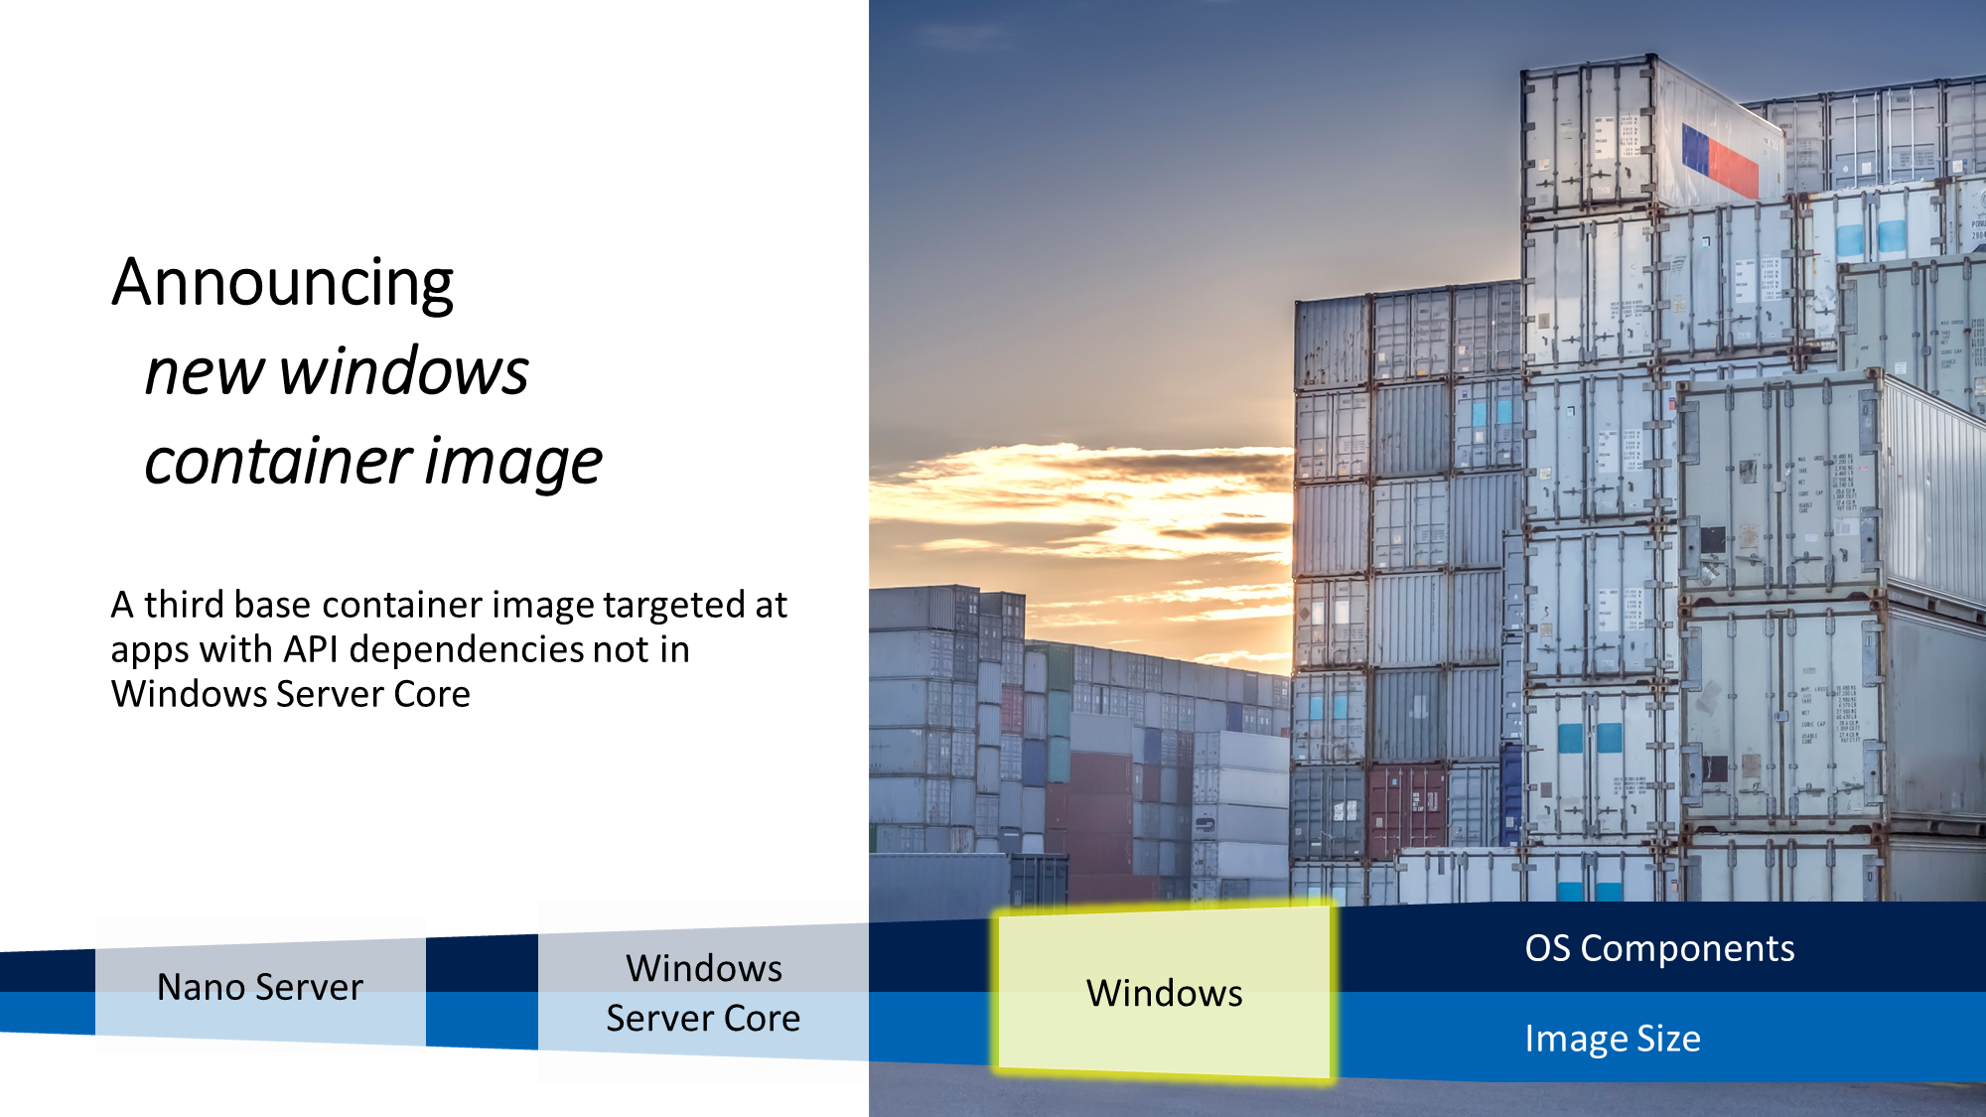
New Windows Image: We’re adding a new base image to the Windows Server container collection. In addition to nanoserver and windowsservercore container images, the new windows image is now available. This image carries even more components than its nanoserver and servercore siblings, meaning it can support applications that have additional API dependencies. Go to https://aka.ms/windowscontainer to learn more and get started.
Group managed service account reliability: We’ve improved the scalability and reliability of containers that use group managed service accounts (gMSA) to access network resources. You should see fewer authentication errors when using a single gMSA with multiple container instances. Additionally, you no longer need to set the container hostname to be the same as the gMSA. We also fixed a bug that prevented you from using gMSAs with Hyper-V isolated containers.
Windows Mixed Reality Improvements
Introducing Quick Actions: While using an Immersive Application, Quick Actions allow users to easily Go Home, view the time, or launch Mixed Reality Capture tools (Photo, Video, and more). To launch Immersive Application Quick Actions, simply press the Windows key or use the Bloom gesture.
New post-update experience
We wanted to take a moment to remind you that you may see a screen that looks like the image shown below after upgrading. Don’t worry – all your stuff is still there! We know some of you bought and setup your devices a long time ago – the features available in Windows have changed since then, so we’re giving you an opportunity to go through the setup questions you may have missed to ensure your device has the best setup possible. Click “Let’s Go” to go through those setup questions or click “Skip for now” if you want to go straight to your desktop.
The conditions for showing this page are cloud programmable and may change over time – if you haven’t seen this page on previous upgrades it’s very likely that you will see it with today’s build.
Microsoft Font Maker app
Have you tried it out yet? With the Microsoft Font Maker app you can use your pen to create a custom font based on the nuances of your own handwriting – currently available via the Microsoft Store and we’d love to hear your feedback! Install the fonts you create to add a personal touch to everything you do!
Note: Currently you can use the app to create a basic English font – interested in support for more characters and languages? Let us know!


As a reminder, Microsoft has also kicked off the RS5 bug bash today, which will be running from June 22nd 12am PDT – July 1st 11:59pm PDT. On this occasion, all Windows Insiders are invited to report all bugs found in Windows 10 Insider build 17704, and those who participate can win a trip to Microsoft’s headquarters in Redmond.