Windows 11 offers a convenient and efficient way to safeguard your essential data through its built-in backup solution – Windows Backup. This guide will walk you through the process of using Windows Backup to ensure that your important files, settings, and applications are securely backed up, making the transition to a new PC a breeze.
Windows Backup on Windows 11
Step 1: Sign in with a Microsoft account
To get started with Windows Backup on Windows 11, you’ll need to sign in with your Microsoft account. This account is associated with various Microsoft services, including Windows 11, Microsoft 365, OneDrive, and Xbox. By using your Microsoft account for backups, you ensure that your data is seamlessly linked to your account, making it easy to retrieve on a new PC.
Here’s how to sign in with your Microsoft account:
- Click on Start.
- Navigate to Settings.
- Select Accounts.
- Click on Your info.
- Choose “Sign in with a Microsoft account.” If you’re already signed in with a Microsoft account, you’ll have the option to “Sign in with a local account instead.”
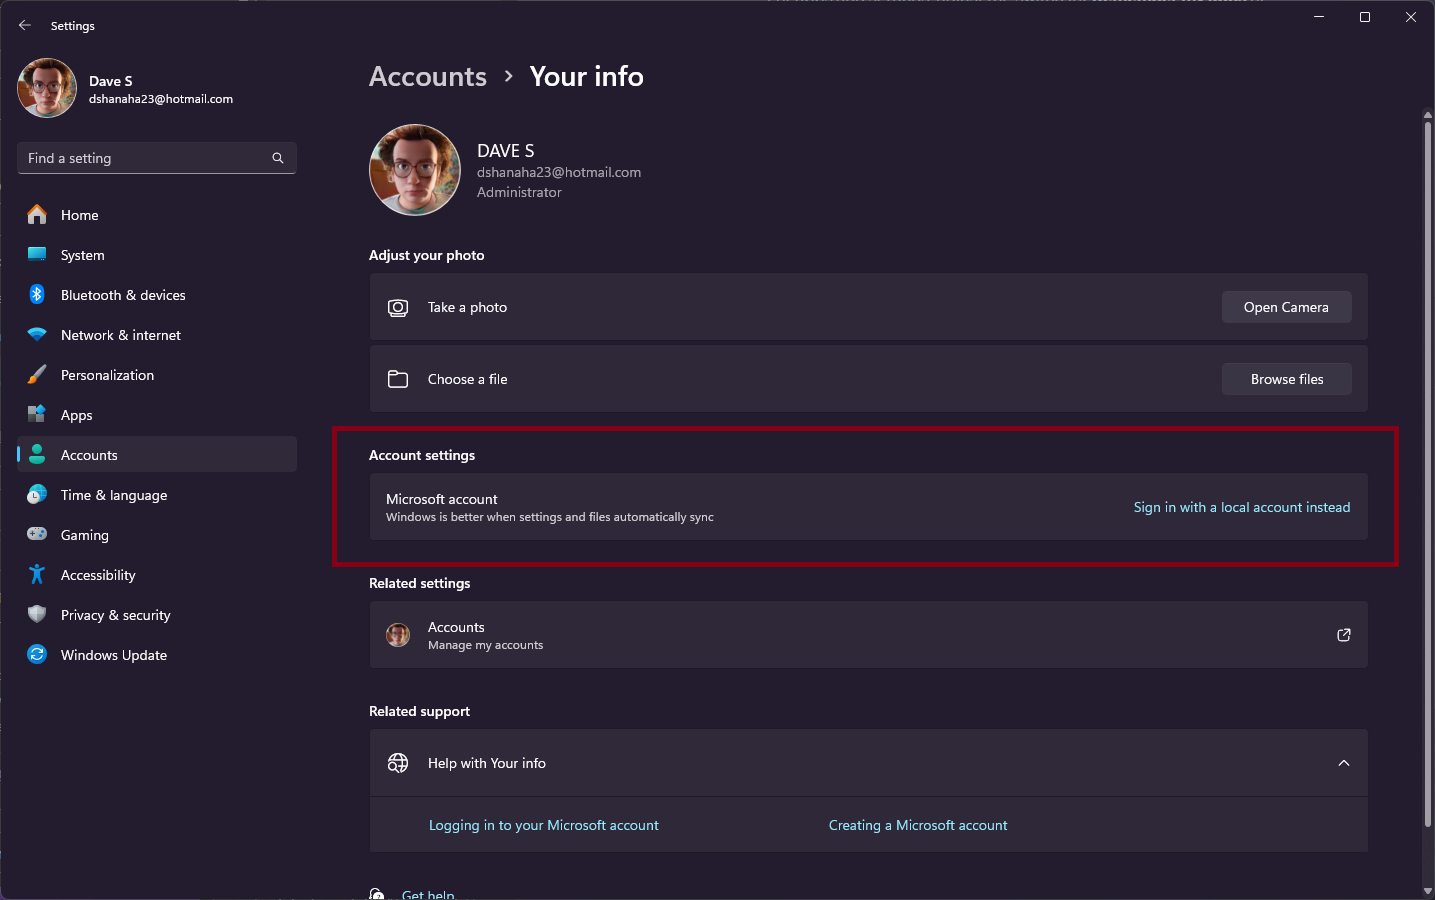
It’s important to note that Windows Backup is currently designed for consumer devices that allow sign-ins with personal Microsoft accounts (MSAs), such as @outlook.com and @live.com. Work or school Microsoft accounts are not compatible with this feature.
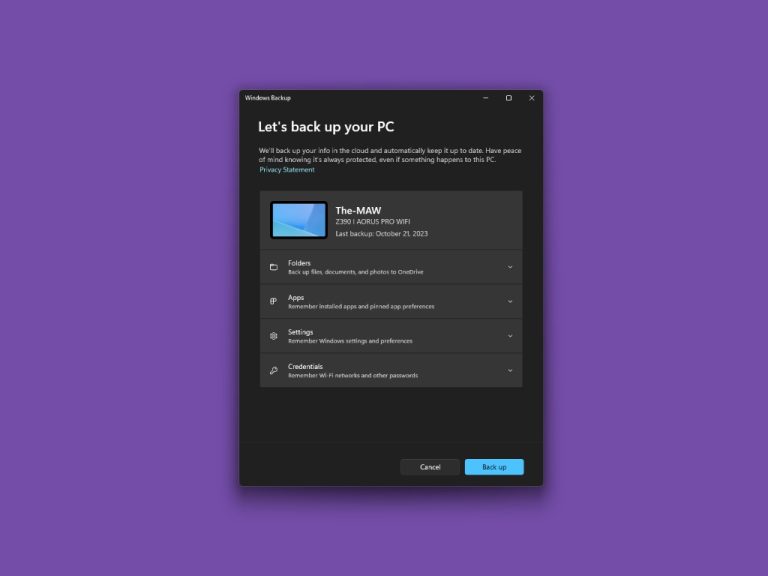
Step 2: Back up your folders
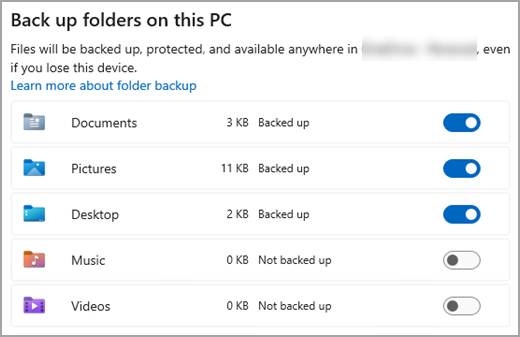
Windows Backup simplifies the process of backing up your folders by syncing them with your OneDrive account. Your free Microsoft account includes 5 GB of OneDrive cloud storage, with additional storage available if needed. Backing up your folders to OneDrive ensures that they are readily accessible on any computer linked to your Microsoft account. To begin this process, follow these steps:
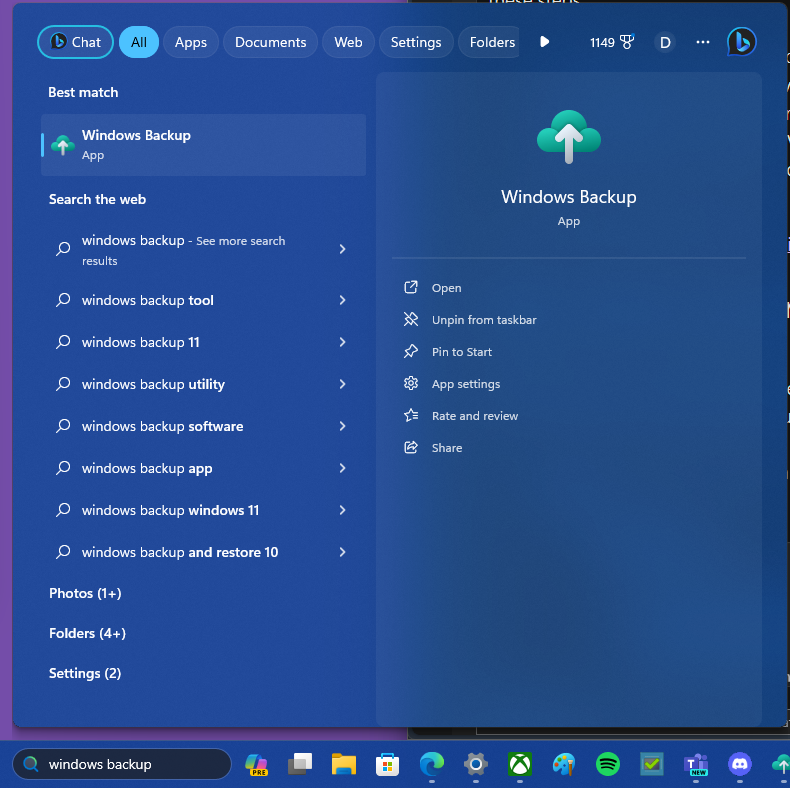
- Launch Windows Backup by clicking on Start, typing
Windows Backup, and selecting the corresponding result. Alternatively, navigate to Start > All apps > Windows Backup.
 - Under Folders, choose the user folders you want to back up to OneDrive. You can select from Desktop, Documents, Pictures, Videos, and Music folders.
- Toggle the switch to enable or disable the backup for each folder.
 Alternatively, navigate to Start > All apps > Windows Backup.
If you’ve previously backed up these folders and wish to stop backing them up, check out our section at the bottom, “How to stop backing something up?”
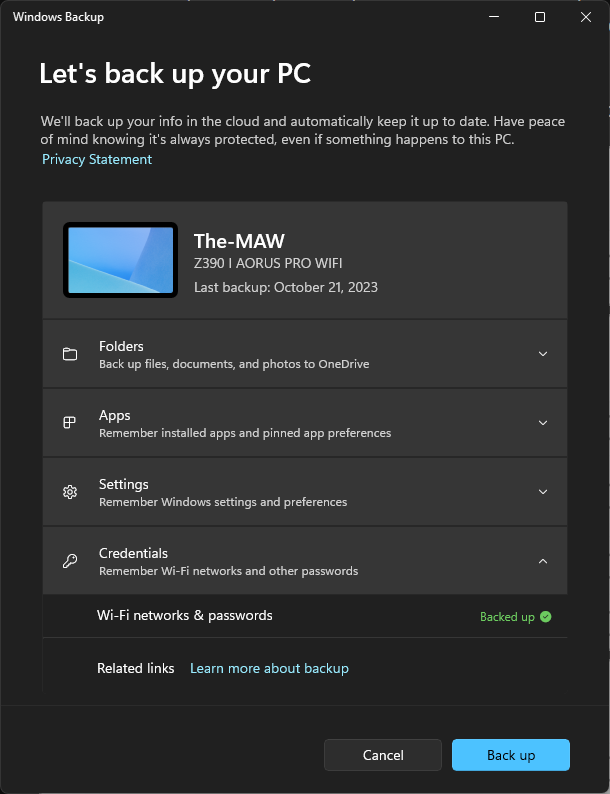
Step 3: Back up your settings
Windows Backup can also assist you in backing up various Windows settings, including installed apps, Wi-Fi network details, language preferences, and wallpaper settings. You can easily manage these settings within Windows Backup by following these steps:
- Navigate to Windows Backup and observe the status of these settings in the following sections:
- The Apps section.

- The Settings section.
- The Credentials section.
- The Apps section.
- Toggle the switches to enable or disable the backup for each setting.
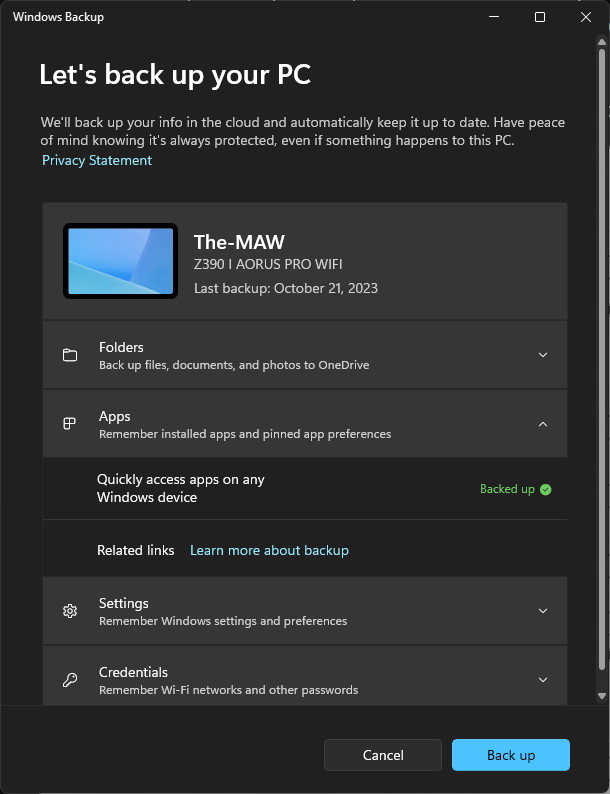
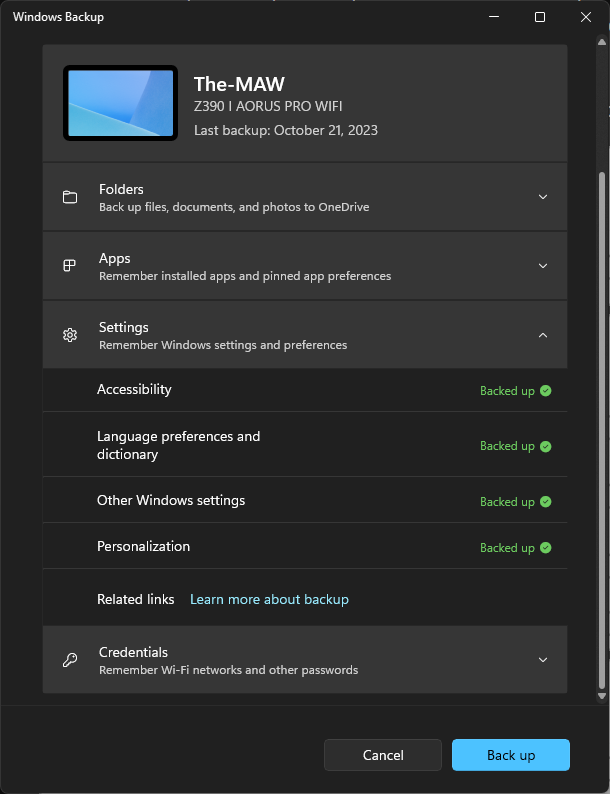
If these settings have been backed up in the past, they will show as “Backed up,” with a green checkmark and the toggle switch will be unavailable. For instructions on discontinuing these backups, refer to Microsoft’s instructions “What do I do if I want to stop backing something up?”
Once you’ve configured your backup preferences, select Back up.
If you encounter an error while attempting to back up, it may be due to issues with OneDrive or your sign-in status. Refer to our guide to fix OneDrive sync problems for further assistance.
Step 4: Relax!
Congratulations! Your folders and settings are now being securely backed up. You can access your files on any computer where you sign in with your Microsoft account. It couldn’t be more straightforward.
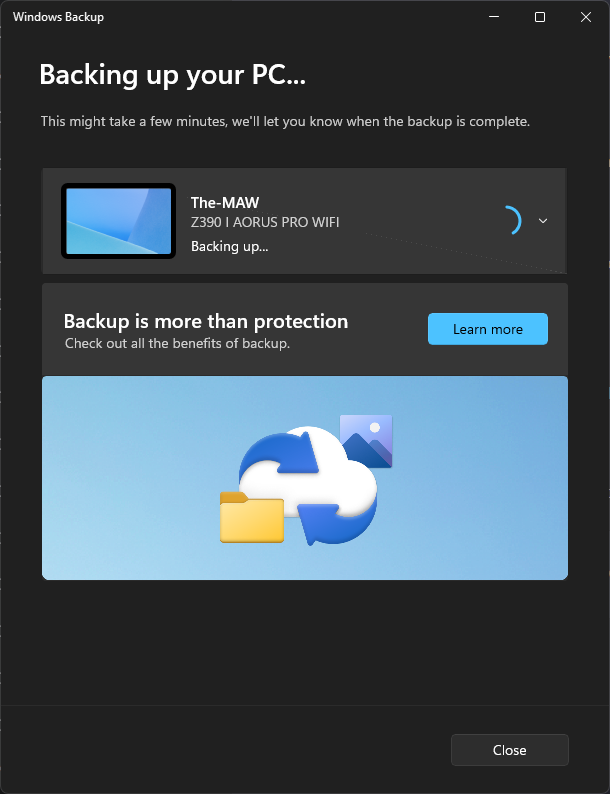
To check the status of your backups, you can open the Windows Backup app, or navigate to Start > Settings > Accounts > Windows backup.
How to restore your backup
Restoring your backup is a hassle-free process. When setting up a new PC or reinstalling Windows, log in with the same Microsoft account used for the backup. The system will recognize your backups and offer you the option to restore them.
If you have multiple computers backed up, you can select from a list of available backups during the setup process, ensuring that your data is readily accessible.
Your apps will be restored with their respective pins on the taskbar, Start Menu, and All Apps list. For apps not available in the Microsoft Store, you’ll be directed to the web to download the installer.
Your crucial settings will also be restored on your new device, providing a seamless transition. For a comprehensive list of supported settings, consult the “Windows Backup settings and preferences catalog.”
You can access your files at any time by signing into OneDrive using the same Microsoft account used for the original backup.
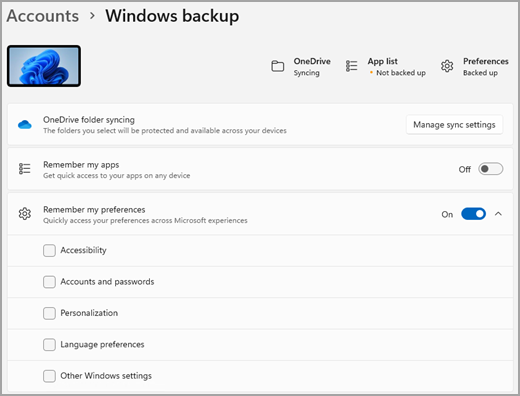
How to stop backing something up?
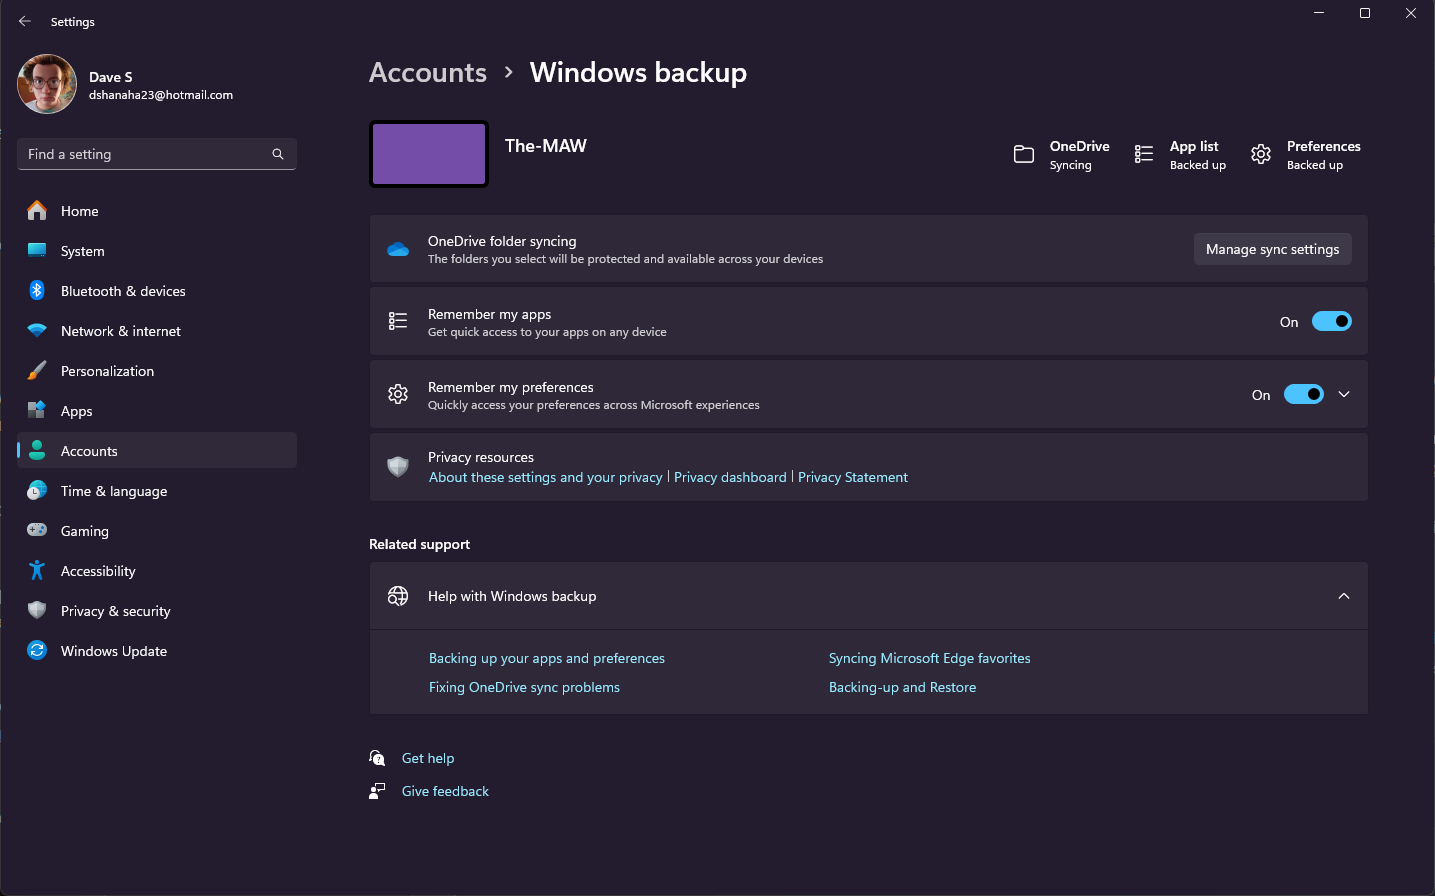
If you no longer wish to back up specific folders, apps, or settings, you can manage these preferences in Start > Settings > Accounts > Windows backup:
- To deactivate file backup, select Manage sync settings next to OneDrive folder syncing and turn off the folders you no longer wish to back up.

- For apps and settings, adjust the switch for Remember my apps or explore the options under Remember my preferences to configure your preferences.

- In the “Accounts and passwords” section, you can control Wi-Fi networks and passwords in Windows Backup. Please note that “Accounts and passwords” is the box to check in Settings for Wi-Fi networks & passwords in Windows Backup.
Once you’ve turned off backup for certain items, you can delete previously backed-up data from your Microsoft account by visiting your Microsoft Account Devices page, navigating to the “Cloud synced settings” section, and selecting “Clear stored settings.”
How to manage your backups
Managing your backups in Windows 11 is a straightforward process. Whether you want to check the status of your backups, change the items you’re backing up, or delete specific backups, Windows Backup provides the tools to do so.
Checking backup status
- To check the status of your backups, open the Windows Backup app.
- The app will display the current state of your backups, indicating whether they are up to date or if any issues need your attention.
- Alternatively, you can access backup information in Windows 11’s Settings. Navigate to Start > Settings > Accounts > Windows backup to view a summary of your backup status.
Modifying your backup preferences
If you need to adjust your backup settings or select different folders, apps, or settings for backup, follow these steps:
- Open the Windows Backup app.
- Navigate to the corresponding section, such as Folders, Apps, or Settings.
- Toggle the switches to enable or disable the backup for specific items.
- Save your changes by selecting Back up.
Deleting backups
In certain scenarios, you might want to delete specific backups or data stored in your Microsoft account. To do this:
- Visit your Microsoft Account Devices page.
- Scroll to the “Cloud synced settings” section at the bottom of the page.
- Select Clear stored settings to remove data associated with your backups.
Additional tips for a smooth experience
By following these steps and tips, you can efficiently use Windows Backup on Windows 11 to protect your valuable data and enjoy a seamless transition to a new PC.
- Regularly check your backup status in Windows Backup to ensure that your data is up to date and secure.
- Make use of the free 5 GB of OneDrive cloud storage that comes with your Microsoft account. Additional storage is available to purchase if needed.
- When setting up a new PC or reinstalling Windows 11, log in with the same Microsoft account used for the backup to easily restore your data.
Windows Backup on Windows 11 provides a comprehensive and user-friendly solution to back up your files, settings, and applications. With the integration of your Microsoft account, your data is securely stored, making it easily accessible on any device linked to your account. The straightforward process of managing your backups ensures that your data is always up to date and that you have complete control over what is backed up.
In the event that you need to restore your backups on a new PC or reinstall Windows, the process is hassle-free. Your settings, apps, and files will be waiting for you, providing a seamless experience. Furthermore, managing your backup preferences and deleting backups is a breeze, giving you full control over your data.
With these steps and best practices, you can take full advantage of Windows Backup on Windows 11, ensuring the safety and accessibility of your important data.