For amateur and hobbyist video editors like myself, the most common video editing software is iMovie. This software is exclusive to MacOS, but it is known to be simple, easy to understand, and still good enough to put out professional-looking movies and videos.
Recently, though, my colleague Kareem Anderson and I relaunched a podcast for onmsft.com. Like many others, I was initially depending on my MacBook Pro and iMovie to edit each episode and each video once we finish filming. But once I got my new HP Envy 15, I switched the entire production process to Windows 10 with Wondershare Filmora X.
Coming off using iMovie for my video editing the past few years, and switching to Wondershare Filmora X, I must say I really love it. From its simple to understand user interface, its massive library of titles transitions, and even music, this Windows 10 video editing software is a lot like iMovie.
What is Wondershare Filmora X?
Before diving into my review, I want to quickly summarize Wondershare Filmora X. You might not have heard of it, but as a product of Wondershare, this video editor is designed to be simple yet efficient. It’s available as a free download on MacOS and Windows, but there are some paid plans available that will get rid of the watermark in videos made with the free version.
I actually paid for the lifetime plan, which is a one-time fee of $70. However, there are subscription plans available for $40 a year. It should be noted that with some paid plans, you’ll also get downloads from the Filmstock Standard Library, and new effects each month. I never really bothered to use these.
Getting started and understanding the user interface


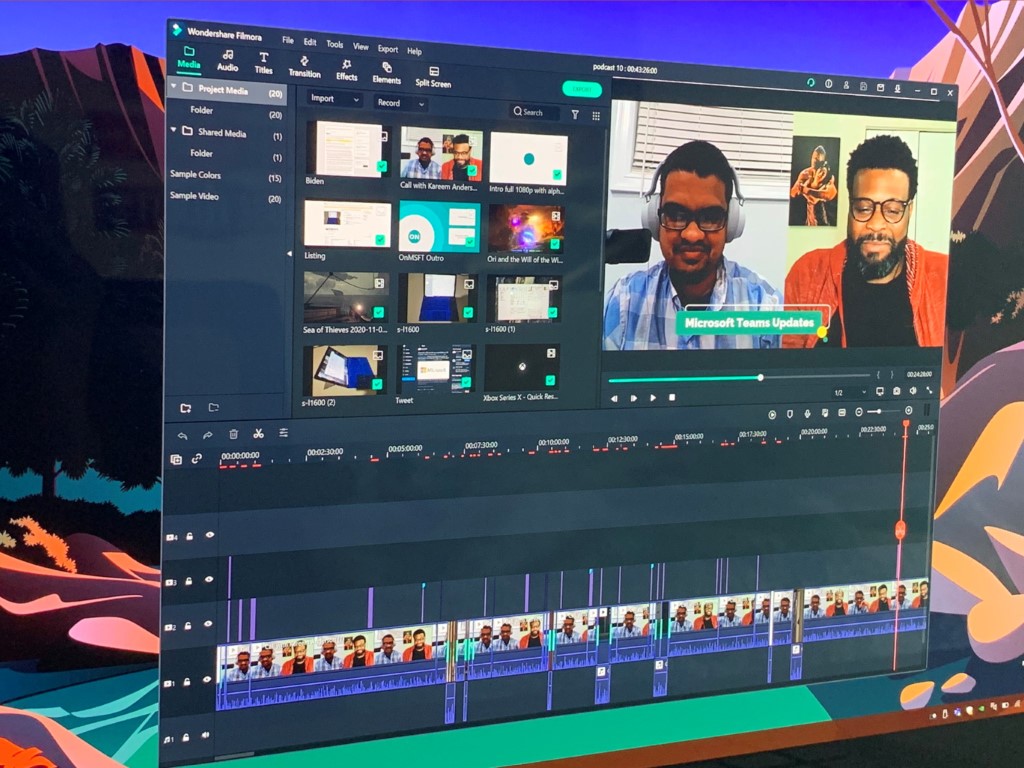
As I keep repeating, one of the things I like most about Wondershare Filmora X is how easy it is to get started with it. Before I purchased, I wasn’t familiar with the software at all. That didn’t stop me though. As soon as I booted the program up, I jumped right in and felt right at home. It’s a lot like iMovie, as seen in the sliders above.
On bootup, Filmora X gives you a splash screen to pick a project. You can choose an aspect ratio, for widescreen, Instagram, portrait, or Cinema. Usually, I choose widescreen. Once you choose one, you get thrown into the app itself, which is quite easy to understand. Just like iMovie, you don’t have to go through hidden menus to find what you want, or how to edit your video. Everything you need is right upfront. There are three sections for this experience: A library section on the top, a preview section on the right, and a timeline section on the bottom.
The library section works just like it does in iMovie. You can open the File Explorer in Windows and drag in the movie file, b-roll, photos, or videos from the location to this area in Filmora, where you want to edit it. Or, you can use the import media option to bring in your media. Either way, Filmora suggests for you to lock the media to the project’s FPS and aspect ratio, to avoid issues in post-production. A nice feature to make your videos look cleaner, and something I haven’t seen in iMovie.

The timeline, meanwhile, is exactly as it is in iMovie. You can drag down things from the top of your library section and into the timeline to edit it. There are a total of 100 different “tracks” you can add to the timeline, presented by the stipes. Each “track” can either be a segment of video, audio, music, or caption, transition.
Of course, you can drag everything from your library into a line and into one single track, too, but I usually keep them separated out to help make video edits easier. There’s a “+” and “-” button to help in the timeline area you make tracks appear smaller or larger when you edit so they can fit on your screen, just like in iMovie. More on that when I talk about my editing process.
As you add more tracks, Filmora is smart enough to recognize their positioning and will lock them in place next to each other, creating no gaps in your movie. Again, this is exactly like how it works in iMovie. Nothing different. There’ll even be a little timeline across the top to show you how your clip progresses. Not to mention, the bar with the scissors, which lets you cut and trim the video as you go. It doesn’t get any easier!
Finally, there’s the preview window. From here, you can playback your video as you edit it. You’ll also be able to record voice-overs from here, too. Or, add captions and other graphics. But, more on that a bit later.
The editing of a raw clip

Okay, so dragging files into FIlmora is one thing, but what about the actual editing process? Well, it also is easy. It’s a two-part process. First, there’s editing the raw video clips. Then, there is trimming clips, muting audio, adding transitions. It is such a seamless process.
There are a lot of editing options in Filmora X, most of which I haven’t yet explored to its full extent. So far, the most basic which I have used is the ability to trim clips, add transitions, mute the audio, and add captions. Oh, and fixing the video itself. I’ll be covering the raw editing part first.
First, there’s fixing the video itself. To edit the stabilization, correction, or brightness of video that you inserted into a timeline, all you need to do is to snap to that area of your clip (or the full clip) in the Timeline and then double click the preview area. These options are usually available right under the video itself in iMovie but do need a double click here. Still, fixing these things is just as easy as pulling a few sliders and clicking a few buttons. It’s self-explanatory, and if you mess up, you can undo your edits by clicking CTRL+Z on the keyboard.
FiImora X also introduces some special Motion Tracking, Color Matching, and KeyFraming features for editing your raw videos. I’ve yet to use these, but it is being promoted by Wondershare and are of note.

Anyway, there’s a full suite of video correction options. You can rotate and transform the video, change the bleeding, add motion tracking, stabilize a shaky clip, or even auto-enhance it. There are also tabs for correcting the audio, removing background noise, changing the colors in the video, and even adding transitions to the clip. These are all great options if your original clips don’t turn out well due to issues with the camera or microphone when filming.
Adding transitions, titles, trimming clips, and more

Now, there’s the actual creation of the movie. With the raw clips edited, putting together a movie is easy in Filmora. I’ll talk about this by going through my experience with the editing process for the Podcast at OnMSFT. This will take you through adding transitions, titles, cutting a clip, inserting b-roll, and more.
We have a pre-made intro and outro which I have saved on my laptop. I drag this from the library into Filmora at the start of the timeline and then, I drag in the Podcast clip as filmed after it. Between the two, I add a transition. Doing this is easy. Just click the Transition tab, and choose Included, then drag the transition between the two clips on top of the little preview in the timeline area. There’s an entire collection to choose from with paid plans. Again, just like in iMovie, where you have the Transitions tab. Quite simple.
After that, there’s the process of adding titles. In the introduction of my Podcast, I add a caption for myself and Kareem. Again, it’s easy to do this. Just click the Titles tab, choose one, and then drag it over to the top in its own space on a separate track. Then, drag it to where you want it on the video. You can then double click it to edit, and add your caption. Just like iMovie, you get full control of where you want to place it in the clip. You can control it by clicking the preview area and dragging it around or adjusting the size of the captions. Other things for font, colors are there, too. Simple, right?

Next, is the process of editing out those mistakes or footage you don’t want. To do this, just drag the slider with the scissor to the point in the clip where you want to cut. once you do that, it’ll cut the clip out. Click the part you don’t want, and then press “delete” on your keyboard.
After that, there’s overlaying of the B-roll. To do this, just drag your clip or your photo or video from the library on top of the existing clip where you want it to appear in the timeline. Filmora will automatically ignore any other clip and snap to this. It’s really easy. Just be sure to mute the audio in the B-roll. Like in iMovie, there are sliders for the audio under the clip. You can click the bar, and pull it down to zero to mute it.
You might also want to overlay audio or pre-recorded voice-overs, too. Well, Filmora has a collection of 76 different audio clips for you to use. You can click the Audio tab to use these, and drag them into your timeline where you want them to appear. Just be sure to adjust the volume of clips, accordingly. It’s great to see these, but you can always add your own by importing it to the library or dragging it in from File Explorer. Oh, and you can record voice-overs by clicking the Microphone button in the preview area, too.
To further tweak any media added to the timeline, you can right-click it. You’ll see lots of options. All of which are self-explanatory. The most common that I use is Detach Audio and Split. These do as they suggest. Detaching the audio lets you delete the clip and pull it down on the timeline in its own section, and overlay photos or videos. Other options will bring you to the raw editing tools we described earlier. Again, doesn’t get any easier.
I just love the selection that Filmora has. It has a total of 137 adjustable titles, 178 Transitions, 158 filters, 87 Overlays, and 191 mask elements. Not to mention, pan and zoom effects, too. It’s a creative person’s dream come true.
Exporting

Once you finish editing a project, Filmora makes it easy. Just like iMovie, there’s a lot of presets. You can export to your local hard drive, or via YouTube or Vimeo directly by logging in. Going the route of Local is easier. You can choose the format, be it MP4, WMV, or MP3. You even can save it as a GIF, too, if you want. So many ways to share your awesome creation.
iMovie for Windows
With Microsoft not having its own video editing software for Windows 10 (there are some in the Photos app, but it’s not as complete,) Filmora X should is a must for any Windows 10 user who is an amateur at video editing, or looking to get started with video editing. Just like iMovie on MacOS, the software is easy to use. It’s quite simple to learn, and it feels just like iMovie does on Mac devices.