
You’ve just bought – or built – or received – a shiny a new Windows 10 device and you’re ready to turn it on. In this guide, we’ll step you through the basics to be aware of as you turn on your PC for the very first time.
Setting up Windows 10 isn’t difficult but it can take a little while to do it right the first time. We recommend you set an hour aside to get configured. Getting everything ready during the initial setup procedure means there’s less to do later on.
At this stage, we must offer a warning – these instructions won’t always exactly apply to your device. The screens you’ll see may vary slightly depending on the precise version of Windows 10 which comes with your product. Some PC manufacturers may also add their own setup stages, so refer to your device’s in-box documentation for any additional guidance you require.
We’re refraining from providing any hardware-specific instructions, so this guide should be widely applicable across all Windows 10 laptops, tablets and desktops. These instructions may also be of use when you’re clean installing Windows 10 on an existing machine. Let’s get going.
First startup
Follow your manufacturer’s guidance to get your device ready for initial startup. Press your device’s power button to start the bootup procedure. This first start may take quite some time, so be prepared to wait a while before anything significant happens.

After a few minutes, you’ll land at the Windows Out of Box Experience (OOBE) – a set of initial setup screens where you can start configuring your device. If you have a microphone and speakers available in your new hardware, you can complete setup using just your voice. This quickly becomes cumbersome though, so we’ll be muting Cortana’s voice control for now and proceeding with traditional mouse and keyboard.
Confirm your region on the first page and click the “Yes” button to move forwards.

The next page asks you to choose your keyboard layout. In most cases, this will already be appropriately selected from your region choice. If you need to switch the layout, choose your desired one from the list before pressing “Yes”.
If you like, you can add additional keyboard layouts on the next page – if you want to, press the “Add layout” button, but otherwise choose “Skip” to save your settings. Windows will take a moment to apply your regional preferences.
Updates
The next stage may take a few minutes. Windows will start checking for updates, which include important security and bug fixes. There’s not much to do here except wait patiently while Windows downloads any updates which are available.
It’s important not to turn off your device during this stage. Although the update process may take a long time (especially if you have a slow internet connection), getting updates out of the way now leaves you free to explore your desktop as soon as setup is complete.

If your device is running an older “feature update” of Windows 10, setup may detect that now and ask whether you want to upgrade to the newer version. If this option is presented, you’re likely to benefit from accepting it now – feature updates add new features and settings options, so you’ll save time by only getting started on your desktop once you’re on the newest version.
Be aware though, that a feature update will take longer to install – it’s a big download and a demanding installation procedure for the machine. You can leave your PC to handle the process automatically, but be ready for a wait of a few hours on a slow connection.
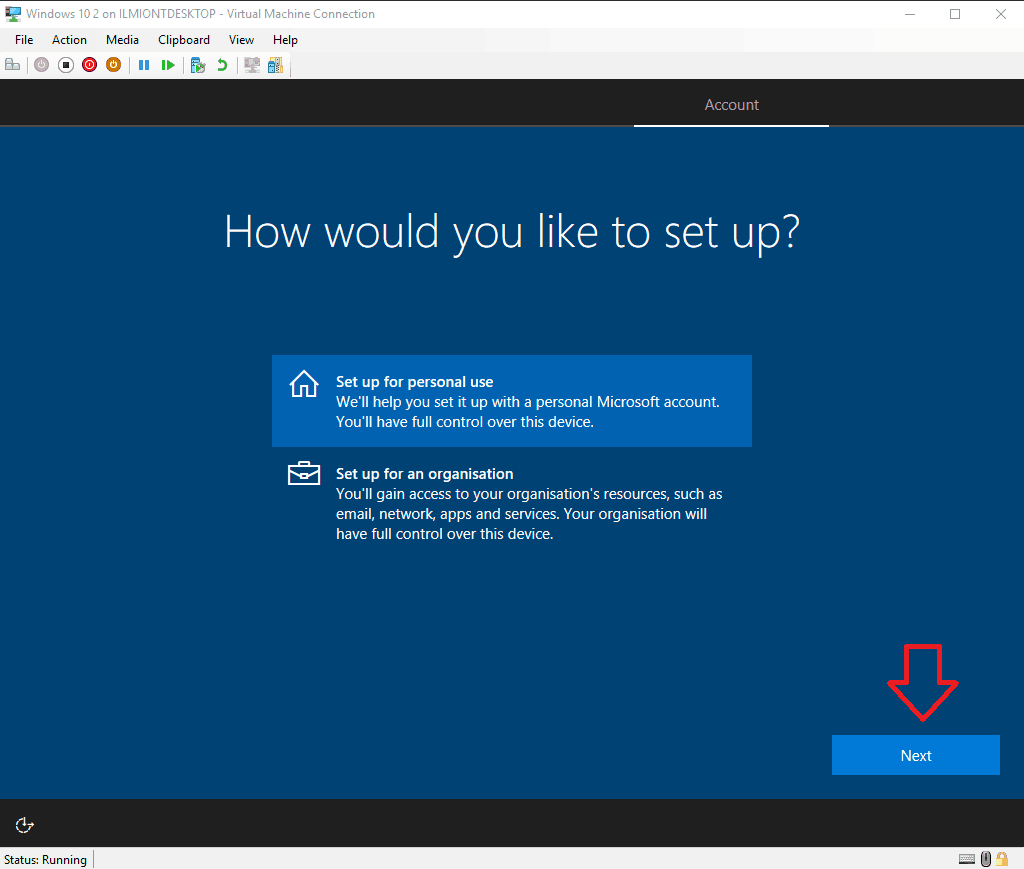
Accounts
After updates are installed, you’ll be asked to choose how your PC is going to be used – for personal use, or as a business device. Usually, you’ll want to click “Set up for personal use,” unless you are configuring a business PC and have been given specific instructions. We’ll assume you select personal use for the remainder of this guide. Click the option and press “Next”.
Next, you’ll be prompted to sign in with your Microsoft account. If you already have a Microsoft account, enter your email address now to attach it to your PC. This allows you to access Microsoft cloud services such as OneDrive and Cortana without any further configuration.

If you don’t have an account, you can create a new one by pressing the “Create account” link. Follow the steps here to get yourself a new Microsoft email address (or reuse your existing one) and open your Microsoft account.
The final option is to use an “offline” account. This doesn’t require you to create a Microsoft account, but means you won’t be able to use online cloud services. It is the simplest option though, and arguably the most secure and least intrusive.

Click the “Offline account” link in the bottom-left of the screen to create one. You’ll need to press “No” on the next screen, in which Microsoft makes a last attempt to convince you to use an online account. Then, follow the steps to enter your name and create a password for your account.

If you want to switch to a Microsoft account later on (or move in the opposite direction, to an offline account), this can be achieved from Windows Settings at any time in the future.
Cortana
With your account configured, the next stage is to choose whether to enable Cortana. Cortana is Microsoft’s voice-controlled digital assistant, which allows you to complete common tasks by talking to your PC. Cortana can also keep you updated on information such as the news and weather, as well as synchronising information between your PC and a smartphone.

If that’s too much to consider at this stage of setup, you might want to leave Cortana disabled for now – you can always turn it on later. Press the “Yes” or “No” button to indicate whether you want to use Cortana.
Privacy
Finally, you’ll reach the Privacy settings page. Note here that this screen has undergone multiple revisions during Windows 10’s lifetime, so what you see might look slightly different if your device isn’t yet running the latest version.

We’ll abstain from providing specific guidance here, since your choices should reflect your personal attitude towards data collection. By default, Microsoft leaves every switch turned on, which gives the company access to detailed diagnostic data and allows the company to track you with adverts, produce targeted recommendations and process your voice data.
You can turn off any option that makes you uncomfortable. When you’re done, press “Accept” to complete the final OOBE page. Windows will now take a few moments to get your device ready to use. This may take several minutes on slower products, so wait patiently while it completes. Again, you must not turn off your device during this stage of the setup procedure.
Let’s start
After a few minutes, you’ll briefly see a “Let’s start” message before being shown your new Windows 10 desktop for the first time. While your PC is now essentially ready to use, there are a few more housekeeping tasks we recommend completing first.

The most important of these is checking if you really are up-to-date. Although critical patches are installed during OOBE, you’ll almost certainly have many more updates available now Windows is fully configured. Again, we recommend getting updates out of the way now, so click the Start button in the bottom-left corner and press the small cog icon in the left menu to open Settings.

From here, head to the “Update & security” category (you might need to scroll down) and press the “Check for updates” button to begin the update process. This may take quite some time, especially on a slow internet connection, but you can continue with some of the other housekeeping tasks while updates are underway.

Next, you may want to remove some of the pre-pinned bloatware from your Start menu. Press the Start button again and you’ll several app shortcuts cluttering your screen. You can right-click any of them and choose “Unpin from Start” to remove it. Many of the apps are games which you may not ever use. If you want to recover anything in the future, you can reinstall it from the Windows Store.

Speaking of the Windows Store, now’s the time to set another update operation in progress. Your apps – such as Mail, Calendar and Skype – will have their own updates available, separately from Windows ones. Click the Store icon at the bottom of your screen (on the taskbar) to open the Store.

In the Store, click the button to the left of the search bar and choose “Downloads and updates” (this may look slightly different depending on your exact version) and then press the “Check for updates” button. Your apps will begin to update. You can also start installing any new apps you use from the Windows Store at this point.

That’s really all there is to do when configuring a Windows 10 PC. You’ve now got an up-to-date system, with antivirus protection from Windows Defender enabled out-of-the-box. However, we’ve only just scratched the surface here – you’ll likely want to install your own apps next, and then start customising things to your preferences within the Settings app. We’ll be publishing additional articles with more specific guidance soon, but in the meantime this guide should be enough to get you going with your new Windows 10 device.
Further reading: howto, Windows 10