How to zip a file on Windows 10 [Full Guide]
4 min. read
Updated on
Read our disclosure page to find out how can you help Windows Report sustain the editorial team Read more
Key notes
- Zipping files in Windows 10 is a very easy task that can be done in no time.
- You can do it either by using the OS's native toolset or with third-party help.
- To learn more about tools that can zip files, check out this guide on the best file zipping software.
- Check out more useful tips, tricks, and step-by-step tutorials on our Tech Guides section.

Zipping and archiving files is an excellent way of both saving disk space and facilitating the process of file transfers, especially when you are dealing with services that don’t allow the transfer of folders.
That’s where zipping can come in handy, since it basically transforms your folder into a singular file, and it also reduces its size to make the transfer itself faster and easier.
If you were wondering how to zip files with Windows 10, it can be done and it can be done with ease.
The only question is how advanced file compression we are talking about, as the built-in File Explorer compression isn’t exactly something you would call feature-rich.
That’s where third-party tools come into play, but you can also use some of your OS’s native features to perform the task.
So, if you want to know how to zip a file on Windows 10, we got your back. And, as a bonus, we offer a more complex approach for those of you who want to step up their compression game.
How do I make a zip file on Windows 10?
1. Use a third-party archiving tool
Using an alternative zip application such as WinZip is an effective approach since third-party tools obviously bring many more features when compared to the system utility.
It’s not just about the popularity of this tool, but it is really more than a just simple compression tool. It also allows users to share, manage, protect, and backup files.
WinZip is an all-in-one file manager that allows you to compress and decompress to save space on your hard drive, encrypt and password-protect your zip files and folders, manage and organize your files and so on.
Compatible with all major file formats, this tool allows provides you with a complete file management suite to handle your files effortlessly, share them, back them up and protect them according to your wishes.
Here’s a quick guide to zipping a folder with WinZip:
- Open the WinZip app
- Select the folder you want to compress with the tool’s pane
- Click the Add to Zip option
- Save your zip file in the desired location
Now, let’s quickly look at its key features:
- Compatible with all major formats including Zip, Zipx, RAR, 7Z, GZ, ISO, TAR, IMG, and more
- Encryption and password-protect ZIP files
- Integrated File Manager and File Splitter
- Data back-up and sharing options
- Powerful compression tools
- Extract multiple files
- Repair ZIP files
- Archiving tools
”WinZip”
”Zip
2. Use Windows resources
- Navigate to the location where files that you want to compress are stored.
- While pressing and holding CTRL on your keyboard, click on the individual files.
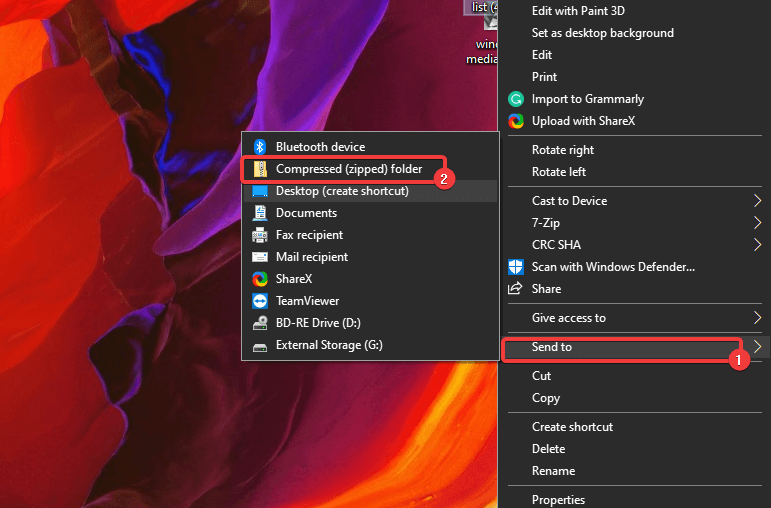
- After you choose what files are going to be contained in the compressed folder, right-click on one of the files and choose to Send to > Compressed (zipped) folder from the contextual menu.
- In case you want to unzip the newly-created zipped folder, just double click on it to open it.
- Once there, click Extract all and choose the extract destination. As simple as that.
3. Zip the file using command-lines
Unlike the previous solution where you didn’t need any third-party help, Windows 10 doesn’t come with a command-line zip program.
However, this can still be done if you use a third-party archiver that supports a command-line executable, such as 7-Zip.
This program is open-source, and while it may not have the same rich toolset as our previous entry, it still gets the job done.
It supports many different archive file formats, and it even has its own proprietary file format as well that provides you with superior compression ratios when compared to traditional zip files:
Here’s how you can use 7-Zip’s command-line executable to zip a file:
- Download and install 7-ZIp
- Add the path to 7z.exe to your PATH environment variable
- Within 7-Zip, open a new command prompt window and use the following command:
7z a -tzip {yourfile.zip} {yourfolder}By following these 3 listed solutions, you should be able to zip and unzip files in Windows 10 in no time.
Try out all of the methods, and let us know which ones did you find to be the most effective by leaving us your feedback in the comments section below.
[wl_navigator]


