FIX: Laptop camera doesn't work in Windows 10/11
![]() 3 min. read
3 min. read
![]() Updated on
Updated on
Share this article

Improve this guide
Read our disclosure page to find out how can you help Windows Report sustain the editorial team Read more

Some users have reported that camera on their laptop doesn’t work after the upgrade to Windows 10. Luckily, we have a couple of solutions for this problem, and I hope they’ll be helpful for you, if you’re facing this issue, as well.
What to do if Laptop camera doesn’t work in Windows 10?
1. Load BIOS Defaults
First thing we’re going to try is to load BIOS defaults, because if something is messed up in your BIOS, some devices, including camera are unlikely to work. To load BIOS Defaults, follow these steps:
- Restart your computer
- On the next startup enter BIOS settings (you can do that usually by pressing Del, but it depends of the computer)
- Find Load BIOS defaults option and press Enter (It’s usually in Exit tab, but if your BIOS is different, look for it on other tabs)
- Now log back to your computer and see if camera works now
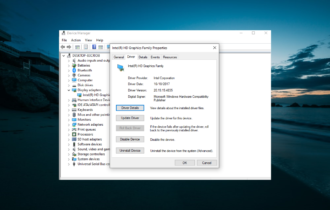
2. Reinstall Drivers
The next thing we’re going to try, and probably the most obvious solution from this article, is to reinstall camera drivers on your computer. In case you’re not sure how to do that, do the following:
- Go to Search, type device manager and open Device Manager
- Expand Imaging devices section, and right click on your camera
- Choose Update driver software, and if there are any updates, let the installer finish updating
- Restart your computer, and check if camera works now
You can also go to your laptop‘s manufacturer’s website and look for drivers for your camera.
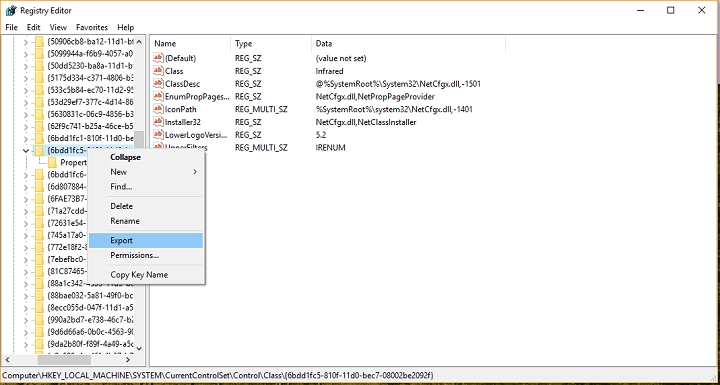
3. Registry tweak
The next thing we’re going to try is to remove LowerFilters and UpperFilters files from your registry, in order to make your imaging device work. Here’s exactly what you need to do:
- Reboot your computer and enter Safe Mode
- Navigate to C:windowssystem32drivers, and rename the file lvmvdrv.sys to lvmvdrv.sys.backup (if there is no such file, that’s fine, just move to next step)
- Now, open the Registry Editor (Go to Search, type regedit and press Enter) and navigate to the following path:
- HKEY_LOCAL_MACHINESYSTEMCurrentControlSetControlClass{6BDD1FC6-810F-11D0-BEC7-08002BE2092F}
- First thing first, create a backup of that Registry folder. Right click on {6BDD1FC6-810F-11D0-BEC7-08002BE2092F}, select Export and save it on the safe location

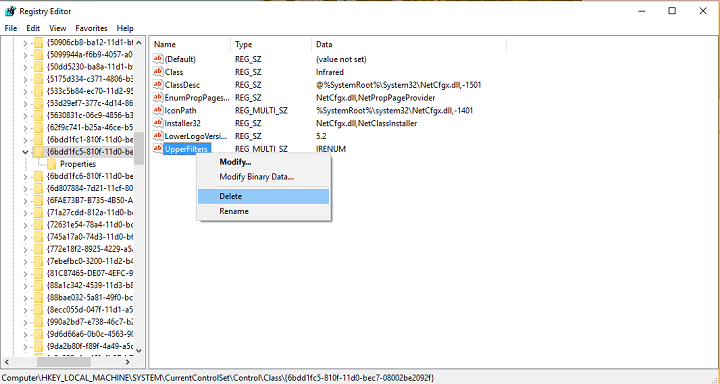
- Now when we created a backup of this registry folder, right-click on LowerFilters or UpperFilters on the right side of the scree, and delete it (in my case I had no LowerFilters, just Upperfilters, so i deleted Upperfilters only)

- Reboot your system, and check if your camera is working now (if something goes wrong, you have a backup of the registry folder, so just open it, and it will load the default registry values)
4. Reinstall Windows 10
If nothing else helps, and you really need to use your camera, you can try reinstalling your Windows 10 operating system. But before you do anything, create a backup of your files, because otherwise, if you make a mistake, you’ll lose everything. Of course, Windows 10 resetting options give you an option to choose whether you want to delete all your files or not, but extra certainty won’t do any harm. If you’re not sure how to reset your Windows 10, go to Settings>Update and Recovery>Recovery and go to Reset this PC option.
That’s it, I hope these solutions helped you to solve the camera problem on your laptop. If you have any comments, questions and suggestions, please reach in the comment section, below.