
If your IT administrator has enabled it, you might notice a “Shifts” experience in Microsoft Teams. This is a schedule management tool that’s intended for managers and firstline workers (who are those folks who come into contact directly with customers or the general public.) It is included with Teams plans for no additional cost and replaces Microsoft’s old Staff Hub experience, too.
But, it is not just for firstline workers. With Shifts, managers are able able to put together schedules, swap out shifts, create groups, put in time-off requests, and even keep a time clock. The feature can be quite useful for small businesses as it is heavily optimized for the Microsoft Teams experience. Here’s a comprehensive look at how you can get started with it to manage you and your employee’s work hours and schedules.
Opening the Shifts app and getting started with managing new shifts
To get started, you’ll have to open the Shifts app. It’s built into the left side of Teams. If you don’t see it there, you’ll have to click … More apps and find it on the list. Once there, you’ll see a list of Shifts assigned to you for the current week. If nothing is there, then you need to have a manager or admin assign a shift to you, or ask them to add one through the app.
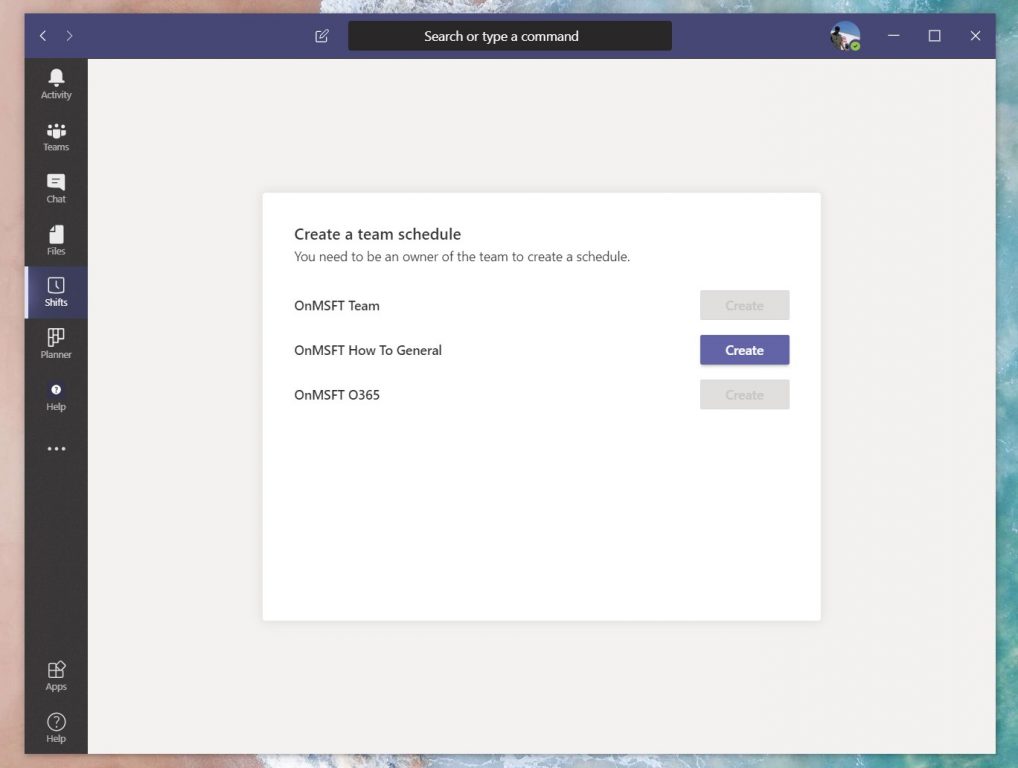
We’re about to discuss how managers or admins can do that next, but keep in mind, that these next steps are typically intended for managers or those with the right admin permissions only. Managers can only create a schedule in Shifts if they’re set an owner of the Office 365 Team. Everyone else will still have access to Shifts, but will only have options to see their own shift for the week or manage time off and other requests.
If you are a manager and have the proper permissions, to continue with creating a shift, you’ll want to choose Create from the list of teams on the page. Once you select Create you’ll be asked to select a time zone for the shift. If you happen to be working globally, as we are here at OnMSFT, you might want to choose a time zone that everyone can understand. As we’re writing about Microsoft, we use the Pacific time zone, which the Redmond, Seattle, company is based in.
You’ll then want to give Teams some time to create a schedule. When done, you’ll be prompted to take a tour. This shows you how you can add team members, create shifts, and more. We’ll get into those in the next sections.
How managers can create shifts and schedules
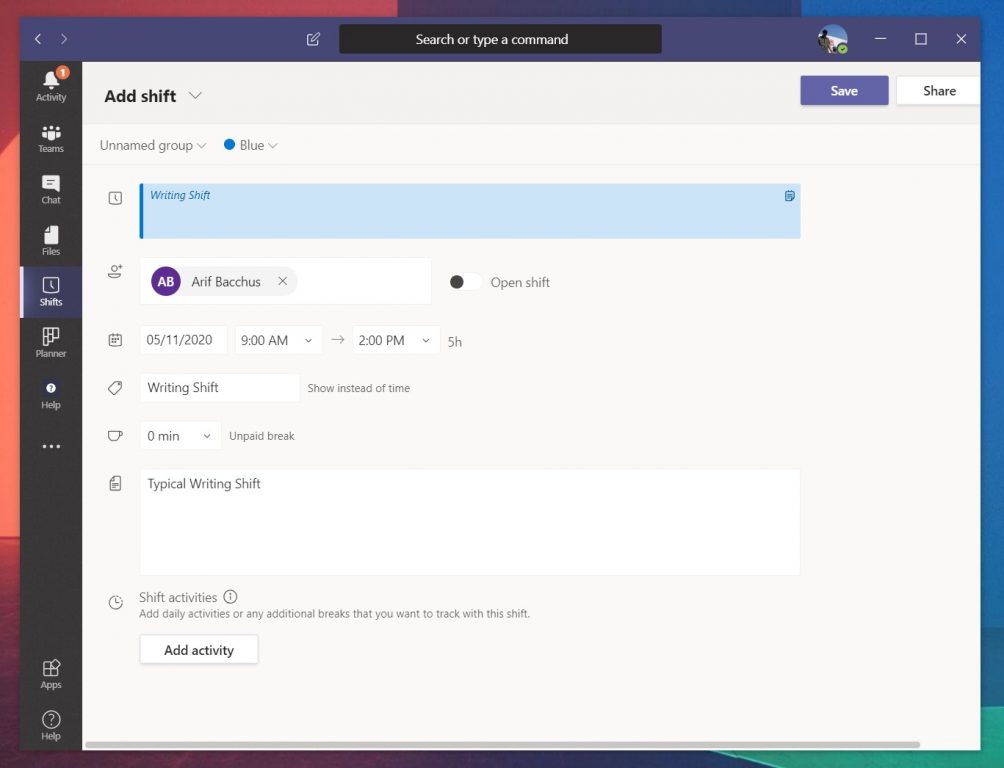
Managers and those with the right Office 365 permissions can create shifts and schedules for employees with Shifts in Microsoft Teams. This can be done by clicking the “add people to the group” button. This icon shows up as a picture of a person on the far right side of the screen. You’ll be able to add anyone to the shift and schedule as long as they have a valid profile under your Office 365 plan.
Once someone is “added” to the group, you can create a shift for them. To do this, just double click on an empty slot in their schedule for the week. By default, this schedule will be divided up into the days of the week. From there, you can double-click a specific day and fill out some details about the specific shift. This includes Start and finish times, a color for a specific theme (or activity) some notes about what the shift is for. You also can add some more specific activities not covered by clicking the Add Activity button.
Once done, the shift can be added to the schedule by clicking the Save button. You always can go back and edit the details by right-clicking in the schedule and choosing Edit Shift. If you want to copy it over to another day, too, (which we do because we have a lot of similar writing shifts here at OnMSFT,) you can right-click, choose Copy and then right-click where you want to place the shift and choose Paste.
If you’re looking to customize the schedule a bit, you can enter a name or additional details into the box above the shift slots. You also can add some notes under the Day Notes section to give your self some additional information.
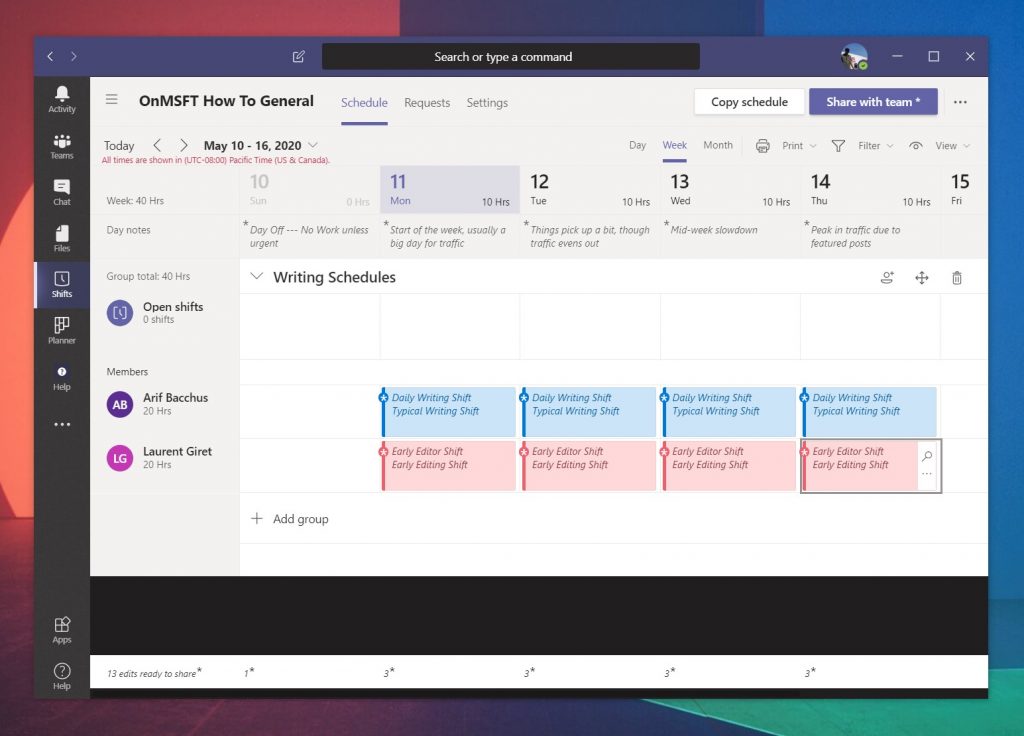
You also can create some open shifts by clicking the Open Shifts area. This will let you create “free” shifts before you assign them to your other members. When you create an open shift, you’ll be able to assign it to team members. Simply click the … under it, and choose Assign open shift.
There are also additional controls to filter the view by members, to print the current view, or change the view based on shifts, availability, or groups. You even can change to a day, week, or month view, if need be.
Sharing shifts with your Team
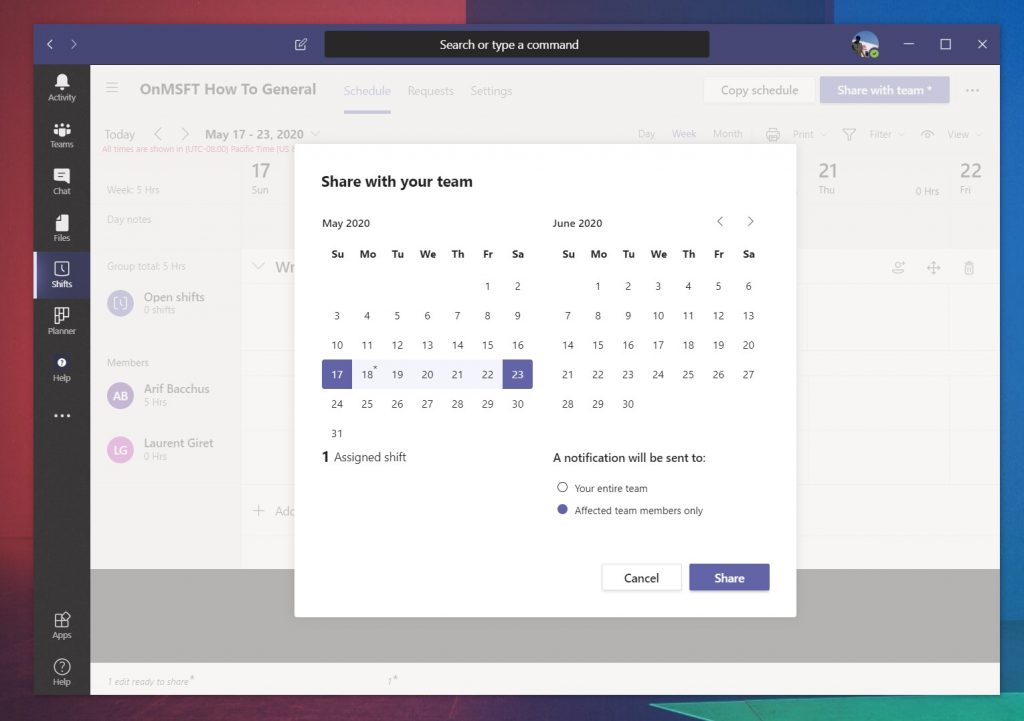
Once a shift is created, it doesn’t become official or appear in your employee’s version of Teams until it’s shared. You can do this by clicking the purple Share with team button at the top right of the screen. This will then give you additional controls on how to share it with team members. You’ll see some options to select the days that you want to share with team members. Feel free to select a range you want to include. They’ll also be checkboxes to notify the entire team (which is everyone listed on the schedule) or just the people who have been affected (the people who you just assigned shifts.)
Managing or making time off and other requests
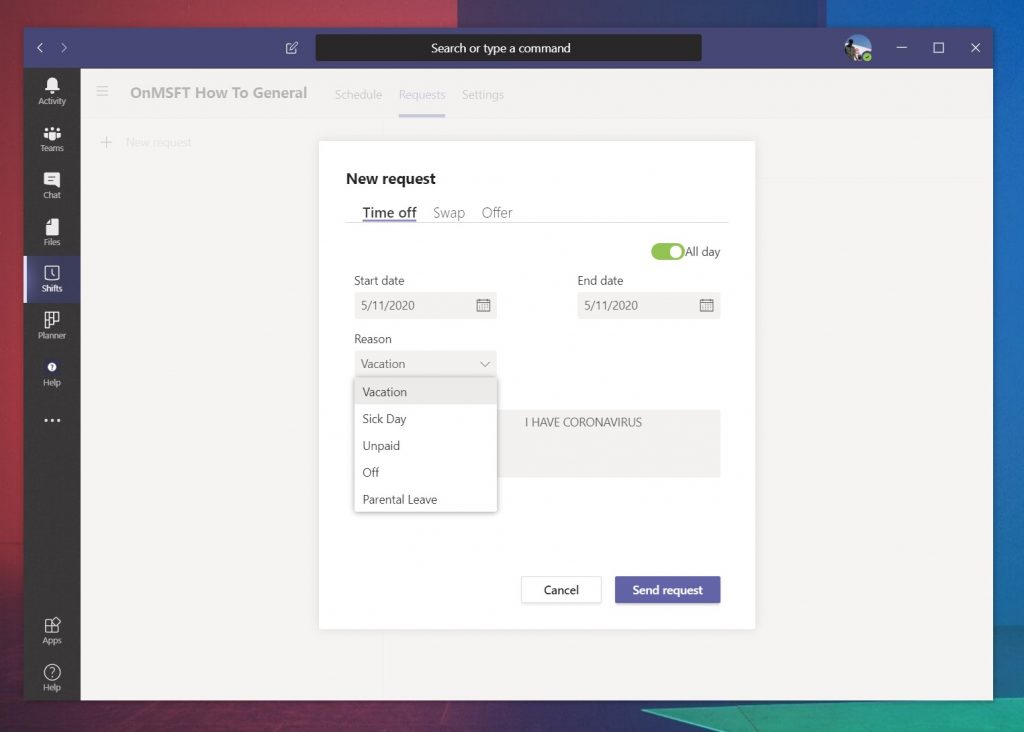
Shift and schedules created, your Teams users and employees will have new options to see their schedule when clicking the Shifts section of Teams. In addition to viewing their schedule, though, they also can request time off and put in other requests. This is done by clicking the icon in the top right corner of the screen that is shaped like a clock with a question mark.
Users can put in a request for time off, and then check the status of it. They also can cancel it, if need be. They also can request to swap their shift or make an offer for another too. There’s a nice UI which lets them pick a reason, leave a note for this, as seen above.
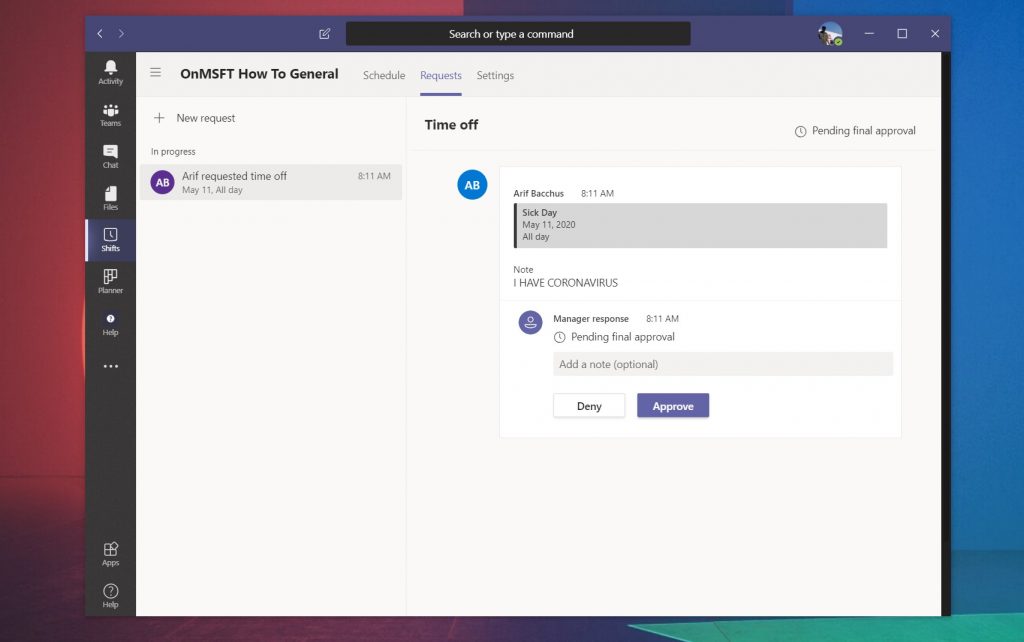
As a manager or admin, it will be up to you to approve these requests. You can do this by clicking the Requests tab under Shifts. You’ll see it under In progress. You can then check on it on the right side of the screen. There will be options for you to approve or deny it, as we have left above. When you approve as a manager, the user will get notified about it.
Setting up the Time Clock in Shifts
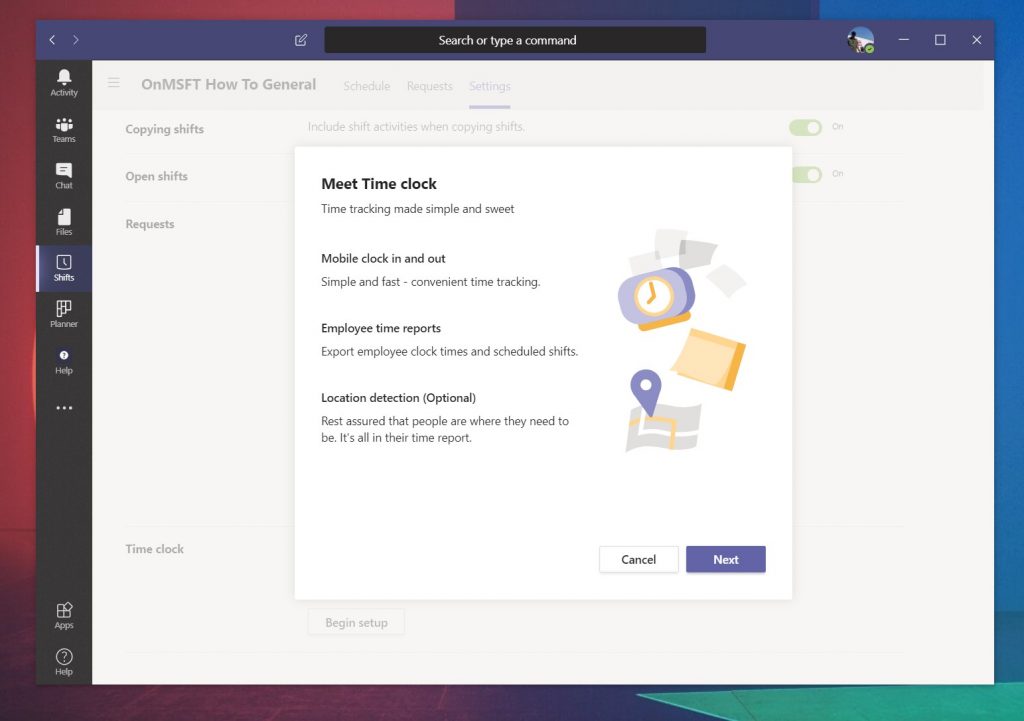
The final aspect of Shifts in Teams that we’ll be covering is the Time Clock. This Time Clock option will let your employees clock in and out using their mobile devices. As a manager, you also can set up optional location detection, too. This will detect where employees are when they clock in and out. These settings can be changed or removed at any time by clicking the Settings tab in Shifts in Teams. You’ll see a Begin setup button there to set it up.
Your employees can use the Time Clock in Microsoft Teams on their iOS or Android mobile devices. When they click it, they’ll be able to come on the clock, and then come off the clock for breaks by revisiting the Teams app. They’ll have an option to confirm it, too. You’ll then be able to export it as an Excel spreadsheet and check it out and download the report of clock in and outs via the same Time Clock Section we mentioned above.
How will you use Shifts?
As you can see, Shifts in Teams is a pretty comprehensive solution. If you don’t have access to payroll services like ADP, it can be used to help keep track of work hours, and so much more. It’s also simple to setup, and doesn’t take too long to get used to. Did you find out guide helpful? Let us know in the comments below, and be sure to stay tuned to OnMSFT this week as we dive deeper into the Shifts experience.