How to use PowerToys Color Picker utility on Windows 10 to find the perfect color
![]() 4 min. read
4 min. read
![]() Published on
Published on
Share this article

Improve this guide
Read our disclosure page to find out how can you help Windows Report sustain the editorial team Read more
PowerToys is such a handy utility that it’s hard to pick which specific utility is the most useful for your productivity. Keyboard Manager, Image Resizer, and PowerRename are all great utilities by themselves, but discovering another PowerToys utility that you didn’t know you needed is refreshing.
The PowerToys Color Picker is great because it gives you a system-wide color identifying utility on Windows 10. Color Picker allows you to get the configurable color information for photography, web and graphic design, and more.
Getting started with PowerToys Color Picker
Of course, you can’t use Color Picker until you enable Color picker in PowerToys, so this is what you need to do.
1. Download and install PowerToys from the GitHub website.
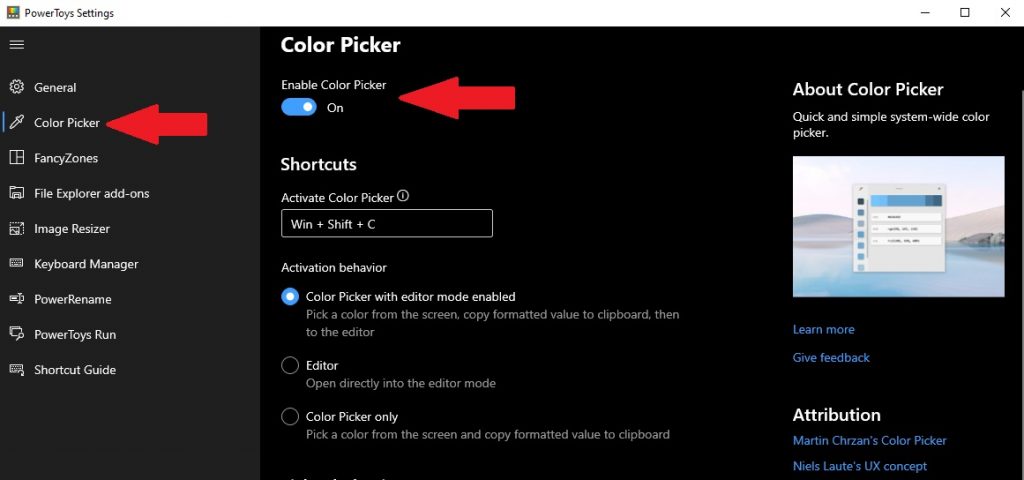
2. Enable Color Picker
3. Use the Color Picker activation keyboard shortcut to find the color value of the color you want.
Color Picker Options
If you want to change the Color Picker activation shortcut to a different one, you can. Just keep in mind that whatever shortcut you use, it must use a combination of Windows key, Ctrl, Alt, and/or Shift.
Once activated, you can decide what you want for Color Picker’s activation behavior. You have three options each with their own description as shown:
1. Color Picker with editor mode enabled
2. Editor
3. Color Picker only
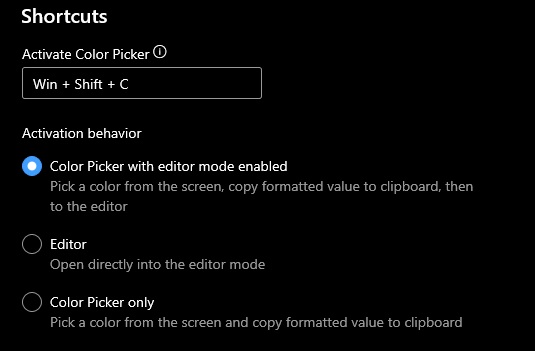
Color Picker with editor mode enabled is on by default and is a good option to use when you are using the PowerToys utility for the first time. It is also a good idea to leave the shortcut as it is so it doesn’t interfere with other shortcuts you have for other programs to prevent a keyboard shortcut conflict.
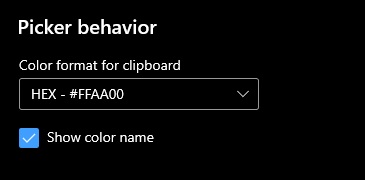
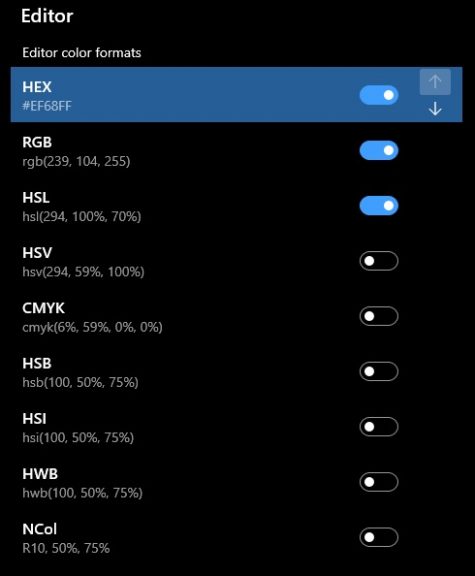
The final options in the Color Picker settings are the ability to turn on and off different Editor color formats and change the display order of the color formats. Color Picker is such a rich PowerToys utility that it is notable that they give you the ability for more color format information options than might be needed.
Underneath the Shortcuts options is Picker behavior. Here, you choose what color format gets copied to your clipboard on Windows 10. One thing that I did enable was the checkbox to Show color name. I enabled it because I found it helpful when learning how to use Color Picker for the first time.
I am by no means an expert, so I can’t claim to know what all the color values mean or what color editing options are needed for different image editing apps. However, the amount of color format options available shows that Microsoft has you covered by offering more options than you could possibly need.
Once you have configured the settings to your preferences, you can close the PowerToys Settings window. Now it is time to use the Color Picker on Windows 10.
Using Color Picker on Windows 10
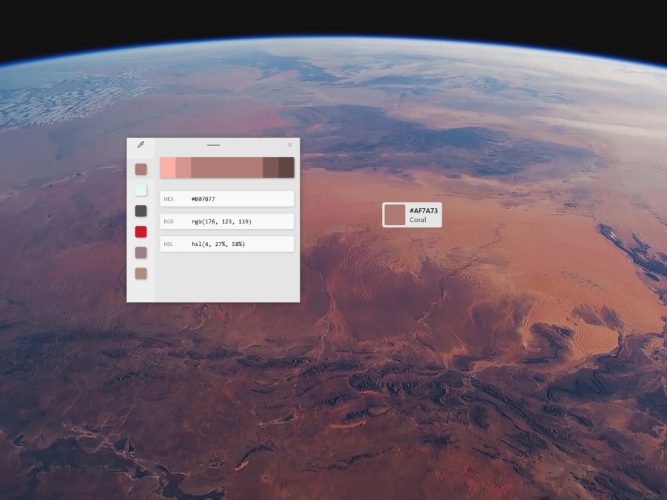
Once you choose all the settings you need, it’s time to use Color Picker in PowerToys on Windows 10. All you need to do is use the Color Picker activation keyboard shortcut (Windows Key + Shift + C) and you can pick anything on your Windows 10 desktop to get real-time color information. Here is an example of Color Picker in action below.
Now, you should know how to use Color Picker to find any color you want using your Windows 10 PC. If you run into any trouble, you can refer to Microsoft’s Color Picker technical documentation for more information.
What do you use to identify colors on Windows 10? Let us know in the comments.