How to Record Screen with Audio in Windows 10 [Quickest Way]
Use the built-in tools for quick & high-quality videos of your screen 🔴
![]() 5 min. read
5 min. read
![]() Updated on
Updated on
Share this article

Improve this guide
Read our disclosure page to find out how can you help Windows Report sustain the editorial team Read more
Key notes
- Recording your screen in Windows 10 is quite easy since the OS natively supports it.
- Make sure your system meets the minimum hardware requirements for the procedure to work.
- You can always use the Windows Game Bar in order to achieve your goal in no time.
Windows 10 is a great operating system, bringing many new features and implementations. If you ever wondered how to record the screen with audio in Windows 10, in today’s article we’re going to show you how to do it.
In order to capture your screen in Windows 10, you must use software that Microsoft incorporated into the operating system.
This software will come in handy for all folks that would like to do it. We are talking about the Xbox One screen recorder also known as XboxOne DVR, which is part of the Xbox Game Bar.
Obviously, people need to record their screens for a variety of reasons, not only gaming, since it is great for presentations, online school, and work.
This tool allows you to record your screen on Windows 10 on any occasion (if your GPU meets the recommended requirements). And all within the system, without any 3rd-party software.
Does Windows 10 have video recording software?
Yes. Windows 10 has the Xbox Game Bar pre-installed on all devices that support it.
It was created specifically to record gaming sessions, but you can use it to record anything you do on your PC. It’s a good tool to make instructional videos or even presentations.
Does Windows 10 screen recorder record sound?
Yes. The built-in Windows Game Bar recording software lets you record audio as well. It offers users the possibility to record system audio as well as microphone audio.
Both can be recorded at the same time, for highly interactive videos, but you can also pick just one, or not record audio at all.
 Tip
Tip
How can I easily record the screen with audio in Windows 10?
Record the screen in Windows 10 using Xbox Game Bar:
In order to capture your screen in Windows 10, you must use software that Microsoft incorporated into the operating system.
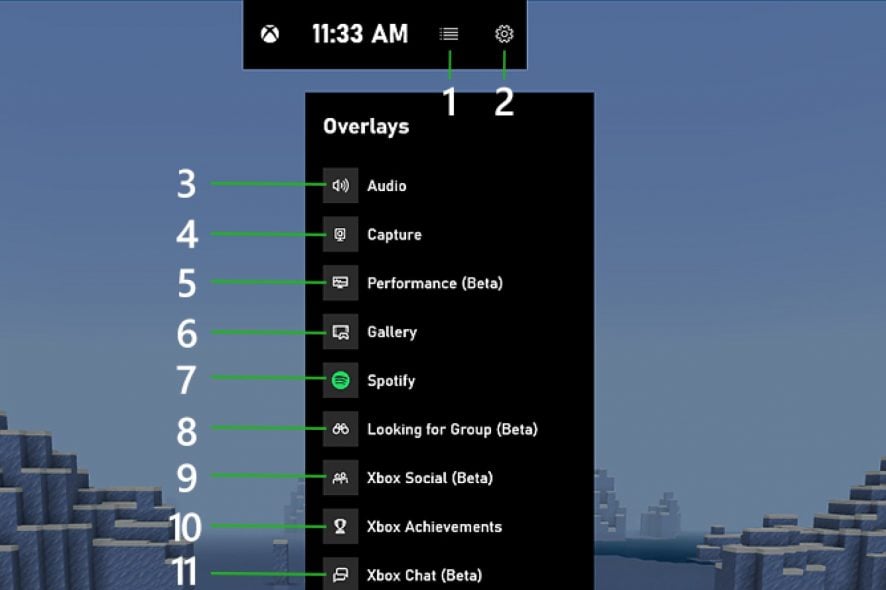
1. Press Windows Key + G at the same time.
2. Select Yes, this is a game.

3. In the Settings, you can set up recording features to your liking.
- Background recording
- Timer
- Clip length
- Customizable shortcuts
- Audio, as desired
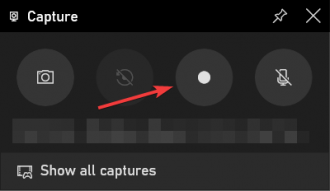
4. Click on the webcam icon to bring up the Capture menu.
5. Once you’ve set up everything, just click on the circle and the recording should start.
6. To stop recording, just bring back command panel (Windows Key + G) and click the Stop button.
7. Alternatively, you can press the Windows Key + Alt + R keyboard shortcut to start/stop recording.
8. All of your recordings will be stored in the following path: C:/Usersuser/name/Videos/Captures
This is how you can record your screen in Windows 10 with audio without having to install any third-party software.
It’s important to mention that you can use this tool to record your screen on laptops as well, as long as your laptop meets the hardware requirements.
Recommended system requirements
Note that you need to make sure you have the appropriate GPU. That’s the main reason why the below procedure is primarily intended for gamers.
These are the requirements you have to meet in order to record the game/screen footage:
- The PC Video card must support the following encoders:
- Intel Quick Sync H.264
- NVidia NVENC
- AMD VCE
- AMD: AMD Radeon HD 7700 series, HD 7700M series, HD 8500 series, HD 8500M series, R9 series, and R7 series or later
- NVIDIA: GeForce 600 series or later, GeForce 800M series or later, Quadro Kxxx series or later
- Intel: Intel HD graphics 4200 or later, Intel Iris Graphics 5100 or later
If yours isn’t capable enough, perhaps it’s time to get a new one. Our list of best gaming laptops will provide the highest-performing products on the market at the moment.
 NOTE
NOTE
Screen recording affects performance
You’ve seen how simple it really is to record your gameplay on the screen, yet we have to mention that doing this will most likely affect your PC’s performance.
Depending on your computer’s capabilities and power, your in-game FPS will either slightly drop or drastically take a hit.
If your device can barely run a game with optimal FPS, trying to record gameplay on top of that will probably be too much to handle.
There are plenty of tools that can record your screen nowadays. Some are lightweight, some focus on performance, and some record higher resolutions, and 60 FPS.
Just check them out in our detailed list of the best screen recording software on the market and choose something that is useful to you.
Taking screenshots
To take screenshots, simply press the PrtSc key on your keyboard while you’re gaming, and the game will immediately create a screenshot into a designated directory.
Moreover, there are other ways to take screenshots on Windows 10. Here’s a list of different ways to take screenshots for you to check out.
If you’re not satisfied with the Xbox Game Bar or your hardware simply does not support it, you might want to try using specialized software.
How to record your screen at high FPS
Alright, since we talked about the methods of recording your screen, we have to tell you about the main differences between a video that has 30 FPS and one that has 60.
Firstly, we should briefly define what FPS is. The official term is Frames Per Second, and it’s pretty self-explanatory. It’s the number of frames registered in the course of an entire second.
Obviously, a higher number of frames will result in a more detailed movement. The image will flow better and smoother, more naturally.
Usually, a higher amount of FPS requires beefier specs, but it is entirely worth it. Clearly, a video that plays at 60 FPS will be more enjoyable to watch than one that only plays at 30.
However, when capturing your screen at 30 FPS, the video will occupy less space, so you basically trade image quality for more space.
Here is how you can record your screen at 30/60 FPS:
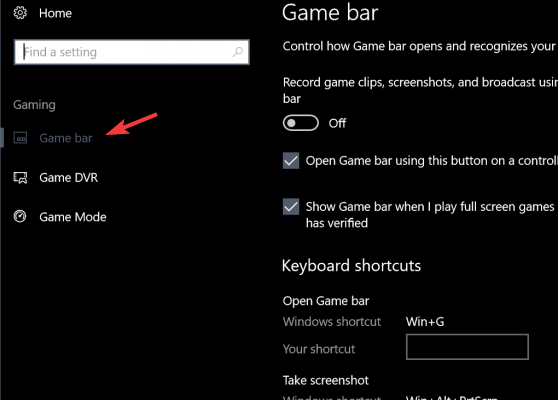
- Press the Windows Key + S and type in Settings.
- Select Gaming.

- Then, click on Game DVR.

- Scroll to Video Frame Rate and select either 30/60 FPS.


As you can see, recording in 60 FPS is quite easy. All you need to do is toggle the appropriate settings in the Windows settings. Additionally, you can change the quality of the video in the same place.
With this being said, make sure you follow our steps, and if you encounter any issues, feel free to tell us in the comments section below.