Disable Timeline in Windows 10 April Update to protect your privacy
![]() 2 min. read
2 min. read
![]() Updated on
Updated on
Share this article

Improve this guide
Read our disclosure page to find out how can you help Windows Report sustain the editorial team Read more

Microsoft introduced a very interesting and useful feature with the Windows 10 April Update. Timeline allows you to sync your PC activities on your phone. In this manner, you can resume your tasks and continue where you left off.
However, many Windows 10 users don’t want to use Timeline due to privacy concerns. Indeed, if you connect to your Microsoft Account website, you’ll find all the data collected about your activities. Obviously, some users don’t like that and want to disable Timeline. Here’s how you can do that.
How to disable Timeline in Windows 10
Navigate to Settings > Privacy > Activity History. There, you’ll find two options:
- Let Windows collect my activities from this PC
- Let Windows sync my activities from this PC to the cloud
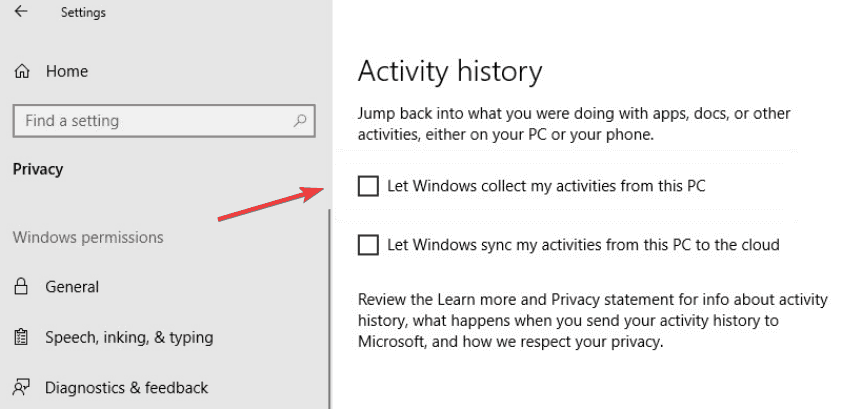
Make sure to uncheck both to disable Timeline. You can then clear your activity history by going to Settings > Privacy > Activity History > Clear activity history. Click on the ‘Clear activity history‘ button to delete all the date Windows collected about your activities.
In case you want to be secure while surfing the internet, you will need to get a full-dedicated tool to secure your network. Install now Cyberghost VPN and secure yourself. It protects your PC from attacks while browsing, masks your IP address and blocks all unwanted access.
The privacy debate around Windows 10
There has been a fierce debate around Windows 10’s privacy issues ever since Microsoft released the OS. Many said the company collected user data without their consent and asked the company many times to stop its telemetry services.
The Redmond giant listened to its customers and introduced a more transparent privacy policy with the Windows 10 April Update. The new privacy settings lay out clearly how and why Microsoft gathers particular pieces of information about Windows 10 users.
Many users said that Microsoft still has a lot of work to do in order to refine its privacy policy, but agreed the company already took a step in the right direction.
RELATED STORIES TO CHECK OUT: