How to Quickly Change the Drive Letter in Windows 11: 5 Ways
Here, you will find 5 modes of changing the drive letter in Windows 11
![]() 4 min. read
4 min. read
![]() Updated on
Updated on
Share this article

Improve this guide
Read our disclosure page to find out how can you help Windows Report sustain the editorial team Read more
Key notes
- There are various ways you can change drive letters in Windows 11 to a more preferable alternative.
- The Windows 11 Settings app enables users to quickly change a drive’s letter with its Change drive letter option.
- You can change a drive’s letter in Windows 11 with a cmd command.
Windows 11 automatically assigns letters to drive partitions and external storage devices. The primary hard drives on PCs always have the letter C, but letters for other drives can vary.
Some users who partition drives may prefer to choose letters for them. You can change a drive letter in Windows 11 with alternative methods.
How can I change a drive’s letter in Windows 11?
1. Change a drive’s letter with Settings
- Press the Windows logo icon and select Settings.
- Click System and select Storage to view an overview of drive usage.

- Select the Advanced storage settings navigation option.
- Click Disks & Volumes to view drives in Settings.
- Select a drive for which to change the letter.
- Click the Properties button for the drive.

- Press the Change drive letter button.

- Then select a different letter on the Choose which drive letter to use drop-down menu.
- Click OK on the Change Drive Letter window.


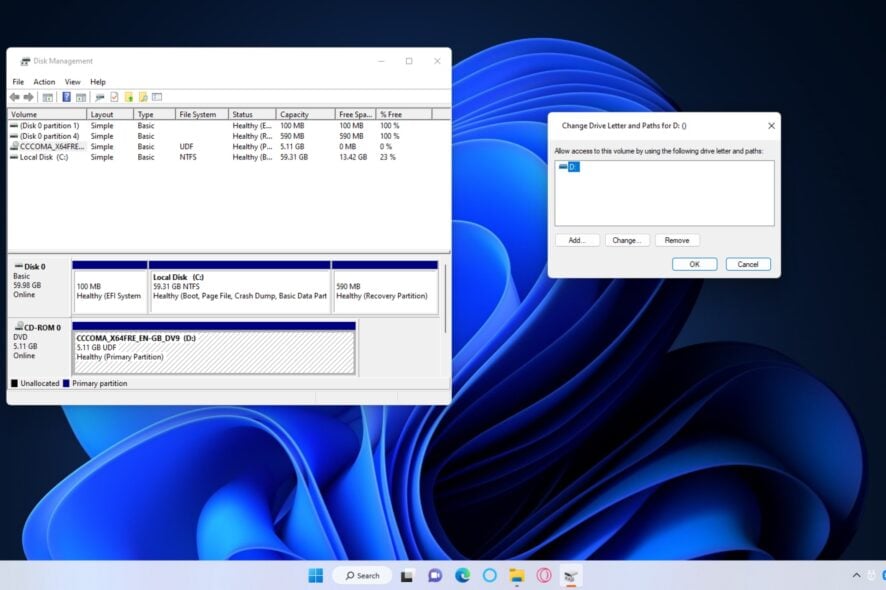
2. Change a drive’s letter with Disk Management
- To view and access the Power User menu, press the Windows key + X combo.
- Select Disk Management to bring up that drive management tool.

- Right-click a drive you want to edit the label for and select Change Drive Letter and Paths.

- Click the Change button.

- Then select an alternative letter on the drop-down menu.

- Click OK to save your drive’s new letter setting.
- Select Yes on the confirmation dialog box you’ll see.


3. Change a drive’s letter with PowerShell
- Click the Search incon, input Windows PowerShell to locate that command-line app.
- Click the Windows PowerShell search result with the mouse’s right button and select Run as administrator.
- Then type the command into PowerShell and press Enter:
Get-Disk
- Next, change a drive’s letter by executing this command:
Get-Partition -DiskNumber 0 | Set-Partition -NewDriveLetter F


You’ll need to change the disk number (0) in that command to an actual drive number on your PC. Also, change the drive letter F to one of your choosing.
4. Change a drive’s letter with Command Prompt
- Open Windows’ Search icon, type Command Prompt, and select the Run as administrator option.
- Type in the following text for activating a Command Prompt utility:
diskpart - To view drives, execute this command:
list volume
- Execute this command with an actual drive number included:
select volume X
- To change a drive’s letter, execute the following command:
assign letter=X


Replace the X in the volume command with an actual drive reference number. Remove the X in the assign letter of preference command and replace it with any alternative one of preference.
5. Change a drive’s letter with Drive Letter Changer
- Download and install Drive Letter Changer.
- Press Windows key + E and navigate to the folder containing the dChanger ZIP.
- Right-click the dChanger ZIP to select an Extract All option for unzipping that archive.

- Select the Show extracted files and Extract options to unzip the dChanger archive.

- Double-click the dChanger.exe to open Drive Letter Changer.

- Click a drive to edit in the software’s window.
- Select the Change Drive Letter option.

- Choose a letter on the menu.
- Select Yes to confirm you want to change the drive’s letter.


Can I also rename drives in Windows 11?
Yes, you can change a drive label to something more preferable via File Explorer and Settings. This is how you can change a drive’s label in File Explorer.
- Open File Explorer by clicking the taskbar button shown below or with the Windows + E key combination.

- Then select This PC in Explorer.
- Right-click a drive to rename and select Properties.

- Click the General tab in the drive properties window.
- Enter a new label for the drive in the text box.

- Click Apply to save the drive’s new name.


So, you don’t have to stick with whatever letters Windows 11 gives to your PC’s drives. Changing a drive’s letter with any of the above methods is quick and easy.
However, changing a drive’s letter can cause file referencing issues. So, users must change letters for new drives that don’t include lots of software and files.