
Back in June of 2019, Microsoft introduced a read receipts functionality for Microsoft Teams. Similar to what you experience on other messaging apps, these read receipts give you a visual cue to let you know when the person you’ve sent a message to, actually opened and read it.
The feature slowly rolled out and is turned on by default, but users do have complete control if they want to use the feature or not. In this Office 365 guide, we’ll dive a bit deeper and explain how you can configure the option.
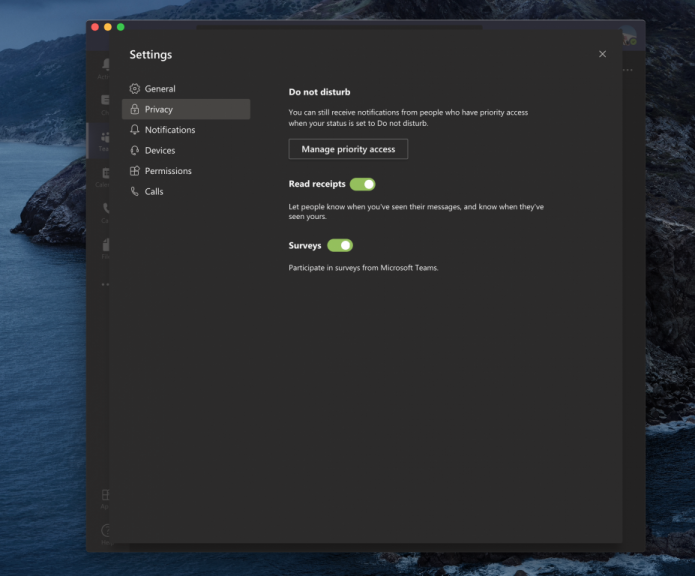
How to turn off read receipts
As we previously said, read receipts are turned on by default in Microsoft Teams. When you send a message in either a 1:1 or group chat, you’ll see a checkmark to indicate it was sent. When the recipient reads it, you’ll then see the checkmark turn into the shape of an eye, to indicate it was read. If this troubles you, you can actually disable it via the Microsoft Teams app on MacOS, Linux, or Windows 10.
- Click your profile icon in the top right corner of the screen
- Click the settings icon, it’s the fourth from the top
- Close Privacy from the list on the left-hand bar
- Toggle the switch for read receipts to off
Keep in mind that if you’re chatting with someone who has read receipts turned off, but you still have the feature turned on, you still won’t see read receipts from that person. You also won’t get a read receipt if someone sees your message in a notification or in their Activity feed, or if they reply via the Toast Tile in Windows 10 or the Banner notification in Mac OS. Read receipts only work if the recipient replies directly from within the chat.
Seeing read receipts in a group chat

If you’re looking to see who has read your message in a group chat, there is a read by option in the chat. Once everyone has seen your message, you’ll get the seen confirmation, which is the eye-shaped icon. You can then see who has read your message by going to that message, selecting more options and choosing the read by option. You’ll then see a list pop-out on the left side.
Administrative options for configuring read receipts

The options we described above are for the user. Microsoft Teams administrators, however, have full control over the feature as well. If an administrator doesn’t want the user to have read receipts, they can change the admin portal value to read receipts to “off.” In the event that an admin wants everyone to have read receipts, the value can be changed to “everyone.” Here’s how to do that.
- Visit the Microsoft Teams admin center
- Click the messaging icon on the left side of the screen, it’s the eighth one from the top
- Click on your messaging policy name and then click the edit icon on the top
- You can then see the read receipts option appear. You can choose an option from the drop-down menu, as we described.
More on read receipts
It might be useful for an administrator to turn off read receipts in situations where there are many people in one chat. In this situation, having read receipts on might create confusion within users, and can overwhelm the messages. The read receipts are better used in situations with smaller groups and in private chats where communication is more important. You can learn more about these read receipts here at Microsoft, and feel free to check out our Microsoft Teams hub for all the latest news and information.