How to Check RAM Type in Windows 11 [Quick Steps]
Find out everything about your RAM memory
![]() 5 min. read
5 min. read
![]() Updated on
Updated on
Share this article

Improve this guide
Read our disclosure page to find out how can you help Windows Report sustain the editorial team Read more
Key notes
- To keep your PC constantly running on normal terms, checking RAM on Windows 11 is always a good idea.
- The easiest way to do so is through the OS's Settings menu.
- Command Prompt also proves to be extremely efficient in achieving your goal, if you want to find out the RAM type as well.

RAM refers to Random Access Memory and represents a physical chip installed on the motherboard of your PC.
This piece stores all the temporary information to access all the programs and software stored on your computer. Also, it functions as primary storage.
It seems like Microsoft users are interested in finding out how to check RAM on Windows 11. Before anything else, you should know that the available methods won’t require experience.
Today’s article will show you the easiest ones, which will definitely help you whenever you need to check the Random Access Memory. But let’s see first why you should do it.
Why should I constantly check the RAM on Windows 11?
The RAM capability is one of the most significant Windows 11 requirements. So it is always important to verify it and make sure it allows your OS to run in proper conditions.
Also, it seems like sometimes games are crashing after adding RAM. Thus, checking its usage is important to make them properly run.
Remember that running out of RAM can get your device into trouble, affecting its performance. In these terms, constantly checking it represents efficient prevention.
In addition, if you’re interested in how to make Windows 11 faster and more responsive, do not hesitate to check out our related guide.
How can I check RAM on Windows 11?
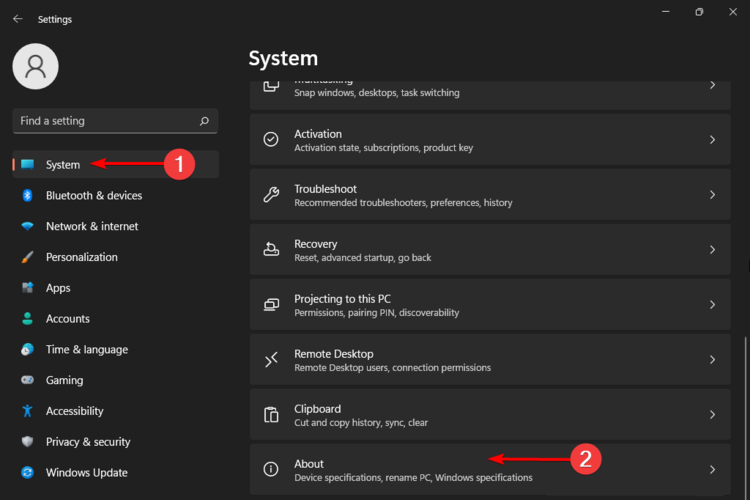
1. Use System Settings to find RAM information
- Hit the Windows key, then navigate to the Settings menu.

- Click on System, then, in the right window pane, scroll down until you find the About section, then click on it.
- Under the Device specifications section, you’ll be able to see the installed RAM on your PC.


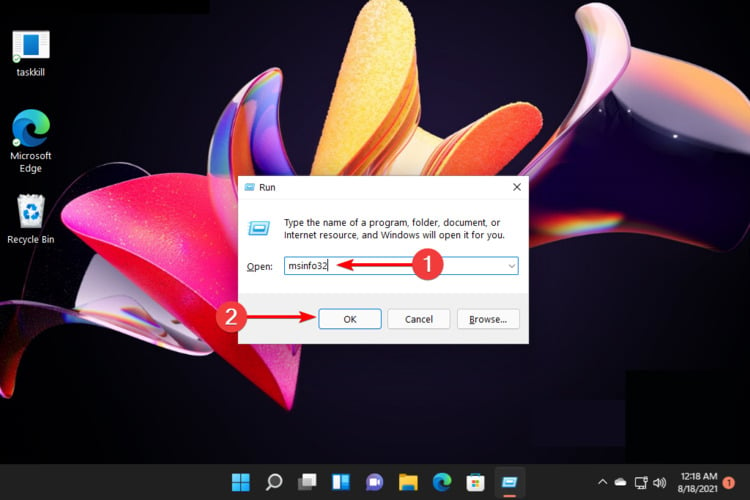
2. Check how much RAM you have via System Information
- Use the following keyboard shortcut: Windows + R.
- In the opened run dialog box, type msinfo32, then click on OK.
- Click on System Summary listed in the left window pane.
- On the right window side, look at the following information: Installed Physical Memory (RAM), Total Physical Memory, Available Physical Memory, Total Virtual Memory, Available Virtual Memory.
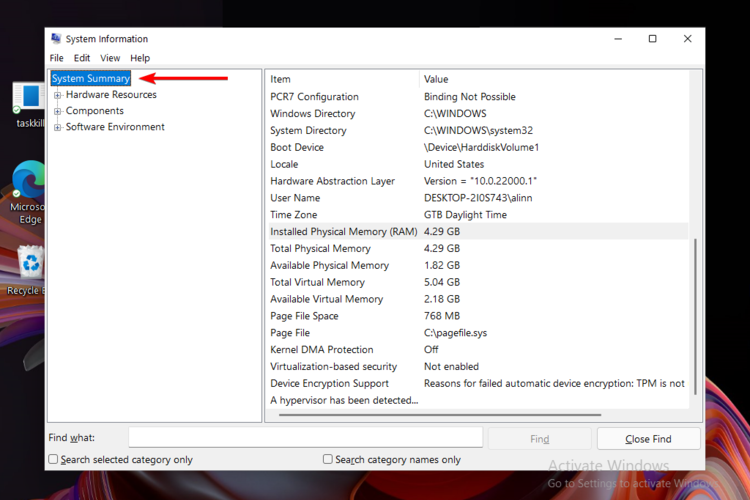
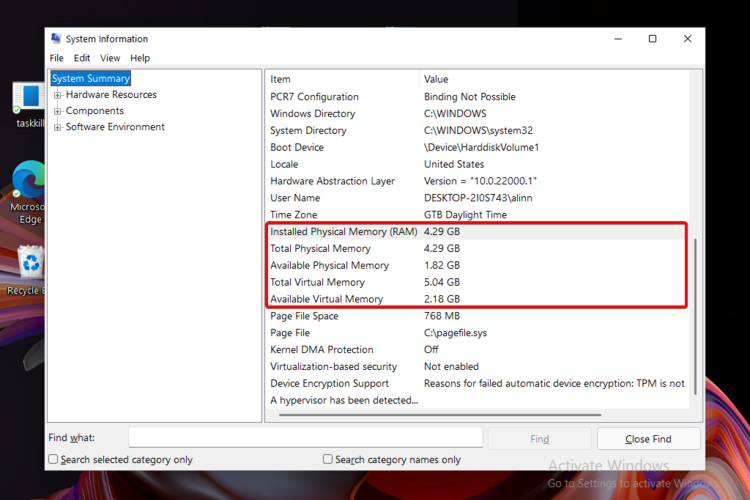
If you wonder what each of the above memory information means, take a look at the following list:
- Total Physical Memory – It refers to the fact that some amount of your installed RAM is allocated for the hardware to function. So it will always be less than your installed RAM and will be the exact amount your OS would be able to access.
- Available Physical Memory – In this case, the amount of RAM is the same as the one currently not already in use by your device. It’s available to be allocated to other programs and/or services. Here, the value depends on the specifications of particular machines.
- Total Virtual Memory – It hasn’t any physical form on the motherboard. It is an unused part of your hard drive used as an addition to the physical memory to compensate for the amount of Physical Memory your computer lacks.
- Available Virtual Memory – This one indicates the Virtual Memory is not currently in use. It is available to be allocated to programs and services.
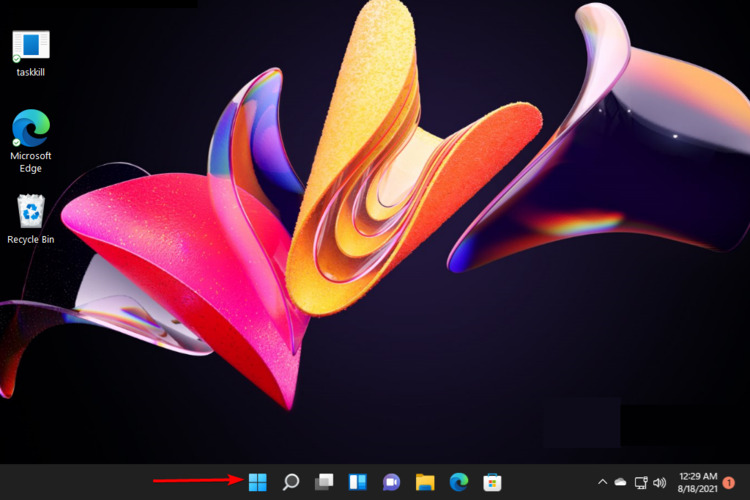
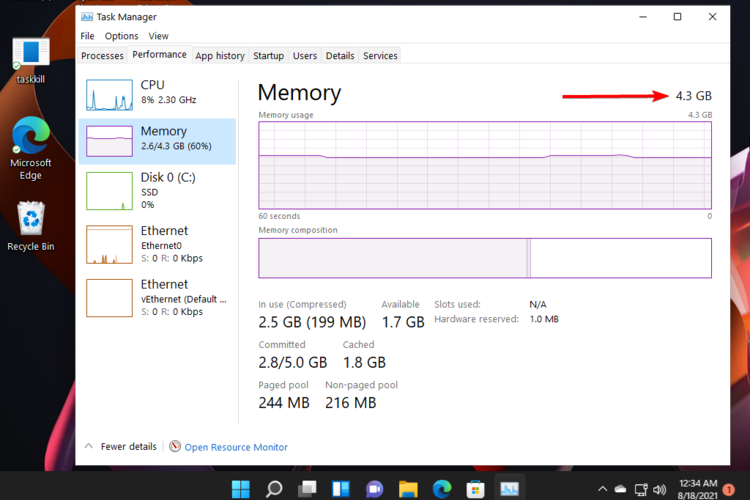
3. Use Task Manager to check RAM
- Click on the Windows icon (from your desktop taskbar).
- Search for Task Manager, then click on it.
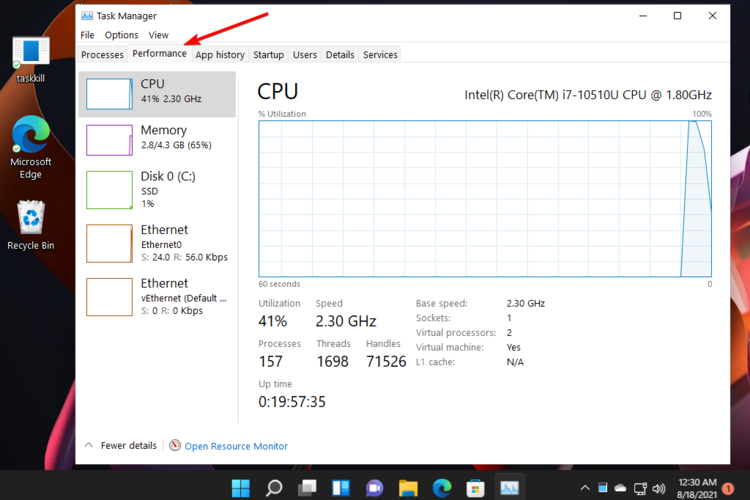
- Press on the Performance tab.
- From the left window pane, select Memory.
- In the right upper section, you’ll be able to see the total available RAM for your system along with the RAM type.
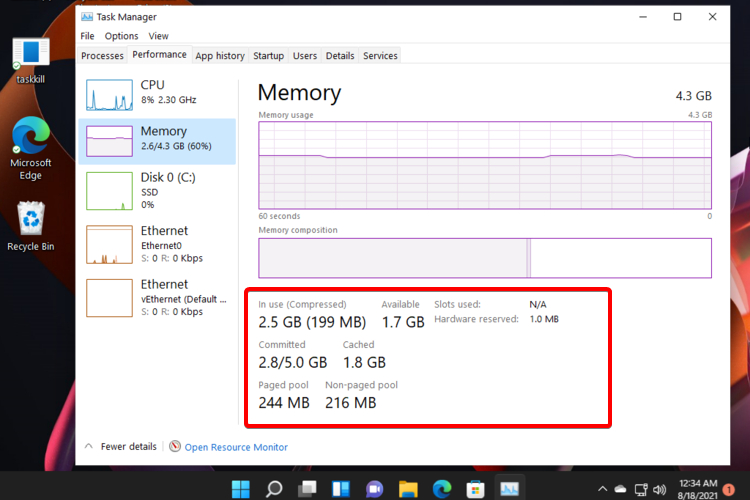
- If you take a look at the lower right side of the window, you’ll see specific sections.

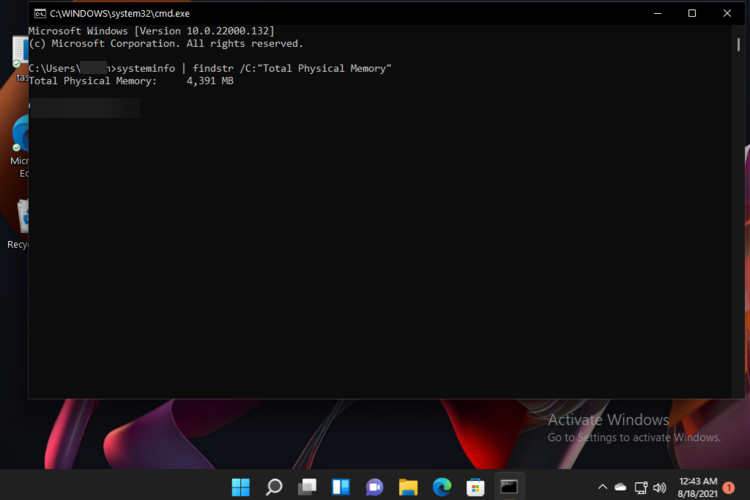
4. Check RAM type in Windows 11 via CMD
If you’re looking for a more in-depth analysis of your RAM, you should use the built-in command tool available on your device. No matter whether your default terminal is Command Prompt or Powershell, both can do the job just well and tell you all you want to know about your RAM in Windows 10.
1. Press simultaneously on Windows+R.
2. Type cmd, then press on OK.

3. Copy and paste the following command, then press Enter:systeminfo | findstr /C:"Total Physical Memory"
4. Wait a bit, then Command Prompt will display the total physical memory in MB (Megabytes).
5. If you want to check memory speed, type the following command in the same screen, then press Enter:wmic memorychip get devicelocator, speed
6. To verify the type of memory you have installed in your system, run the following command, then hit the Enter button:wmic memorychip get devicelocator, memorytype
Note that after running the memory type command, a numerical value will be returned. To be prepared, take a look at the list below and find what each number stands for:
- 0: Unknown
- 1: Other
- 2: DRAM
- 3: Synchronous DRAM
- 4: Cache DRAM
- 5: EDO
- 6: EDRAM
- 7: VRAM
- 8: SRAM
- 9: RAM
- 10: ROM
- 11: Flash
- 12: EEPROM
- 13: FEPROM
- 14: EPROM
- 15: CDRAM
- 16: 3DRAM
- 17: SDRAM
- 18: SGRAM
- 19: RDRAM
- 20: DDR
- 21: DDR2
- 22: DDR2 FB-DIMM
- 24: DDR3
- 25: FBD2
What should I know regarding RAM usage in Windows 11?
There might be some of you that are wondering what are the normal terms for RAM usage on the newest operating system.
According to Microsoft, to keep Windows 11 running in proper conditions, you’ll need a minimum of 4 GB. But please have more than that.
Your OS holds some of the memory in reserve right off the top, even if there is no need for it currently. It does this in anticipation of being used. This reserve can be anywhere from 1.8 to 2.4 GBs of RAM.
If your PC has a high memory usage error, it may freeze while running a program, popping up specific error messages.
If your computer runs low on RAM, it uses a part of the storage drive called the page file. Now you have a complete guide that supports you in checking RAM on Windows 11 using some simple methods.
Games might not work after adding RAM, but they are not the only affected pieces. It seems like editing programs are also getting not enough RAM-related errors, and Photoshop is just one of those apps.
Now that you know everything you need to know about RAM memory, you can fix the wrong RAM speed and other issues on your PC.
If you have any other questions or thoughts, do not hesitate to leave a comment in the section below.