How to Hide a Partition in Windows 11 [Easy Steps]
Keep your partitions safely tucked away with these easy steps
![]() 5 min. read
5 min. read
![]() Updated on
Updated on
Share this article

Improve this guide
Read our disclosure page to find out how can you help Windows Report sustain the editorial team Read more
Key notes
- Partitions are needed to install software, run applications, and organize files hence the need to divide your hard drive into various partitions.
- Once you have your partitions, you can choose to hide some of them in order to secure your files and in this article, we show you various way to do it.
Windows is a partition-based operating system that allows you to set up multiple partitions on your computer. Each of these partitions is used to store data and programs, so they can be customized to suit your needs.
Another way to use these partitions is to hide them to maintain your privacy or better organize your files. In this article, we explore how you can keep your drive partitions from prying eyes.
Can a partition be hidden?
Windows operating system has been a popular choice since its release. One of the most important features of Windows is partitioning. You can create multiple partitions in your disk drive for different purposes like data storage, software installation, etc.
While disk partitioning is not new, many users still don’t know the extent of usability when it comes to deleting, renaming, or even hiding these partitions.
So, Yes, you can hide a partition. A hidden partition doesn’t appear in Windows Explorer and can’t be accessed by any program or tool. The partition is still there, but it is not visible and accessible to the user.
Why do I need to hide a partition?
Now that you know you can hide your partitions, it begs the question: Why would you need to hide these partitions? There are many reasons why you may want to hide a partition in Windows. Some of these reasons include:
- Protecting data – The most obvious reason why people hide partitions is to prevent unauthorized users from accessing your hard drive contents.
- Improve load times – The loading process of applications is dependent on how much space each file occupies. Also, if Windows Explorer is slow, this may solve the issue.
- Keep malware off your PC – Malware tends to spread quickly once it gets onto a machine, so hiding a partition could prevent malware from spreading further.
- Reserve system files – The system reserved partition in Windows 11 mostly contains important operating systems files. You can hide your partition to prevent this drive from filling up too quickly because it could cause problems with your computer.
- Organization – You can use this feature to create separate documents or applications that can be used by multiple users at once without affecting each other.
How do I hide a partition in Windows?
1. Use partition manager software
The easiest way to hide a partition is to use partition manager software. These tools will let you delete, create and format partitions on your hard drive. It also lets you change the size of existing partitions.
If you’re looking for a reliable program to do the job for you, we recommend AOMEI Partition Assistant Professional.
AOMEI Partition Assistant Professional
Feature-rich partition assistant software for home and office with automated disk operations.2. Use Disk Management
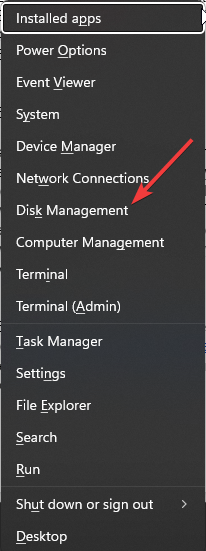
- Right-click on the Start Menu icon and select Disk Management.

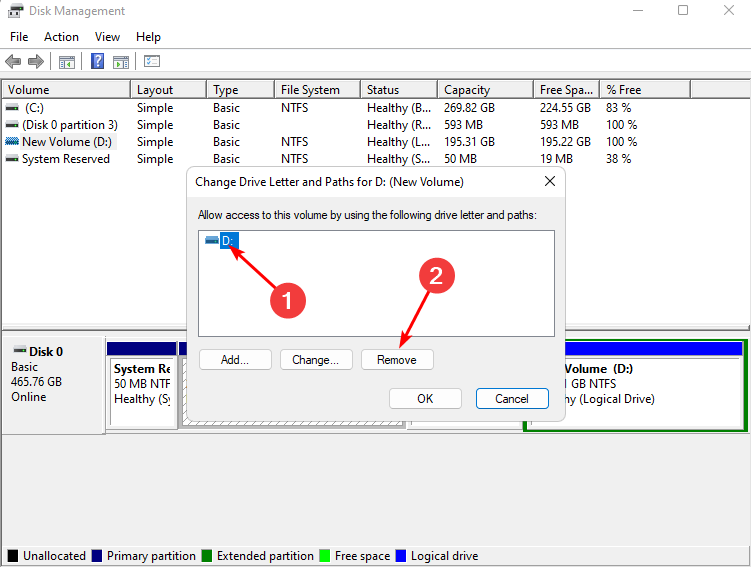
- Next, right-click the drive you wish to hide and select Change Drive Letter and Paths.

- In the pop-up window that appears, click on the drive and hit Remove.

3. Use Group Policy
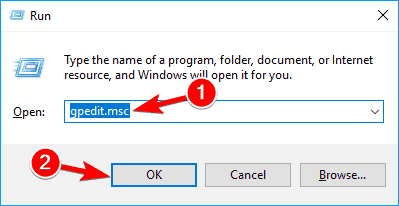
- Hit the Windows + R keys to open the Run command.
- Type gpedit.msc and press Enter to open the Group Policy.

- Navigate to the following location:
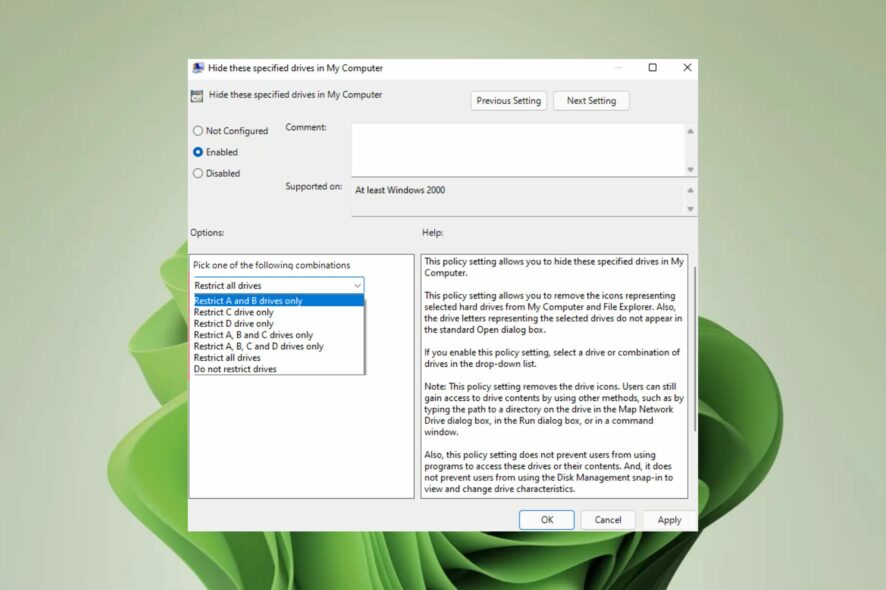
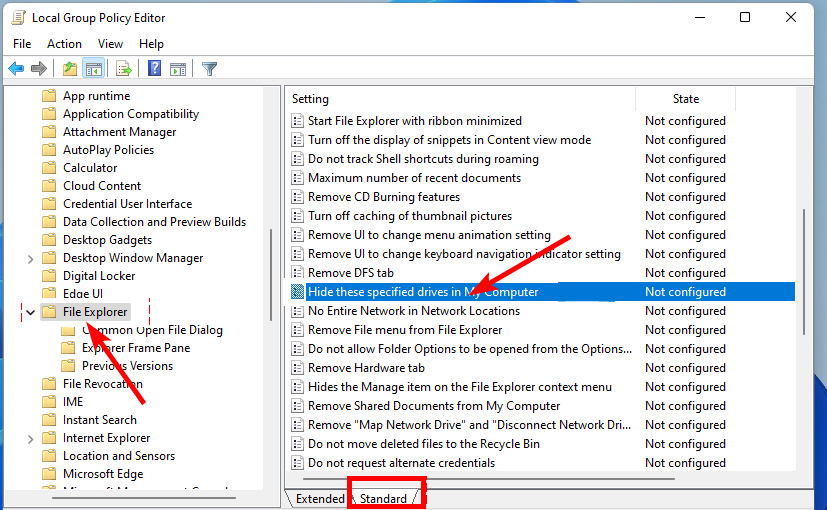
User Configuration/Administrative Templates/Windows Components/File Explorer - Go to the Standard tab and double-click on Hide these specified drives in My Computer.

- In the window that appears, check the Enabled box, choose Restrict X drive only replacing X with the drive letter you wish to hide under Options, and press Apply then OK.

- To unhide, select the Do not restrict drives option.
- Now close the Group Policy Editor and check whether the partition is hidden.
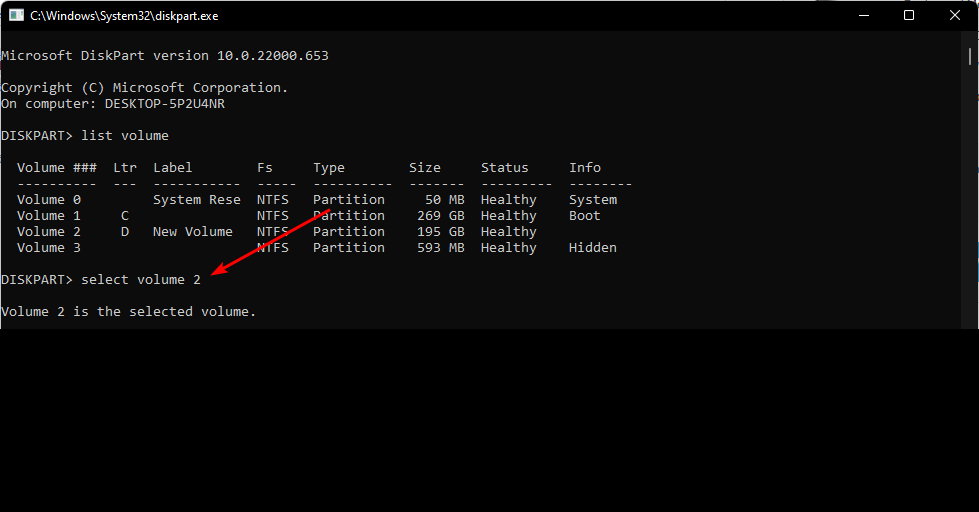
4. Use Diskpart command
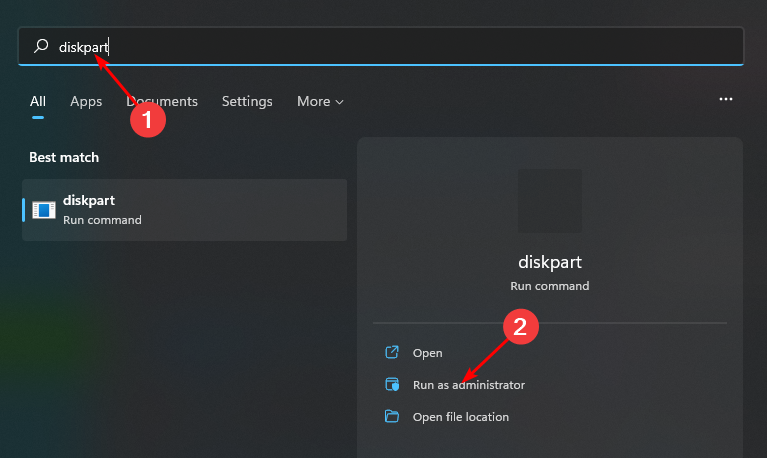
- Hit the Windows key, type Diskpart in the search bar, and click Run as administrator.

- Type in the following command to list the number of drive partitions:
list volume
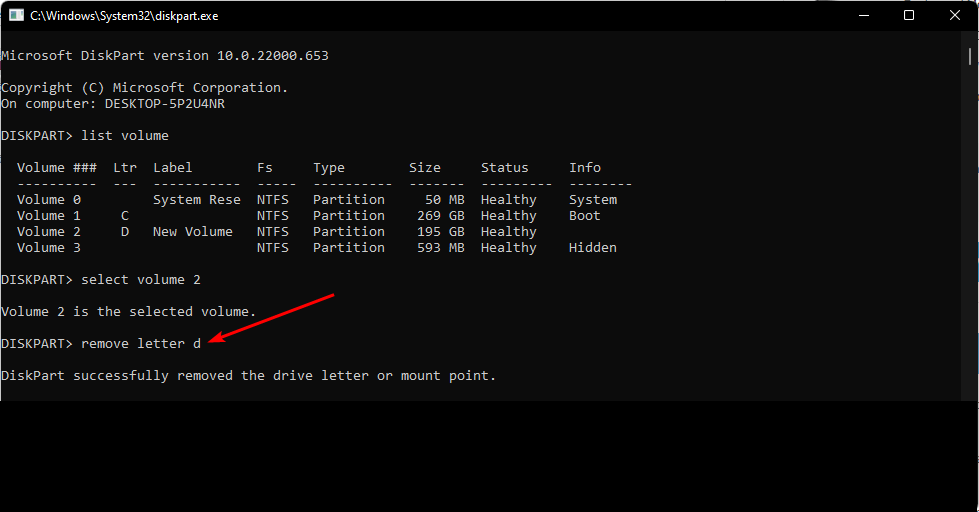
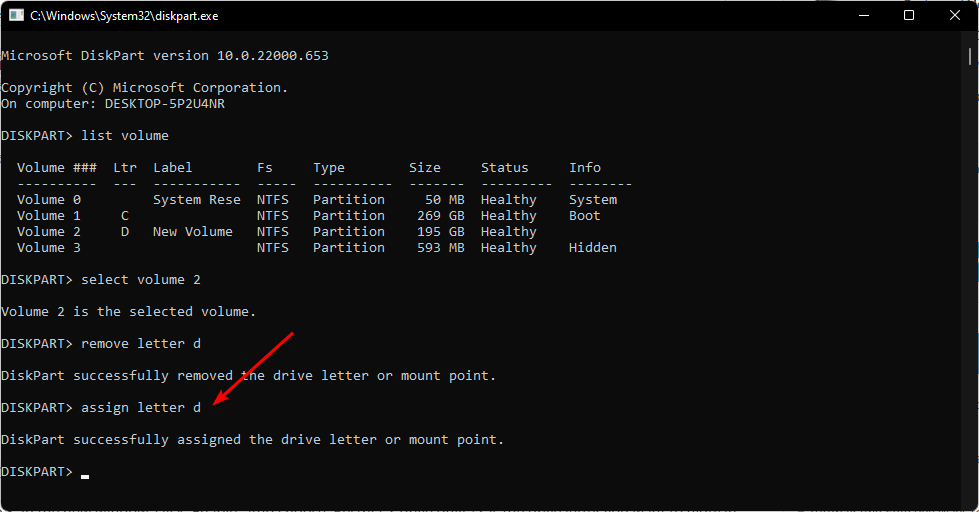
- Next, type in select volume Y replacing Y with the corresponding number of the partition you wish to hide.
- Now type remove letter X replacing X with the corresponding letter of the Volume disk partition in 3 above.
- To unhide the drive in Windows 11, follow steps 3 to 4 but replace remove with assign when you want to display the drive.

How do I restrict access to a drive in Windows 11?
If you don’t want to hide your partitions and instead would like to restrict access, follow the steps below:
- Hit the Windows + E keys to open File Explorer.
- Right-click on the drive you wish to restrict and select Properties.

- Navigate to the Security tab and next to To change permissions, click on Edit, and hit the Edit button.

- Next, click Add or Remove to list the users you want to grant access to. Also, below, you can modify the permissions each user has by checking the Allow and Deny boxes to your preference.


That’s all we had regarding hiding your partitions in Windows 11. You may also be interested in how to compress your drive especially if you’re running low on space.
If you’re looking to optimize your PC, you’ll find disk management tools particularly helpful especially if you delete and create partitions often.
Let us know which method you find easier to hide your partitions in the comment section below.