How to Defrag Windows 11 [Optimization Guide]
Optimize your PC so that it runs with utmost efficiency
![]() 5 min. read
5 min. read
![]() Updated on
Updated on
Share this article

Improve this guide
Read our disclosure page to find out how can you help Windows Report sustain the editorial team Read more
Key notes
- Windows 11 defrag is a simple process that can improve the performance of your hard drive.
- Fragmentation is a common problem that can be easily solved by using a simple tool implemented in Windows.
- If you have an SSD installed on your system, you don't need to defragment it but you can optimize it instead.
Defragmentation is one way to improve your performance and make your PC faster, so it’s advised that you perform it regularly.
Fragmentation is a normal process, and it will happen on every hard drive sooner or later and it’s essential to fix it.
There are several ways to defragment your hard drive, and Windows already has a couple of useful tools that can help you with that, but you can also use specialized defrag software.
Defragmentation hasn’t changed much in Windows 11, and it’s almost the same as in Windows 10, so you should feel familiar with it.
If you haven’t used defragmentation before, be sure to keep reading to find out how to perform defrag on your PC and what this procedure really means.
What does disk defragmentation do?
When working with files on your hard drive, pieces are stored in different sectors, and to access them, the drive needs to rotate to the specific sector so that the head of the hard drive can find it.
However, when moving or deleting the files, the sectors on the hard drive become blank, creating space between data. As a result, the hard drive needs to work more to access that specific data thus causing performance issues.
Defragmentation will reorganize the data and place them in sectors that are close to each other, so the hard drive can access them faster.
Should I defragment my SSD?
Solid-state drives don’t require defragmentation because of two reasons:
➡ SSD has no moving parts
The main benefit of defragmentation is performance improvement. With SSDs being 10 to 20 times faster than the best hard drives and having no mechanical disks that need to be read, there’s no need for defragmentation.
This means that the data is read digitally and it can be picked up from the flash memory in a fraction of the time needed for the hard drive to move the heads.
➡ SSD has a limited amount of write cycles
The second reason is longevity. SSDs last less than hard drives because they have a limited number of write cycles.
This means that moving the files and writing them during the defragmentation process will reduce the lifespan of your SSD by using its write cycles.
How can I defrag my Windows 11 PC?
1. Use the defragmentation tool from Windows
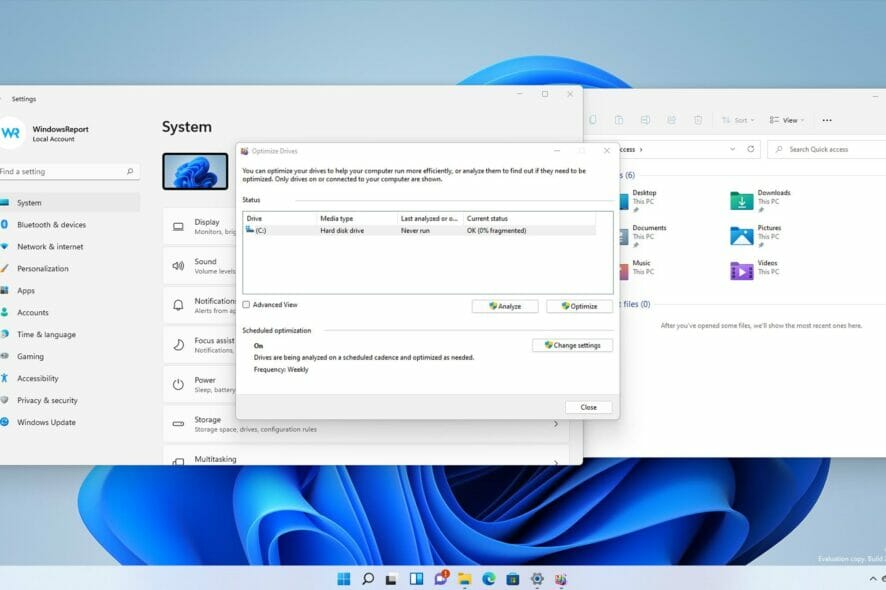
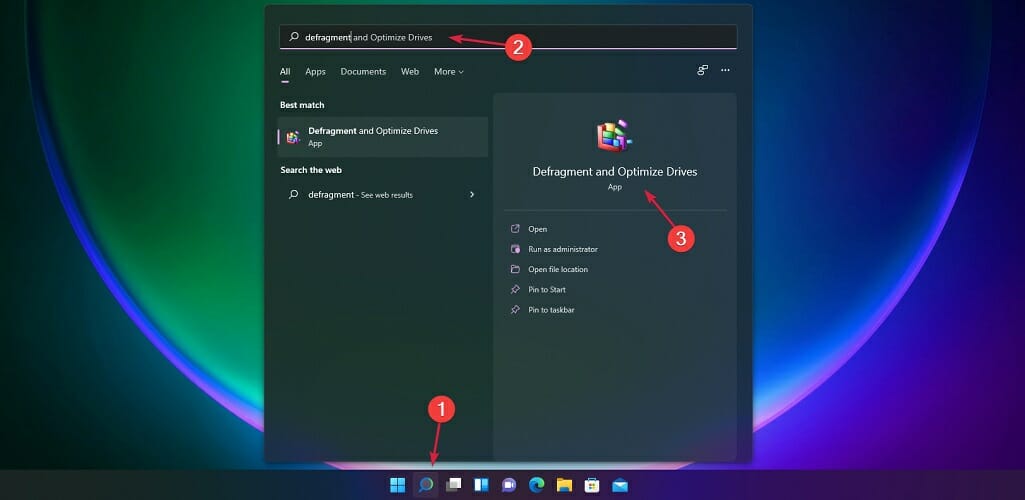
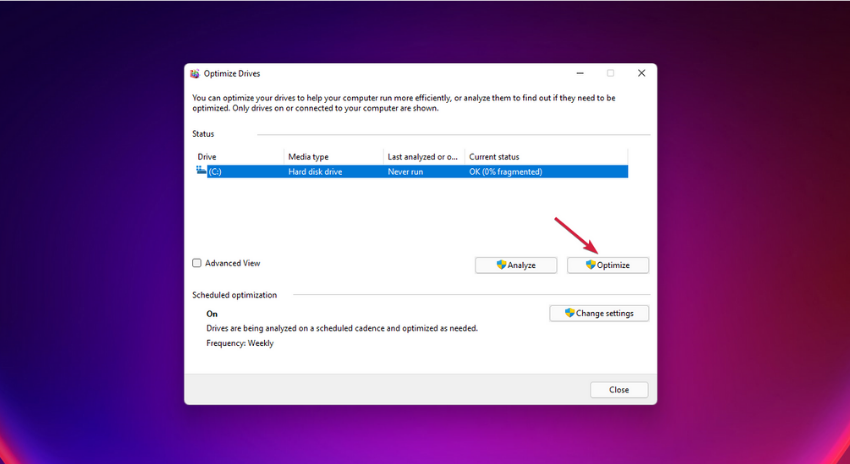
1. Click the Search icon in Taskbar.
2. Type defrag in the search box and select Defragment Optimize Drives from the list of results.

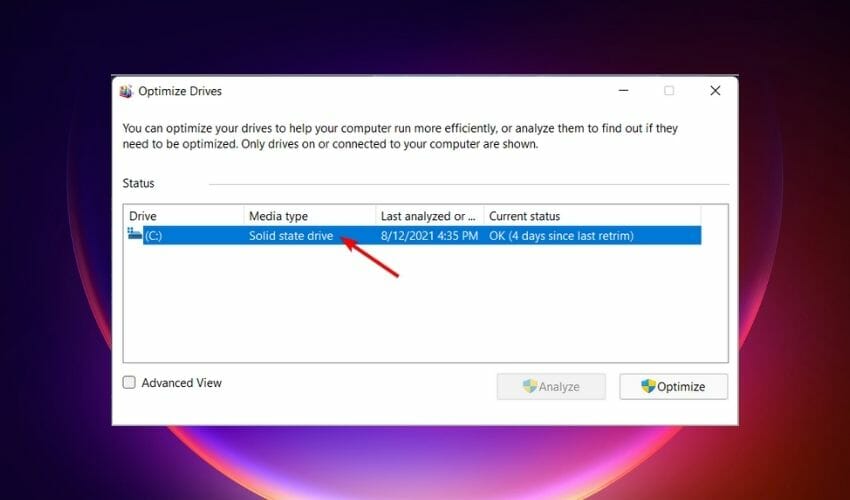
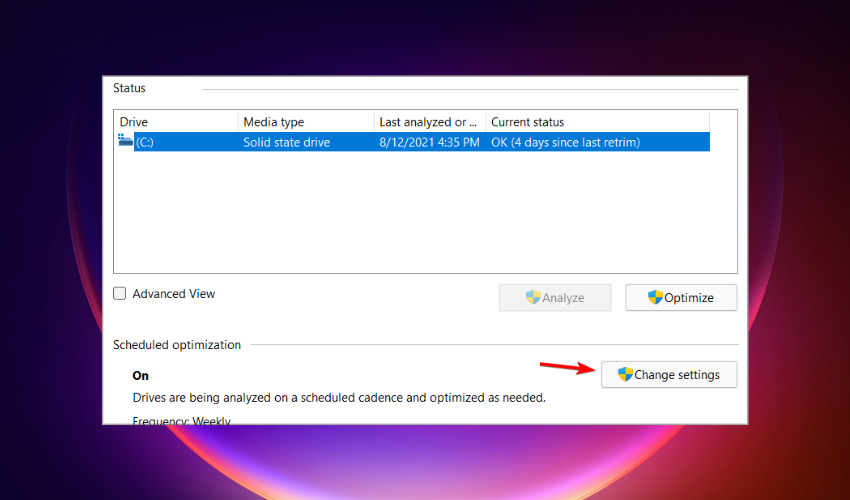
3. When the window opens, you’ll see a list of all your drives and their current defragmentation status.
4. Select the drive that you want to analyze, and click the Analyze button. We have a SSD installed so we didn’t actually defragment it. You should perform this procedure only on HDDs.
5. Wait for the process to finish.
6. If your drive is fragmented, select it and click on Optimize.
7. Wait for the process to finish. Keep in mind that the process can take a while depending on the fragmentation level.
Your Windows 11 PC has a built-in app that you can use to defragment your hard drive. It is called Defragment Optimize Drives and can be used to easily optimize your PC.
As you can see, using Windows 11 defrag is simple, but if you want a specialized tool, we recommend Smart Defrag for more advanced options.
2. Use a command line tool
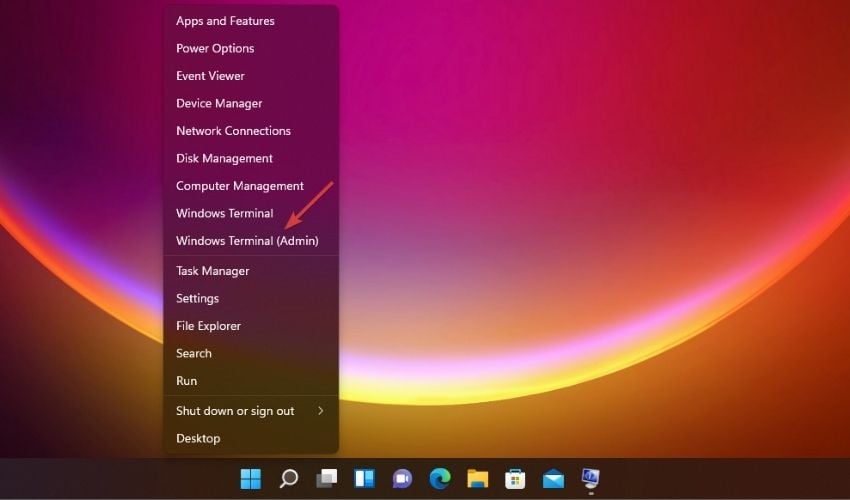
- Press Windows Key + X and choose Windows Terminal (Admin).

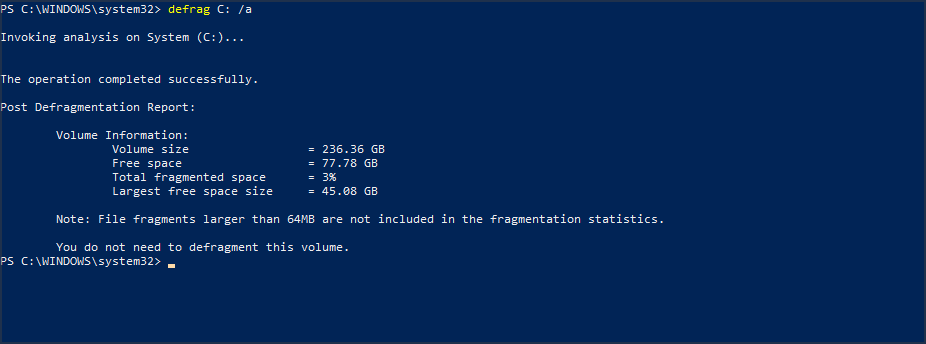
- To analyze your drive enter the following command, but be sure to replace X with the letter of your drive:
defrag X: /a
- After the scan is finished, you’ll see information about your hard drive, including the fragmentation level and a note saying whether you need to defragment your drive or not.
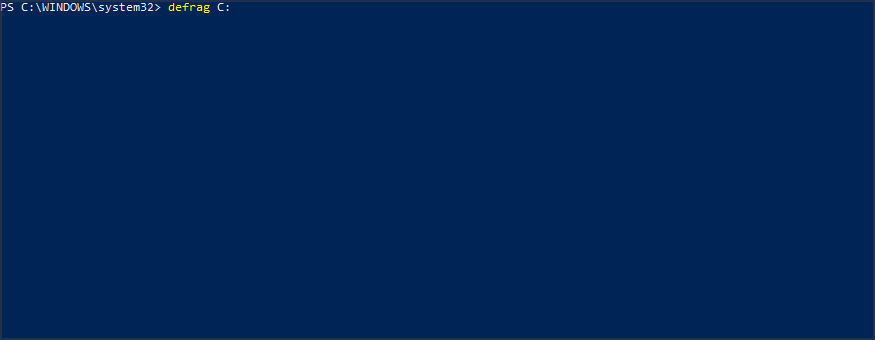
- Now enter the following command to defrag that drive:
defrag X:
- Wait for the process to finish.
There are also a couple of hidden commands that might come in handy. To defrag all drives that are available on your PC, use the following command:
defrag /C

To defrag all drives except the specified ones, run this command:
defrag /E X:

How can I schedule defragmentation in Windows 11?
- Click on Windows Search (the magnifying glass from Taskbar), type defrag and select the Defragment and Optimize Drives app from the results.

- In Scheduled optimization click on Change settings.
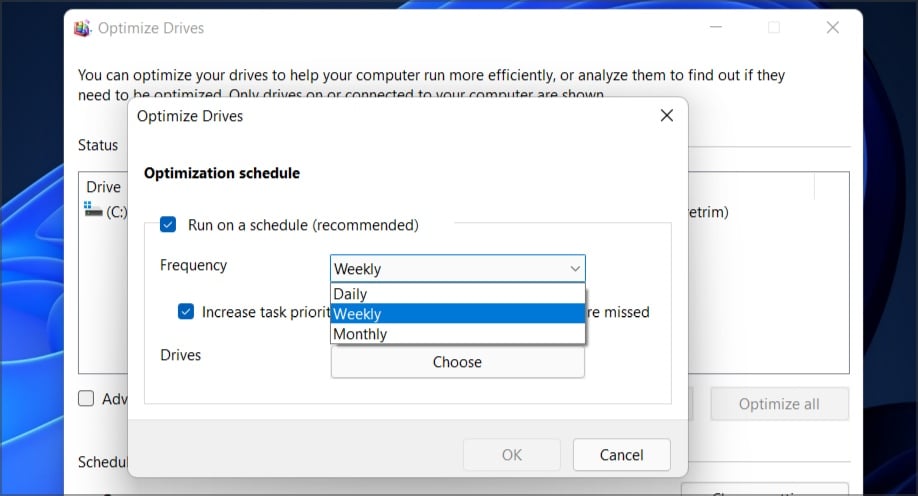
- Set frequency to Weekly or Monthly.

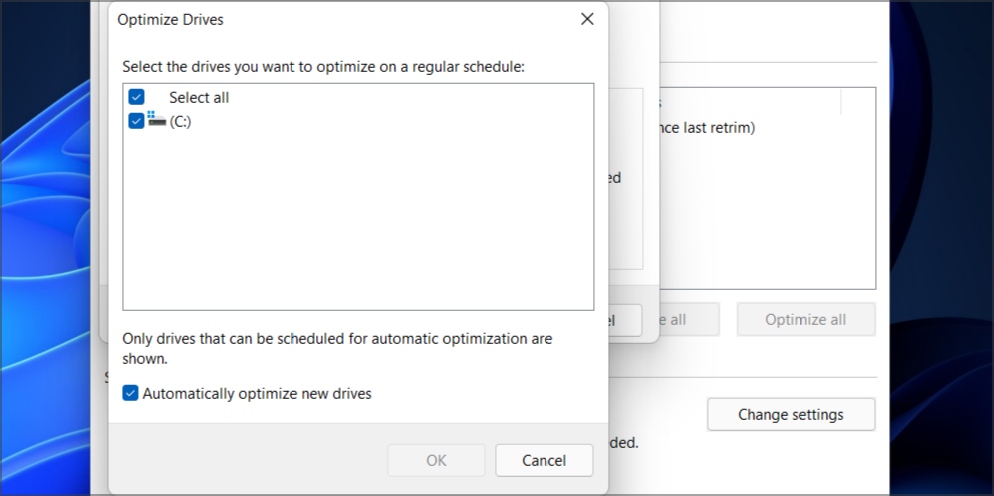
- Now click the Choose button.
- Check the drives that you want to schedule defragmentation for and click on OK.

- Click OK once again to save the changes.
How can I optimize my SSD?
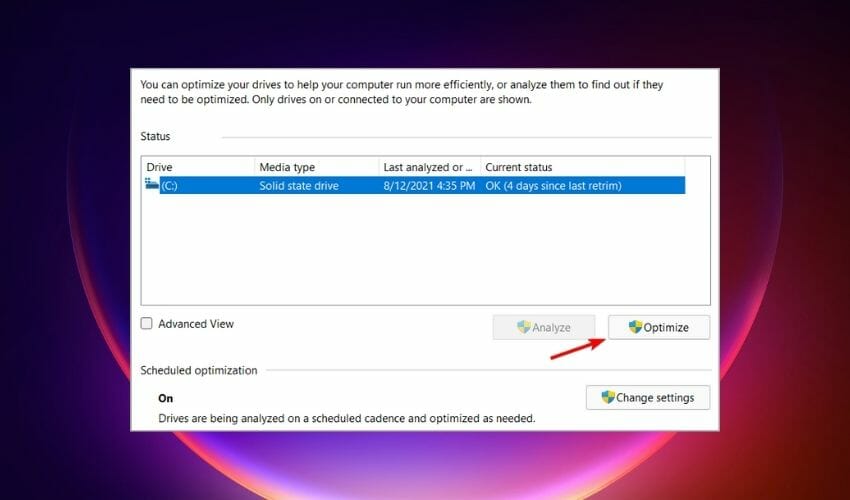
- Click on Windows Search from Taskbar, type defrag, then select the Defragment and Optimize Drives app.
- Click on the SSD drive to select it and clic on Optimize.

It’s not recommended to defragment your SSD but you can optimize it instead, with no risks. The procedure is called trimming, and you can access it just like on an HDD, by using the steps above.
The trim action identifies areas on the disk with unused data. In other words, the files that were deleted and are waiting to be overwritten.
That is because when you delete a file, it doesn’t get erased from the disk. They are only marked as free, available space. But after the trimming process, the data will be deleted.
It’s an active way of optimizing your SSD but it’s not as near as effective as the defragmentation procedure for an HDD.
Defragmenting your HDD once in a while or according to a schedule will actually prolong the lifetime of a hard drive as opposed to an SSD.
Of course, it also makes it run faster because the system will find the data you request a lot quicker than on a fragmented drive.
However, you should also think about upgrading your PC with an SSD because then you won’t need any fragmentation at all, and the read/write speeds are clearly superior to an HDD.
Take a look at our list including the best SSD for your PC and consider the proper option for your system. Even more, you could also consider using a laptop with both SSD and HDD for increased performance and storage.
How often do you defrag your drive for performance improvements? Let us know in the comments below.