
A picture is worth a thousand words. It’s no surprise, then, that the internet is brimming with them. While going about my day, I grab multiple screenshots from my Windows PC that come in handy when covering guides or explainers.
By default, whenever you try to capture images on your PC, they’ll be stored in a dedicated Screenshots folder that is found inside your Pictures folder.
While this does not pose any issue, there might be instances where you’d want to change the location where the images are saved in a bid to enhance accessibility and proper management. Luckily, Windows lets you change the default location of your images.
Here’s how to change the save location of your screenshots
Whenever you take a screenshot using the Windows key + Print screen key, the new images are saved into C:\Users\[User Name]\Pictures\Screenshots by default.
There’s another popular way to save your images, that is through Snipping Tool, however, you’ll be asked to select the location you’d want to save them. So, this guide will be mostly about the former keyboard shortcut method.
We have a separate guide that details how to use the Snipping Tool to capture, edit and save images on your Windows 11 PC. Be sure to check it out for more tips.
To change where you save your images, you simply have to follow the simple steps below:
- Select the Start button and select File Explorer. Alternatively, you can type in file explorer in the Start menu search bar, and select the best match.
- In the File explorer, head to This PC > Pictures.
- Then right-click on the Screenshots and select Properties.
- In the Screenshot Properties, select the Location tab.
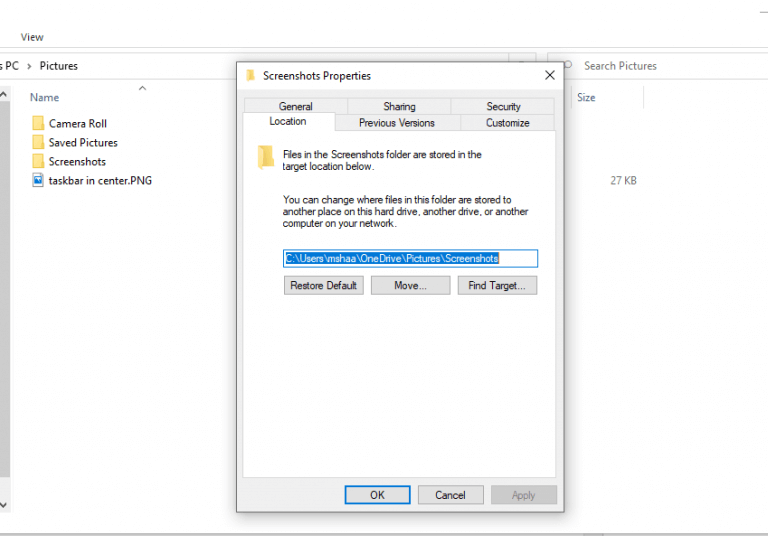
Here, you can enter the path where you want them to go. Alternatively, you can click on Move and select a location you’d like to save your new images.
You’ll also probably be asked if you want to move your them to the new location. Choose whatever suits you best and your settings will be saved. Once you have this setup, be sure to check out our dedicated guide that will help you take screenshots on Windows 11 like a pro.
Access your screenshots conveniently
That’s it. Whether you’re a writer looking to add some pictures to an article, or an employee who needs to put them on their PPT, capturing and using images is a surefire way to make your explanations easier. And, at times, for whatever reason, you might need to save the images in different places. Simply follow the steps above, and the default location of your new images will be changed.