How to Use Microsoft Whiteboard
Whiteboard allows meeting participants to draw and write together
4 min. read
Updated on
Read our disclosure page to find out how can you help Windows Report sustain the editorial team Read more
Key notes
- In this article, we will teach you how to install and use the Microsoft Whiteboard app.
- First, you need to download and install the app that is available in the Microsoft Store.
- After installing, you will need to sign in to Whiteboard with your Microsoft account or Microsoft 365 account.
- You can share your Microsoft Whiteboard with external users via a link.

Microsoft has a new whiteboard called just like that, Microsoft Whiteboard. What was in 2017 just a piece of leaked information, now, with Windows 10 version 2004, has become a full-fledged application that will probably replace the old Microsoft Sketch Board.
Microsoft Whiteboard is a freeform, digital canvas where people can collaborate on new projects and ideas. In other words, wherever you are in the world, you can use Microsoft Whiteboard to hold a meeting with your team online.
How can I use Microsoft Whiteboard on my PC?
1. Download and install the app
- First, you need to download and install the app that is available in the Microsoft Store.
- After installing, you will need to sign in to Whiteboard with your Microsoft account or Microsoft 365 account.
You can also install it on your iOS device from the App Store and if you’re a commercial user, you can use Microsoft Whiteboard in a browser, on the Microsoft Whiteboard site.
Lastly, if you’re a Surface user, you just have to tap on the Whiteboard icon from the Start Screen.
2. Share Microsoft Whiteboard with team members
Users can share a whiteboard to make it available to all participants in a meeting. The same whiteboard is available simultaneously in all the Whiteboard applications on Windows 10, iOS, and the web app.
This can be done via the app’s built-in options, in a few clicks. New members can be invited using a custom-made link that Microsoft Whiteboard generates for you.
1. Launch Microsoft Whiteboard.
2. Click on the person sketch from the top right corner.
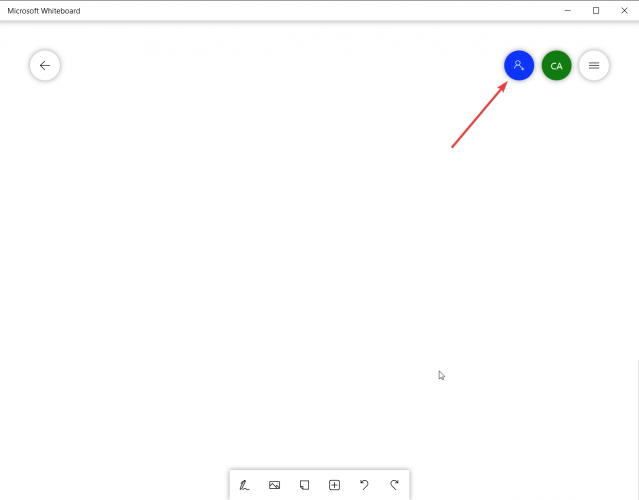
3. Select the Web sharing link button to turn the feature on.
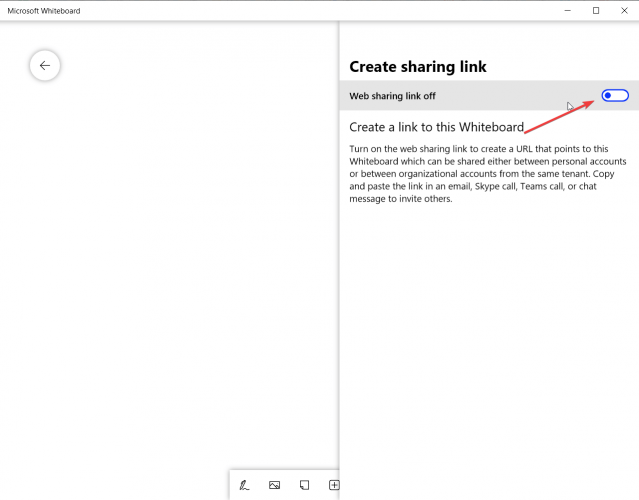
4. Copy the link and send it to your team members.

5. People can access your Microsoft Whiteboard by clicking on the link.
3. Change the settings in Microsoft Whiteboard
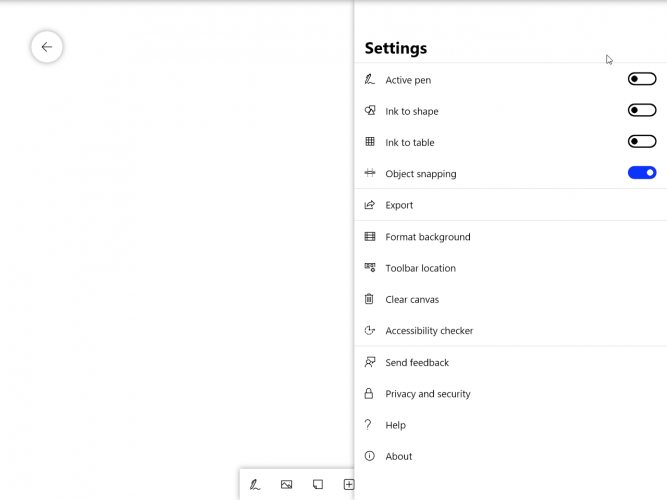
To access the settings, you just need to tap or click on the three horizontal lines from the top right corner.
From there the most important or most used settings are the Export option where you can export the board as a PNG image or a high-quality SVG image and the Clear canvas option.
You might also want to play with the Toolbar location. By default, the tools are at the bottom but you can also place them on the left or right of the screen.
Are you looking for online collaboration tools? Read about the best collaboration software for small businesses in 2022.
4. Other Microsoft Whiteboard settings options
Object snapping – It helps you align your content by providing a visual cue. When you move an object, a line appears close to another object.
Ink to shape – When Ink to Shape is active and you’re trying to draw a shape it will automatically change the hand-drawn ink strokes to a precise shape on your whiteboard.
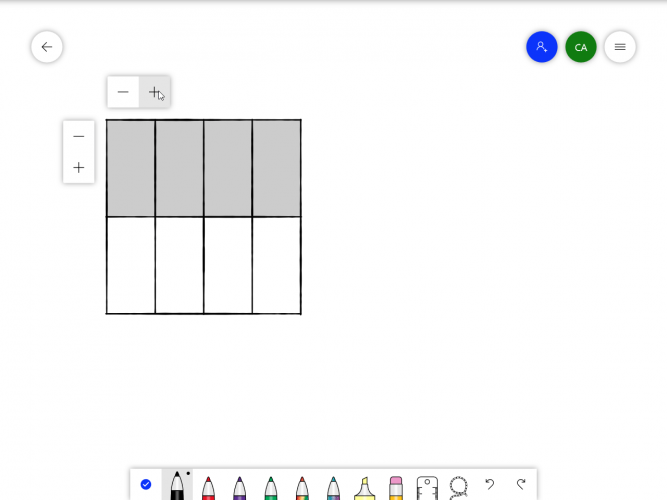
Ink to the table – The whiteboard allows you to create tables with just a few ink strokes.
To begin a table, first draw a square on the canvas. Once it is recognized by Whiteboard, cross the shape with a vertical or horizontal line to create columns and rows, respectively.
After the first stroke, + and – signs will appear on the screen if you want to add more rows or columns faster like in the example below.
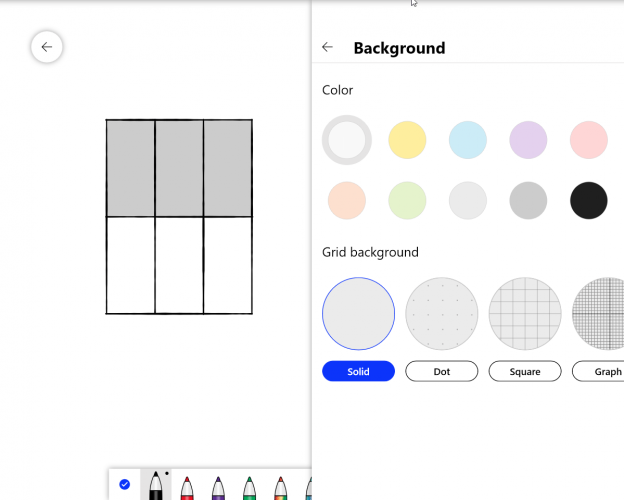
Format background – You can change the background color or you can add different orientation marks like dots, squares, or even graph paper.
How can I use the tools in Microsoft Whiteboard?
1. The Inking tool
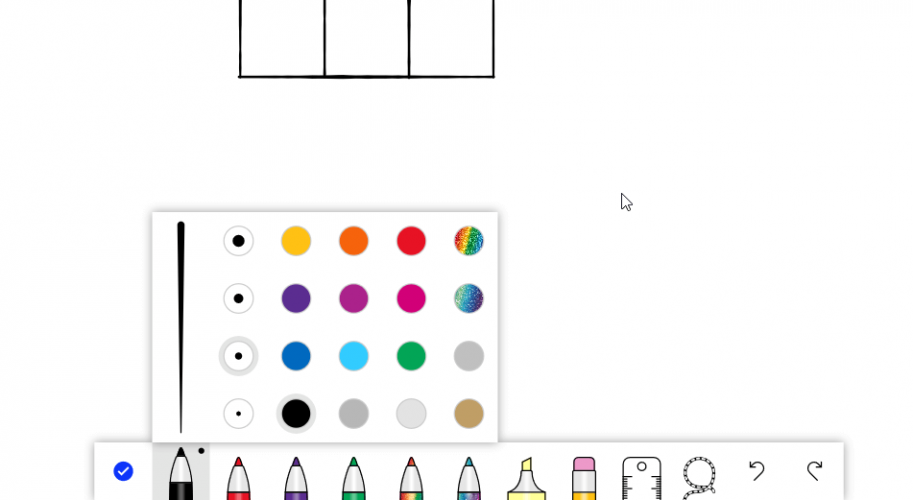
The first tool is the Inking tool, and the most important because there are the active tools that you will need to draw.
You have several color pens and if you click/tap them once again you get to select a color and the width of the line as you draw.
When you change the thickness of the line, you will also change the pressure sensitivity gradient in you’re using an active pen.
Other tools for inking include the basic ones that you can find in any other drawing apps like a highlighter, a ruler, a lasso select, and the Undo and Redo buttons.
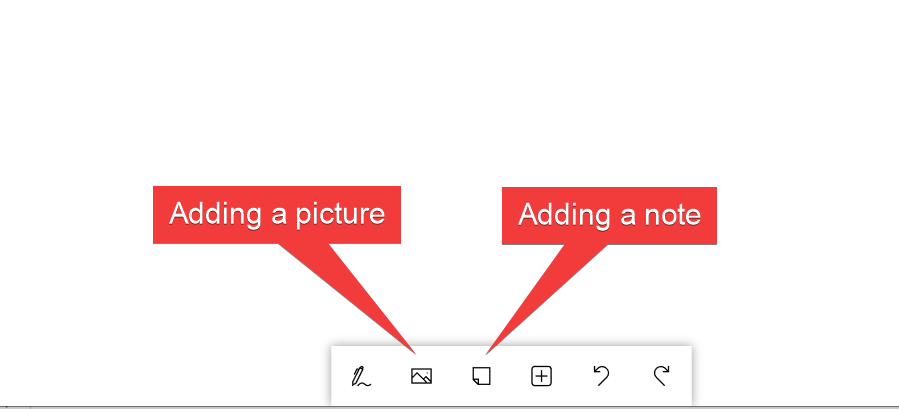
2. Adding a picture and a sticky note
The next two tools from the tool menu are pretty self-explanatory. They are for adding pictures and sticky notes.
3. Adding a menu and other pictures and documents
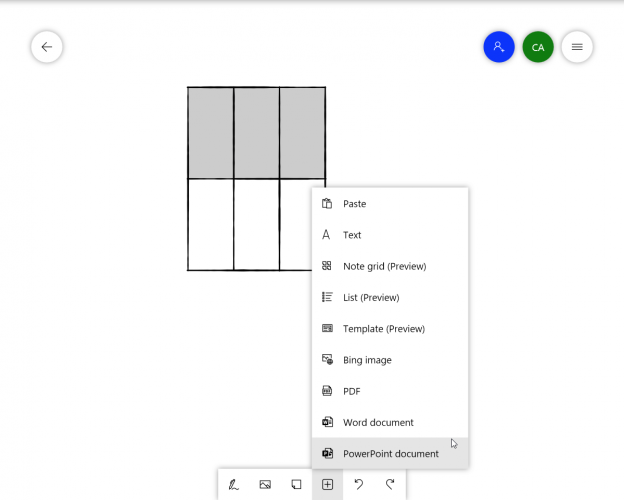
The next button is a complex menu in itself because you can add a lot of content:
- Paste an element
- Add a text box
- Note grid – for adding more organized notes
- List – for adding an actual list
- Template – for adding a template already set up for different tasks like brainstorming, project planning, and more
- Bing image – for adding a picture from the picture web search in Bing
- PDF -for adding a PDF document
- Word document – for adding a Word document
- PowerPoint document – for adding a PowerPoint presentation
Microsoft Whiteboard seems like a very business-oriented app extremely well molded to corporate needs. You can also use it in your Teams app for collaborative purposes.
Tell us what you think about it in the comments.

